Technique

stamp review crew: sale-a-bration

Hello friends! Welcome to another fun Stamp Review Crew blog hop. This time, instead of showcasing one stamp set, we are shining a spotlight on products in the first ever fall Sale-a-Bration brochure. These are products you can earn for free with a qualifying purchase.

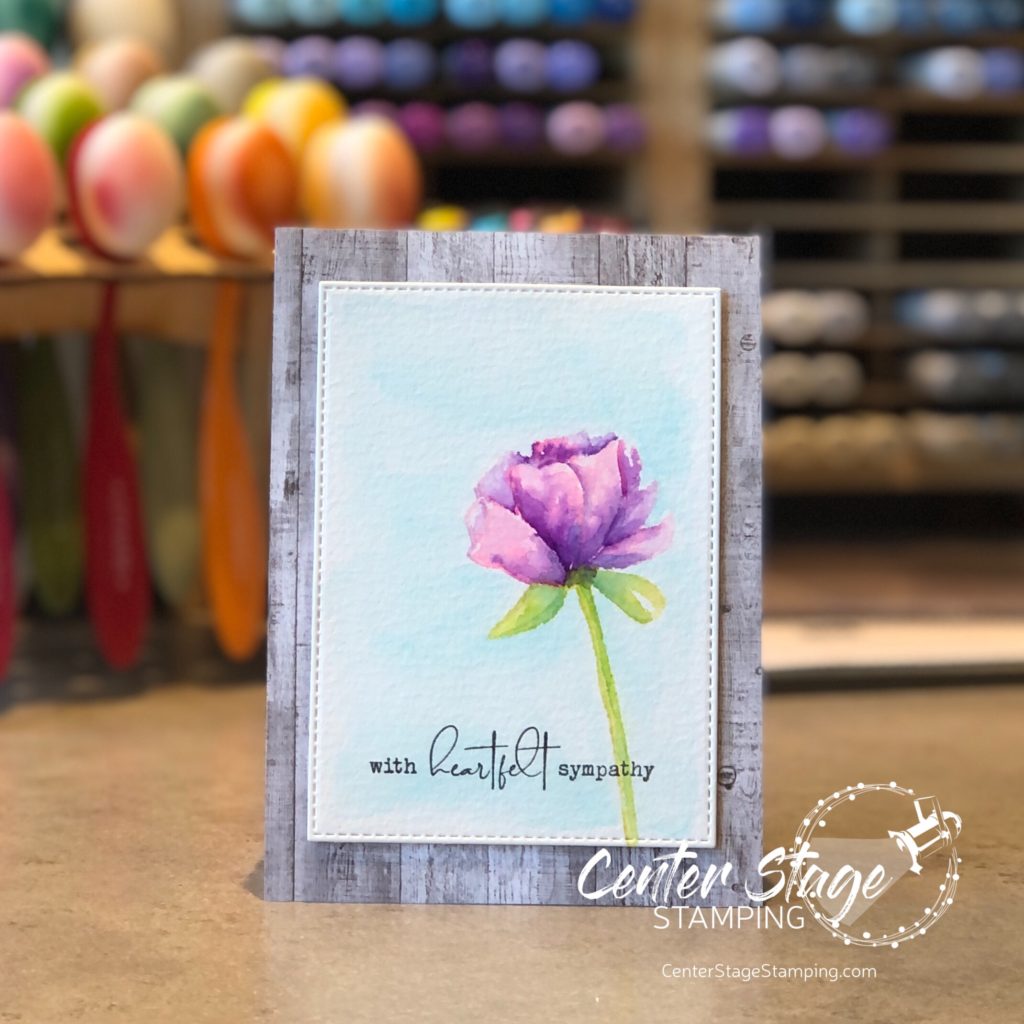
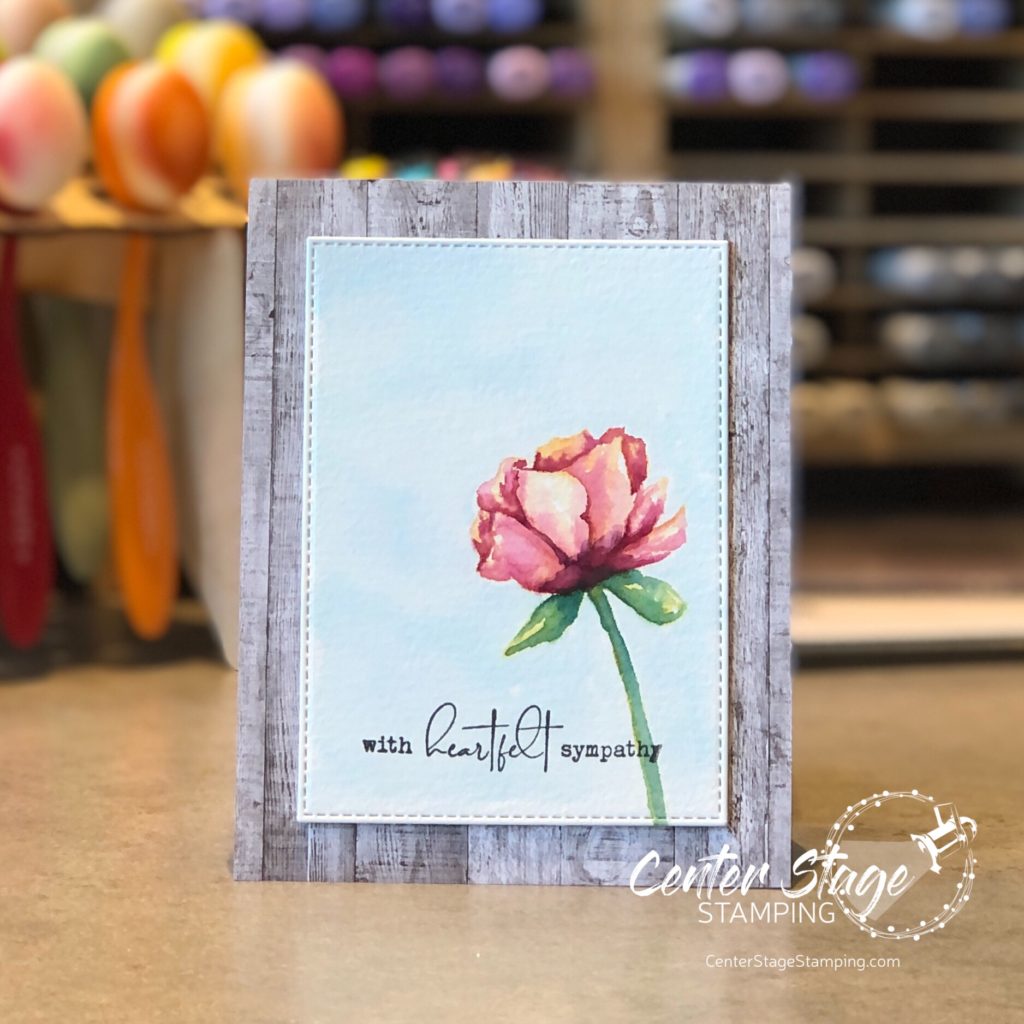
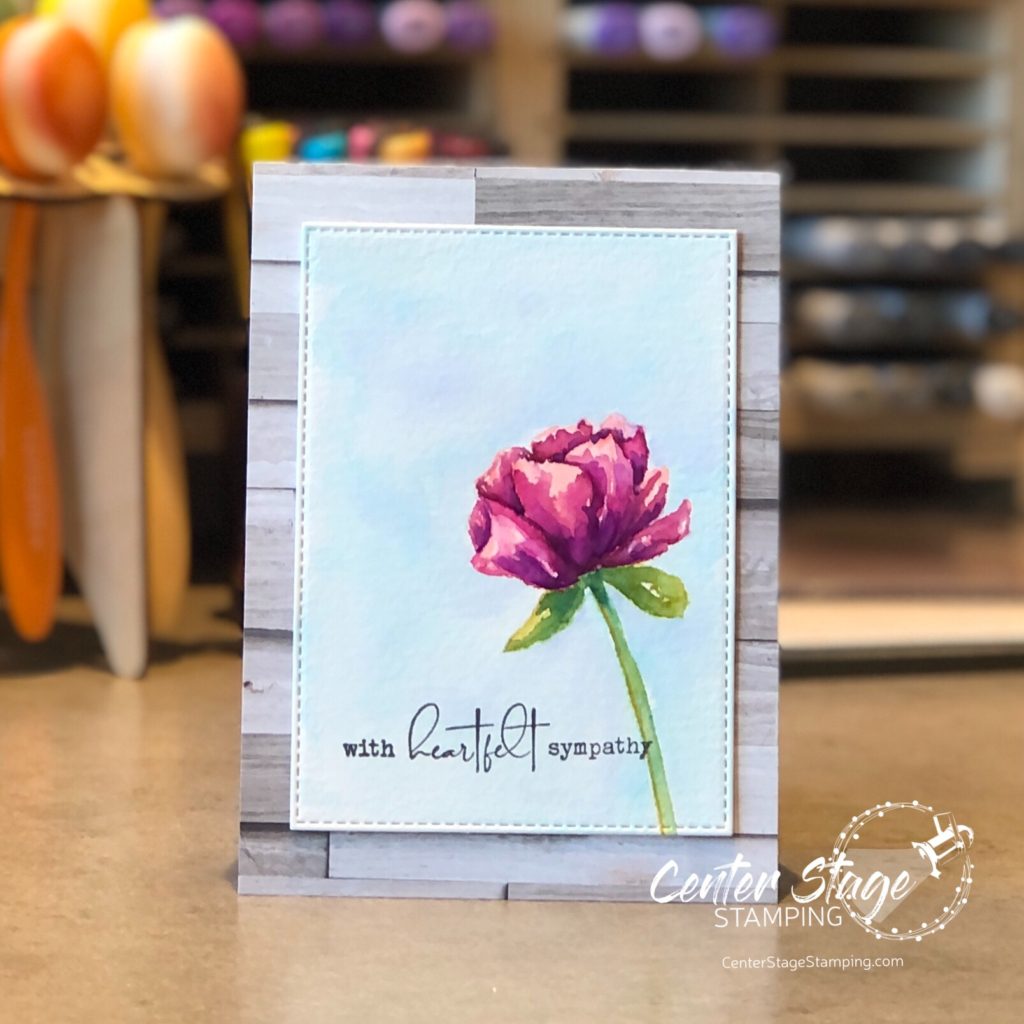
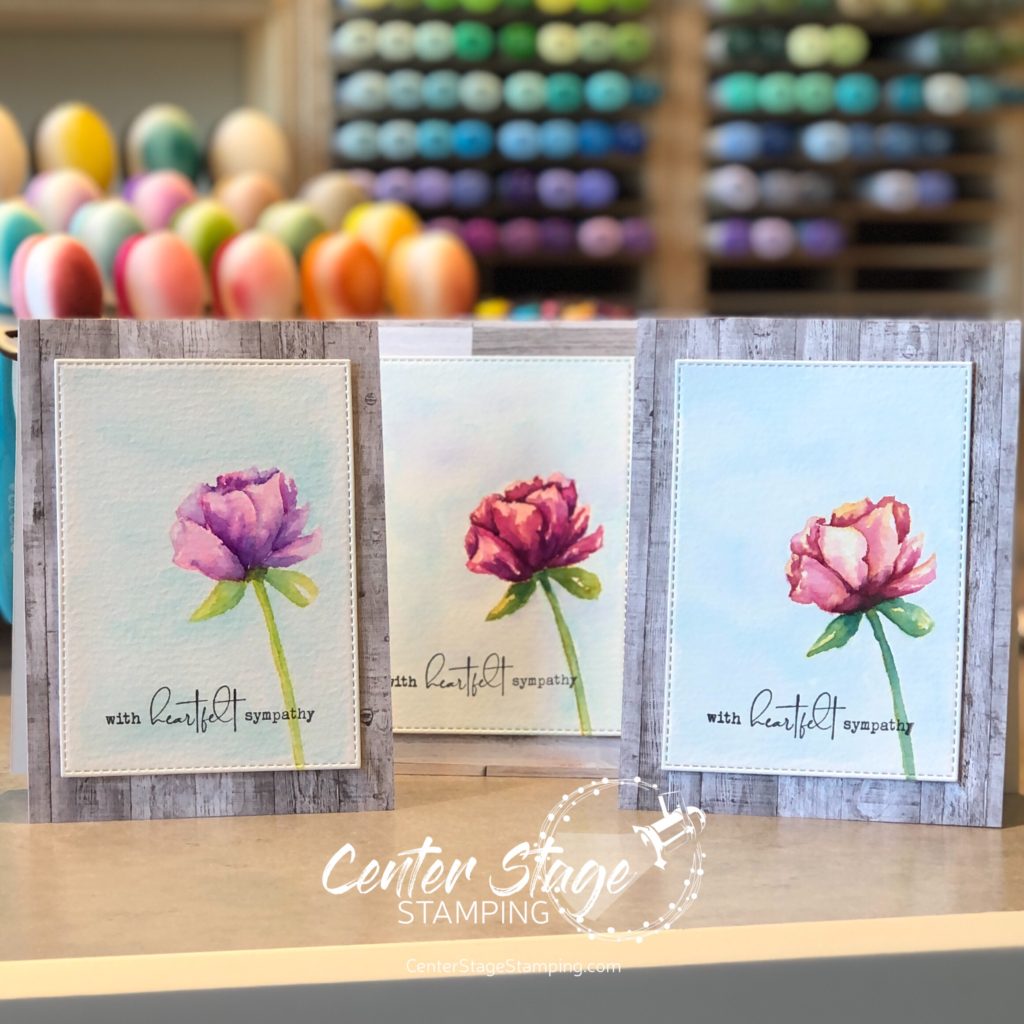
I used the Delicate Dahlias stamp set for my projects. I used some fun watercolor techniques on my two projects.

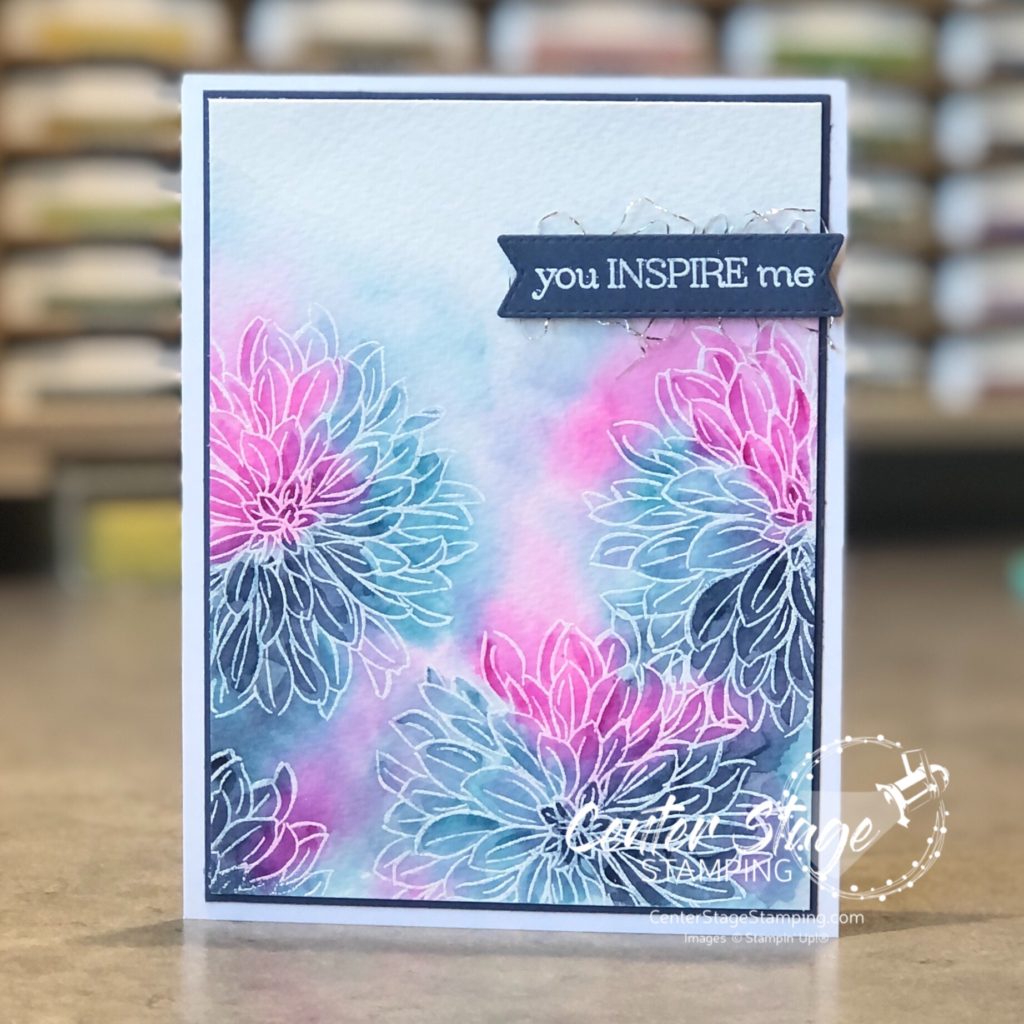
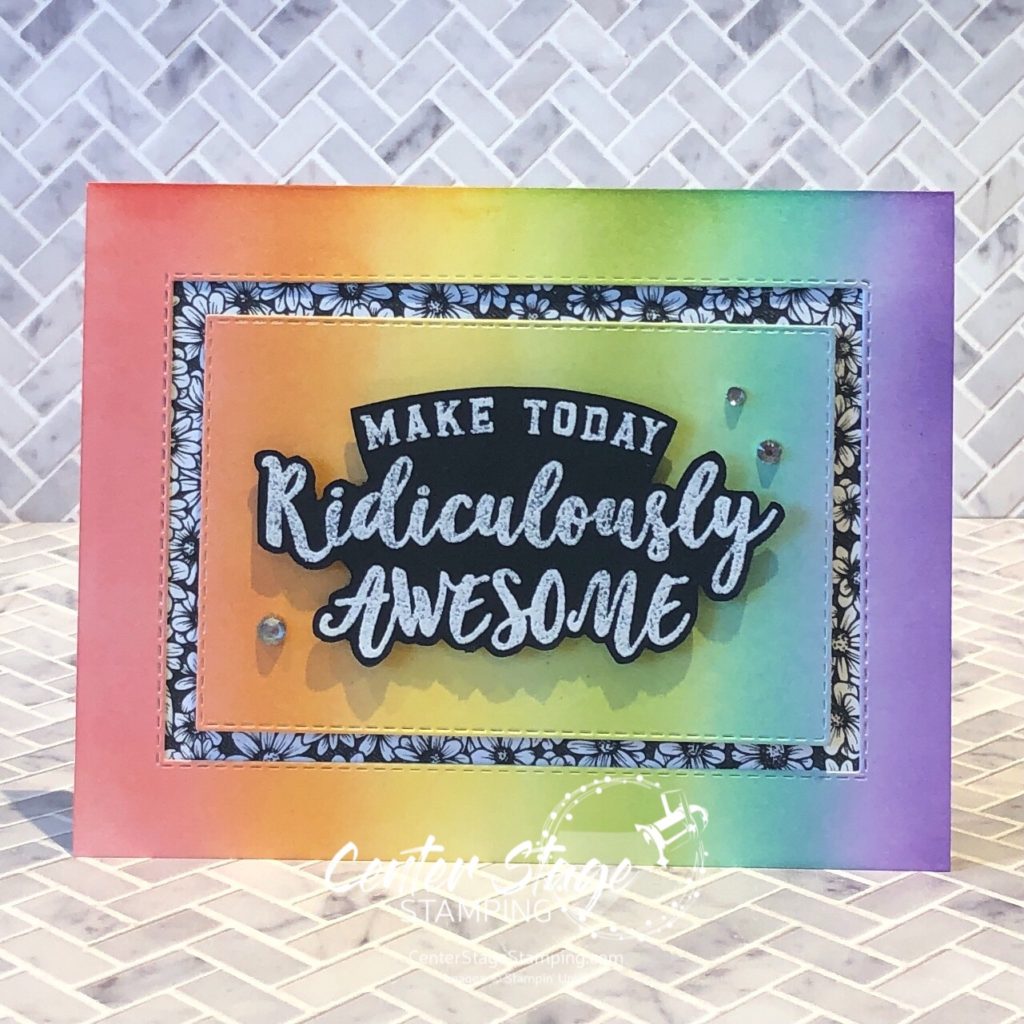
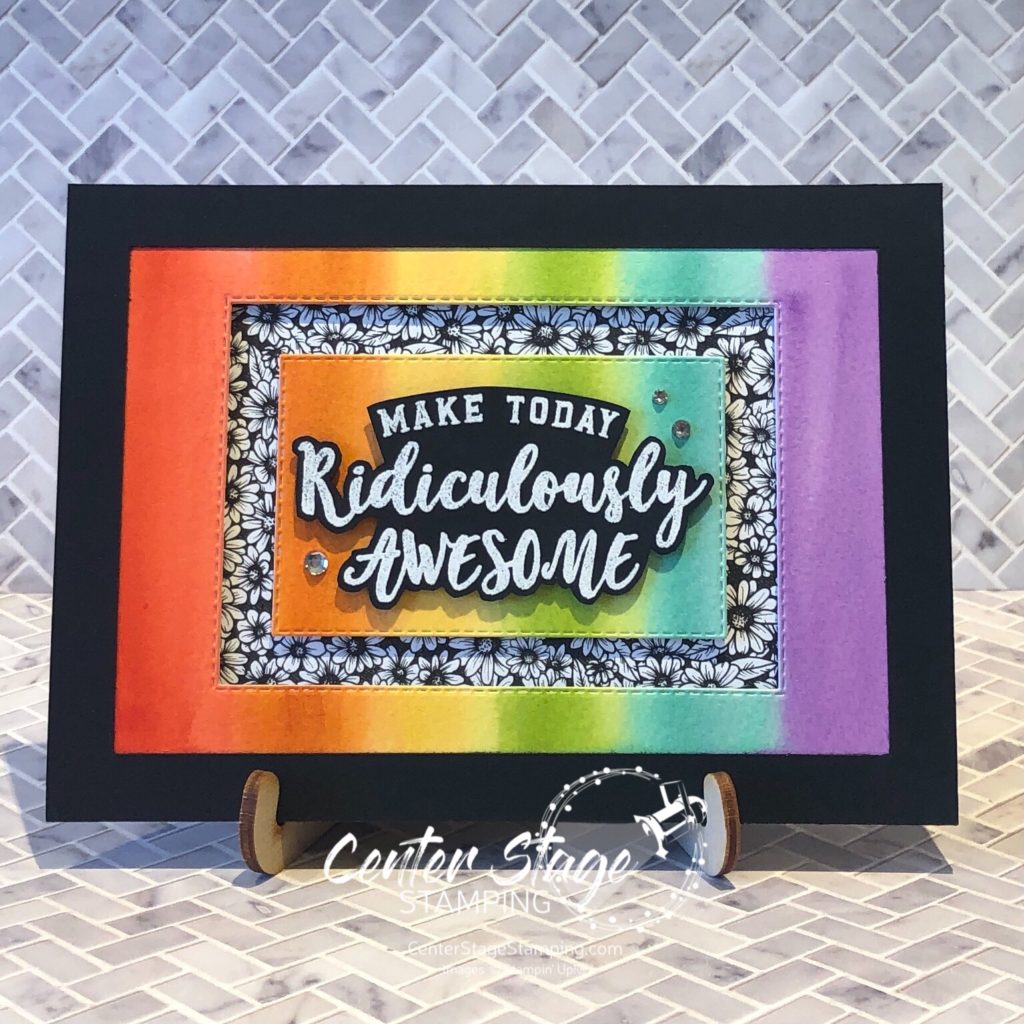
On this first card, I stamped the dahlia in VersMark and heat embossed in white on watercolor paper. Next, I painted on a coat of clear water and dropped in color with ink refills and a paint brush. Once this first layer was dry, I went back in with my paint brush and added some deeper color to the flowers. I love this loose watercolor technique. So easy. Colors used are: Magenta Madness, Misty Moonlight and Balmy Blue.

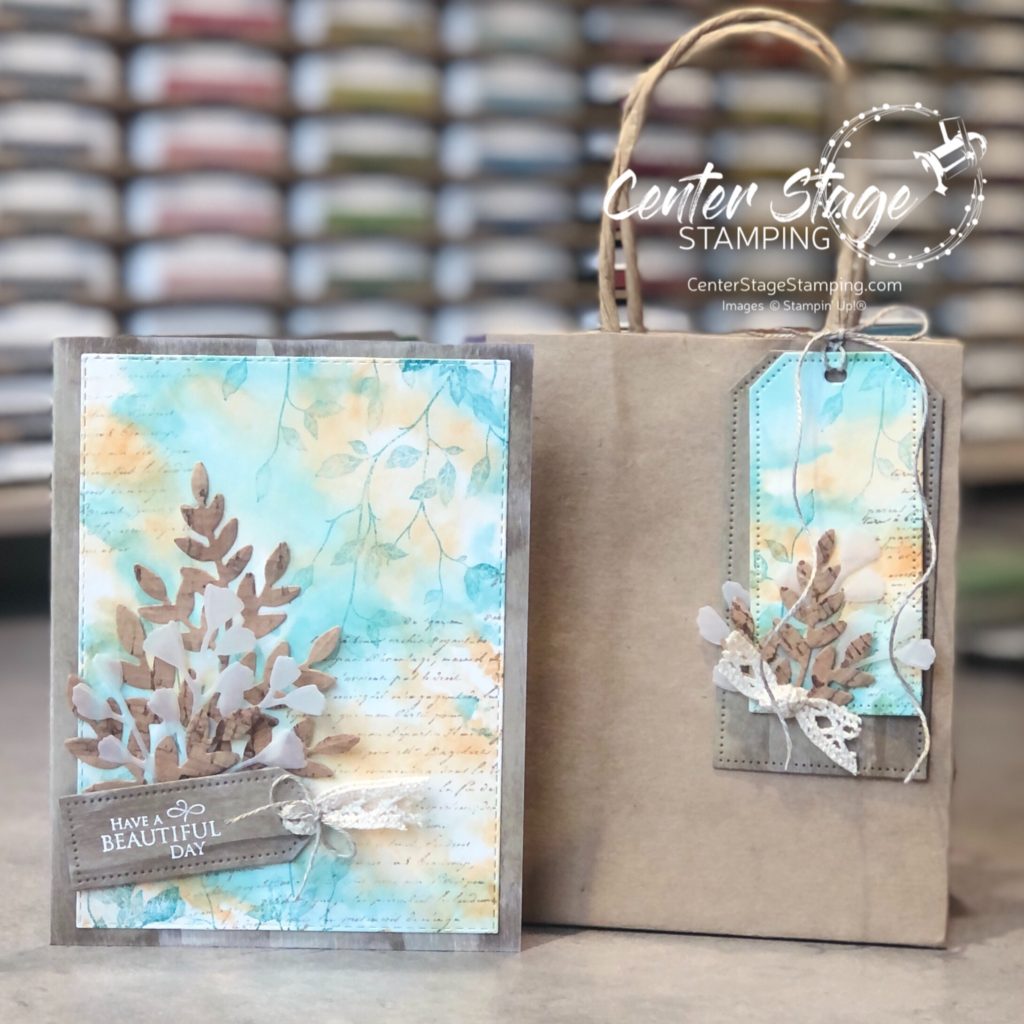
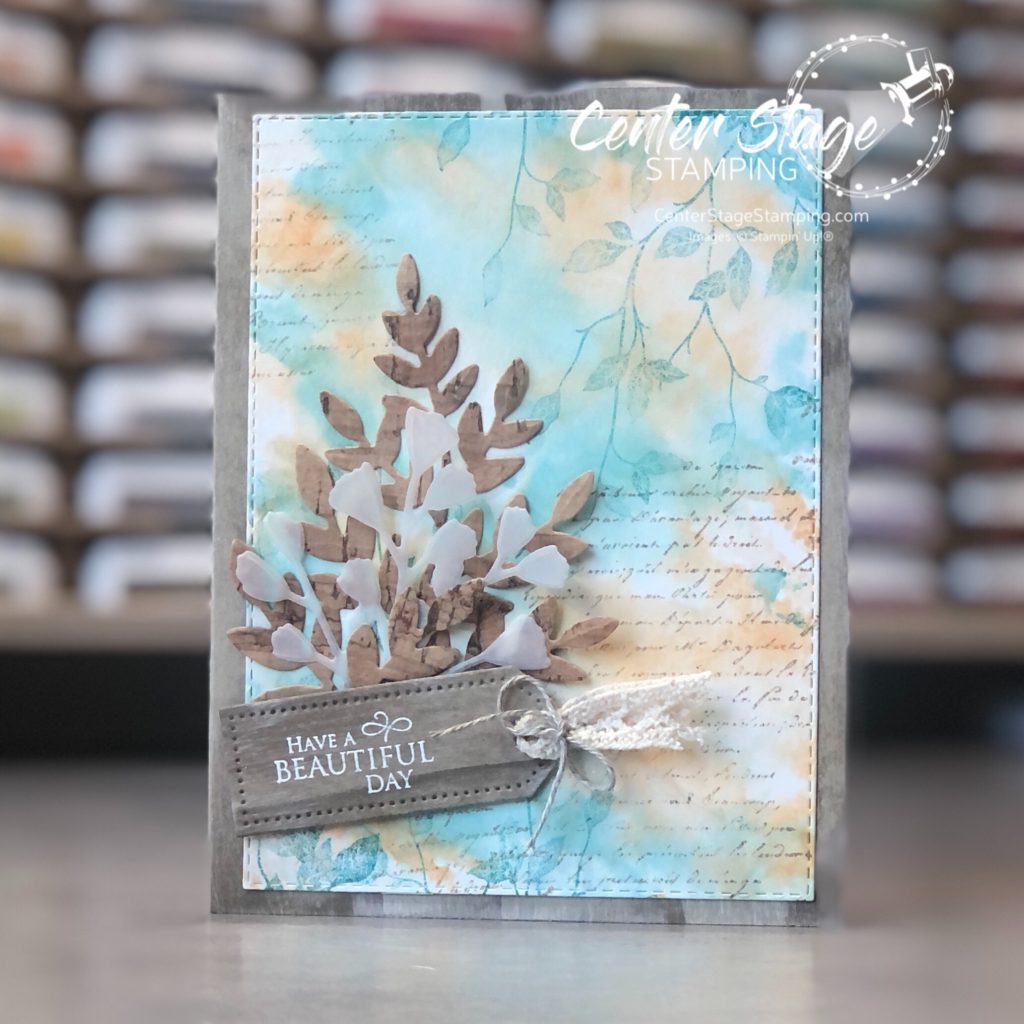
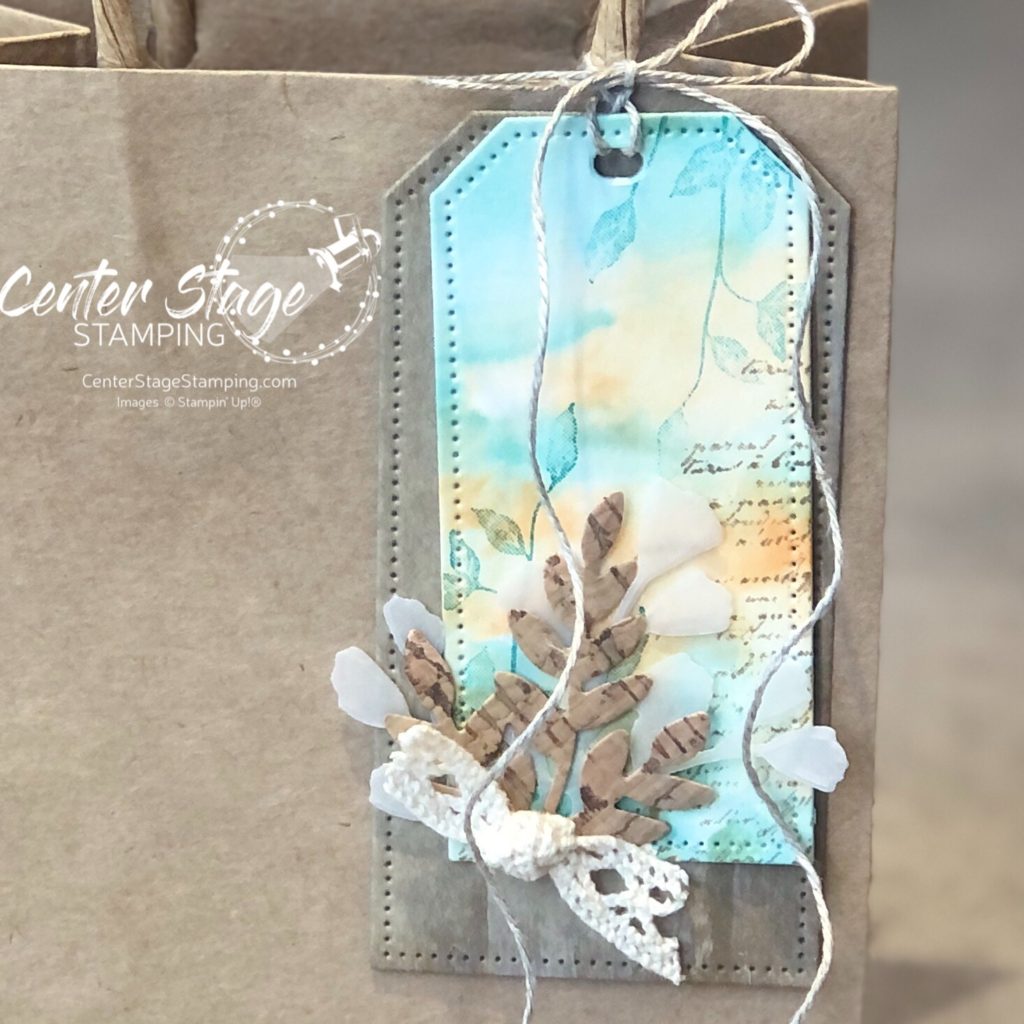
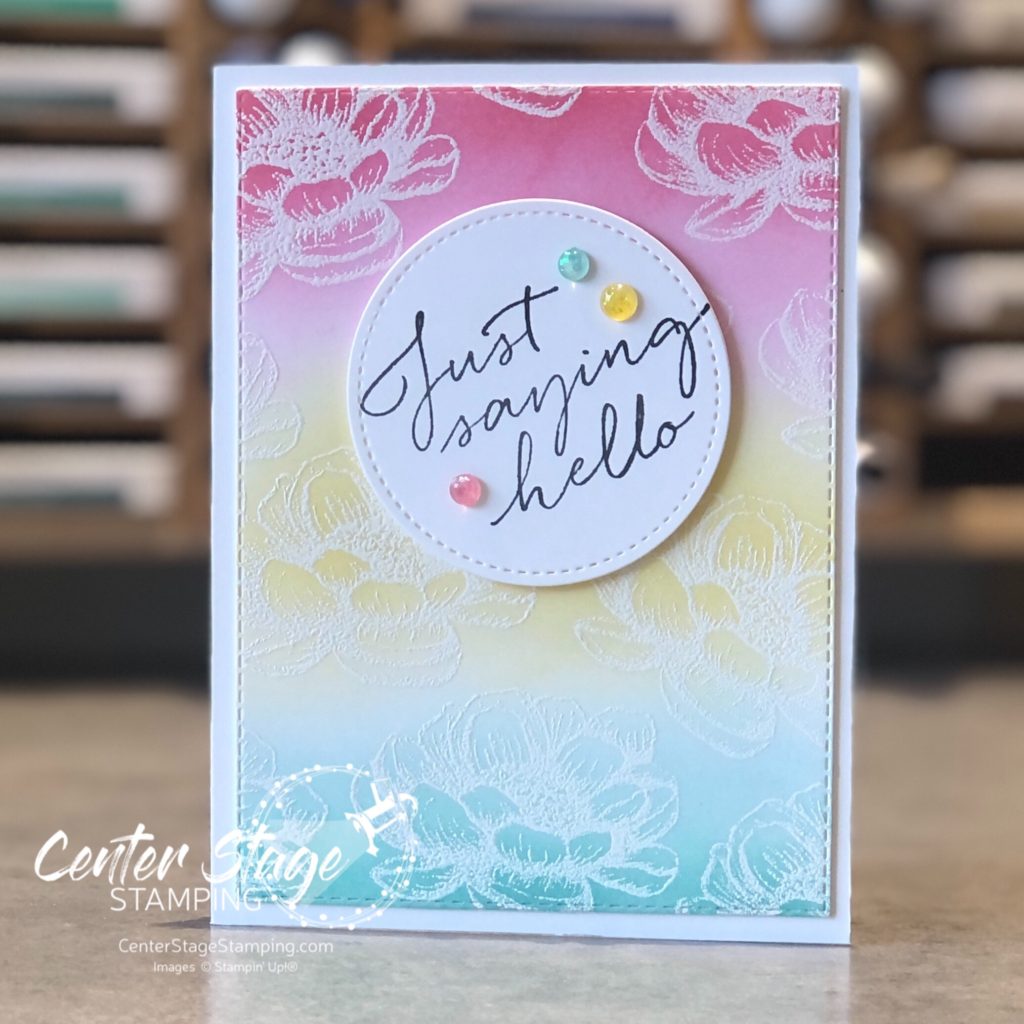
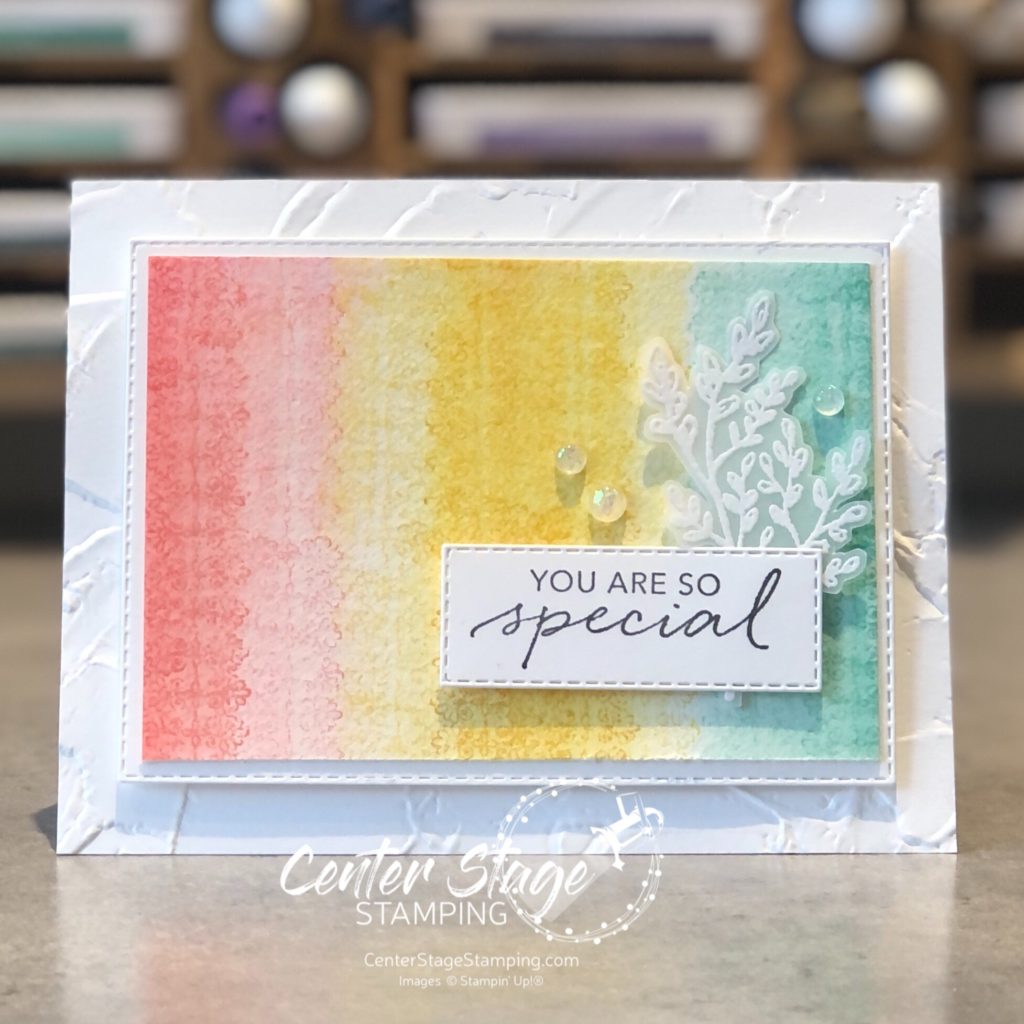
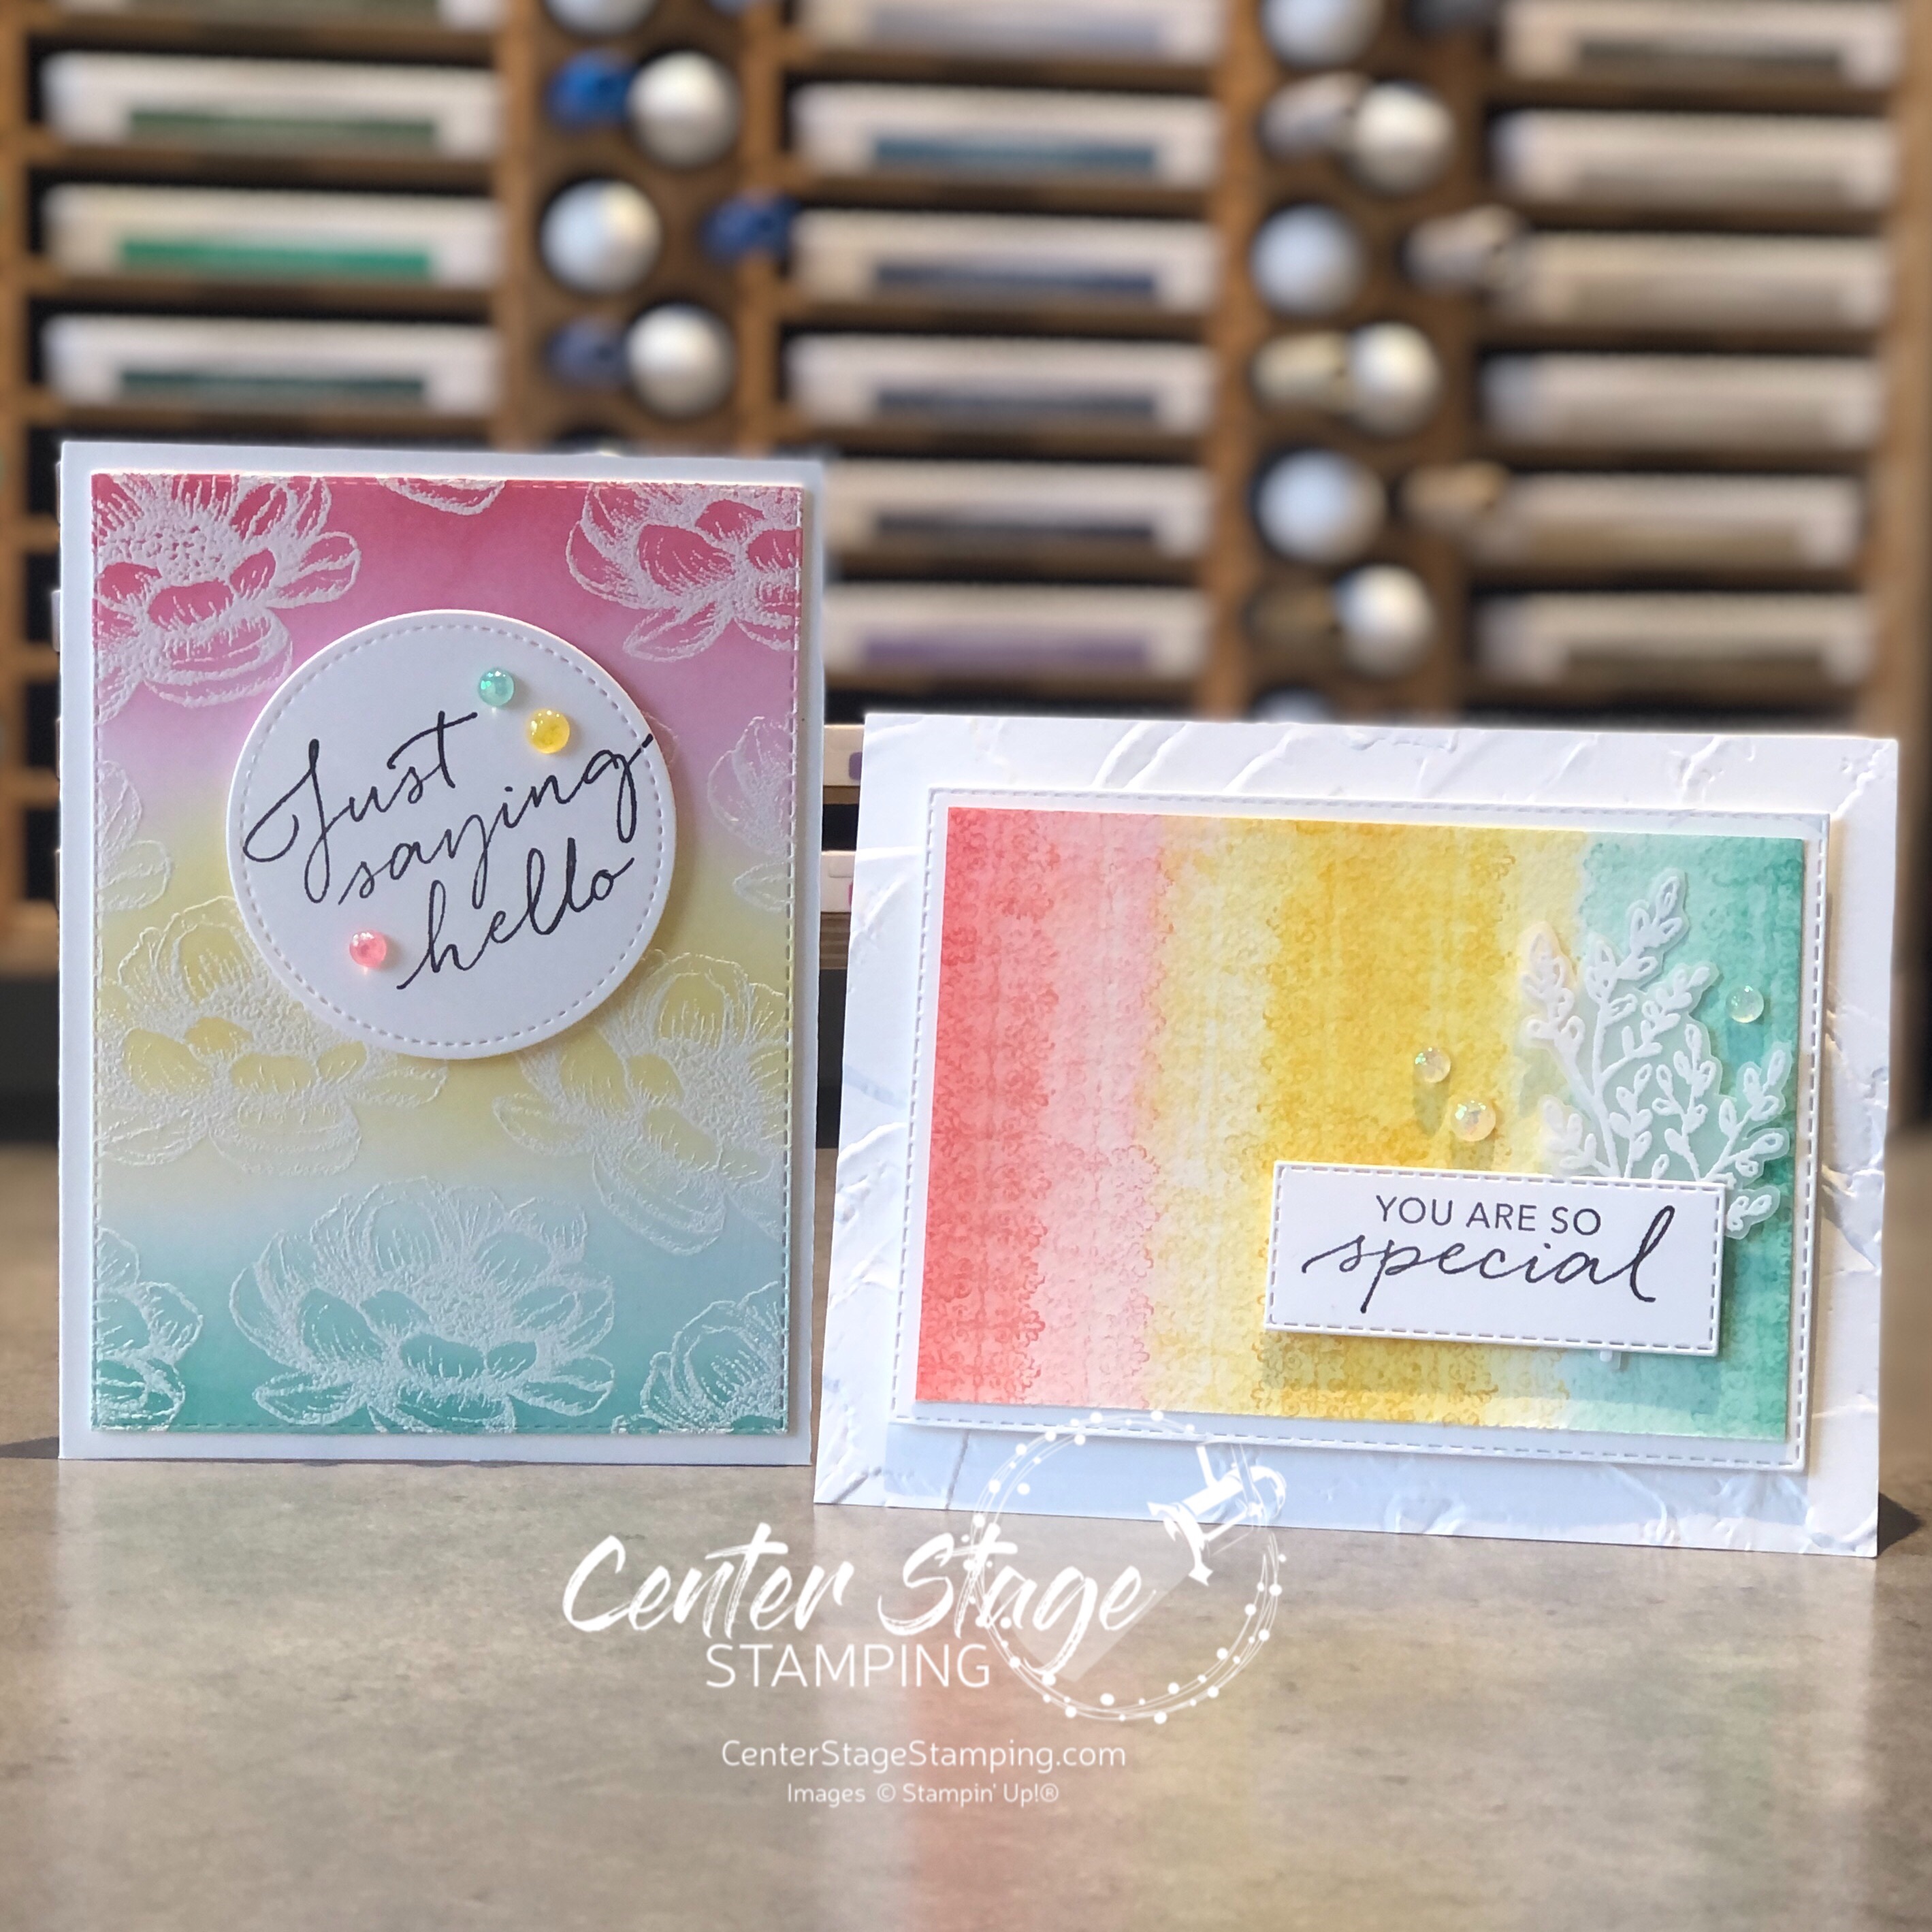
I used the same colors for my second card and added a little Pale Papaya. I free hand painted a watercolor background.

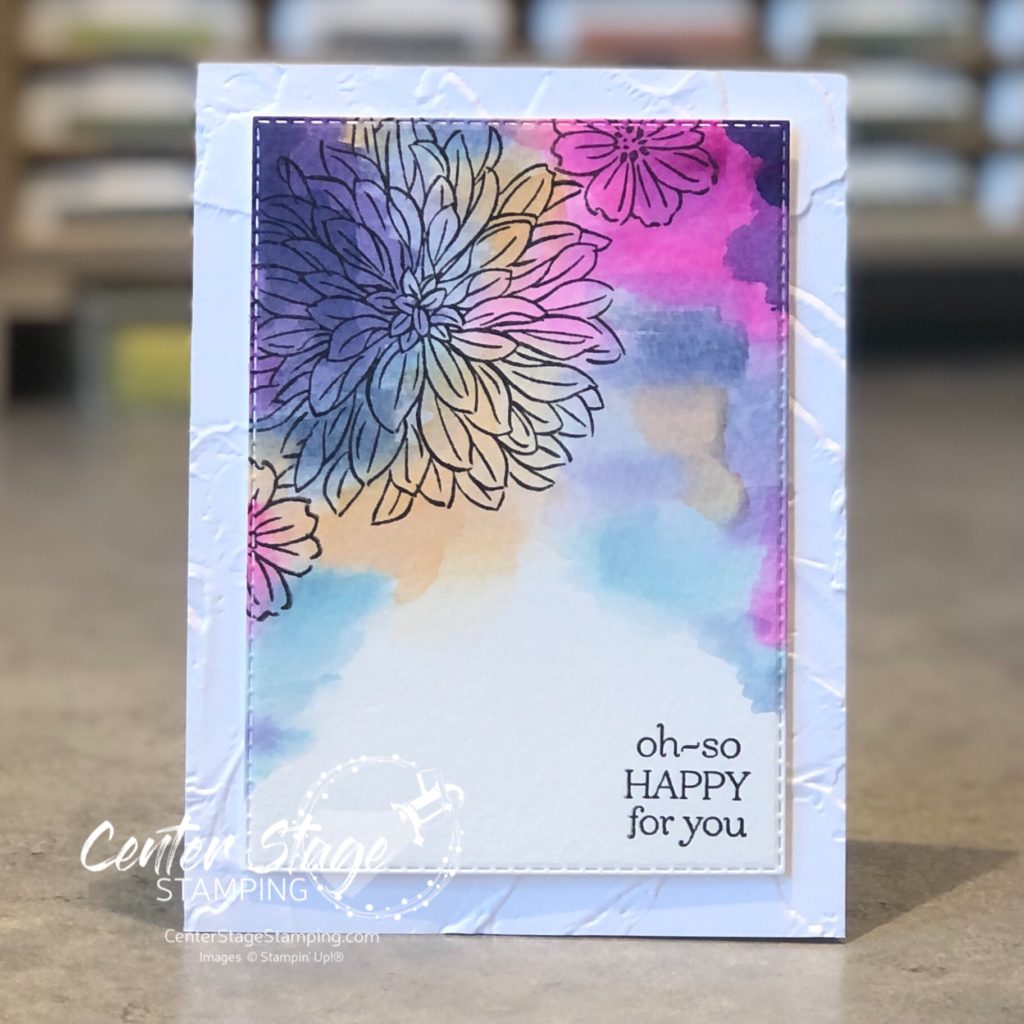
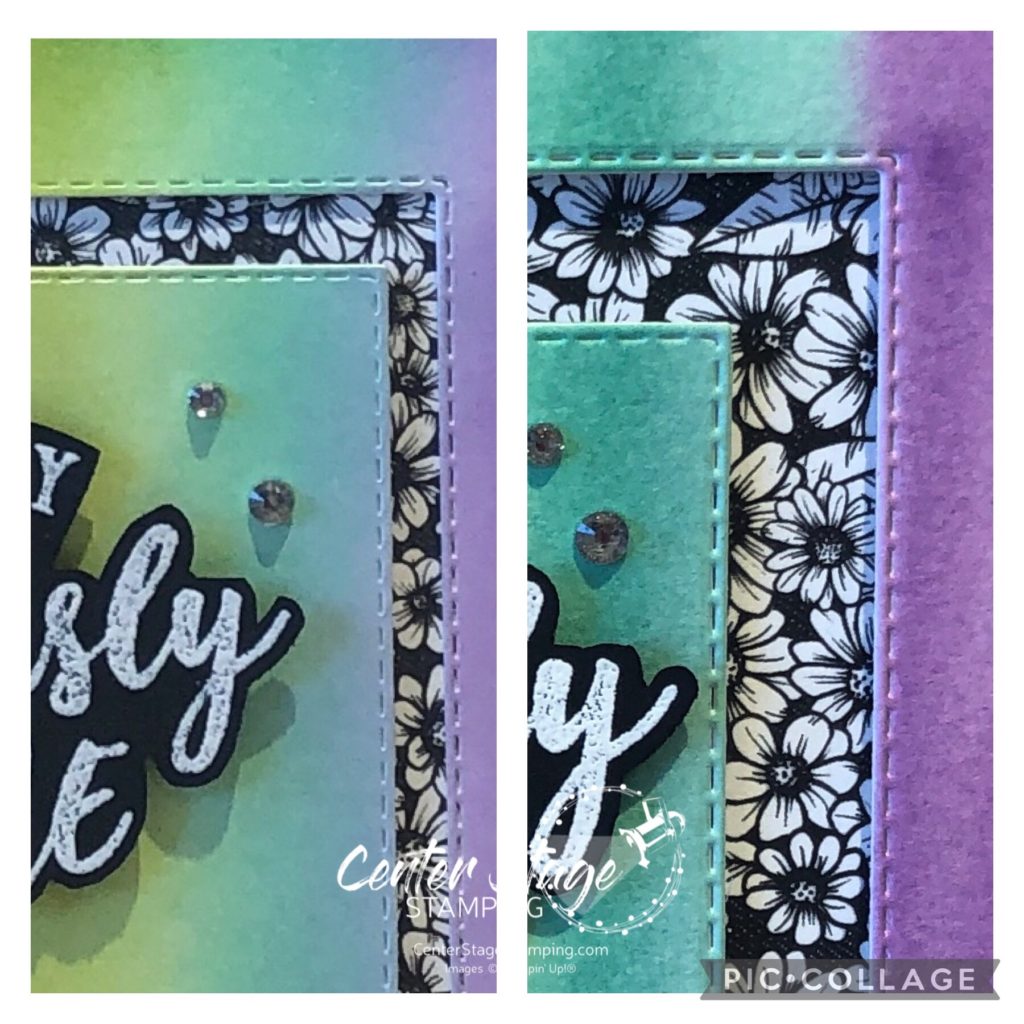
Once the panel was dry, I stamped the flowers and sentiment in black and die cut with a stitched rectangle die. Panel is mounted on a card base embossed with the Painted Texture 3D emboss folder.

Time to continue on the blog hop! Head on over to Nikkie by clicking on the NEXT button below. Or you can go back to Bronwyn by clicking the PREVIOUS button.

Thanks for stopping by! I hope you will join me again to shine a spotlight on creativity!

Share with your friends:

osat blog hop: turning a new leaf

Welcome friends! I’m glad you stopped by today. It’s time for this month’s blog hop with the One Stamp at a Time team. The theme for this month is “Turning a New Leaf” – projects featuring leaves. My first thoughts of leaves bring me to fall, deep colors of turning leaves. Rich red, orange, yellow, brown… But, I’m not ready for that just yet. So, I opted for a different color scheme. I used Bermuda Bay and Pumpkin Pie. I really like how these colors work together.

To make the colored panel, I scribbled Pumpkin Pie and Bermuda Bay Stampin’ Blends on a plastic ziplock bag. Then, I spritzed it with Isopropyl alcohol ( I used 90%), took a piece of shimmer white card stock and laid it onto the bag to soak up the ink. Once it was dry I stamped images from Very Versailles stamp set.

I used the Forever Flourishing dies to cut leaves out of vellum and the new cork paper.

I made my own wood grain paper for the card and tag base. Take a piece of Crumb Cake card stock and lightly drag Crumb cake ink pad and Whisper White ink pads across.

It was fun trying a couple of new techniques! Give them a try and let me know what you think.

Now, continue your way through the OSAT blog roll!

PLEASE CLICK THE BLUE BOX FOR A POP UP LIST OF THE DESIGN TEAM.

Thanks for stopping by! Join me again to shine a spotlight on creativity!

Share with your friends:

osat blog hop: say what?

Hello friends! I am excited to be hopping once again with the One Stamp At A Time team! The theme for this month is Say What? We will be letting sentiments take center stage.

I made this card and standing art for a young gal I wanted to encourage. I thought the “Make Today Ridiculously Awesome” saying from the Ridiculously Awesome set was perfect for her.

I paired bright rainbow backgrounds with the bold black and white True Love DSP. I created the backgrounds with two different techniques. For the card I used Poppy Parade, Pumpkin Pie, Daffodil Delight, Granny Apple Green, Coastal Cabana, and Gorgeous Grape ink pads and Blender Brushes for a nice smooth gradient.

For the art piece, I used the same colors ink refills, water color paper, paint brush and water.

You definitely get a brighter color with the watercolor. I could have built a deeper color on the card if I had kept blending more layers of ink. Here is a closer look at the two techniques side by side – card on the left, art on the right.

I like the texture from the water color paper. I think it adds more dimensional interest. Both techniques are fun. You should give them a try! Time for you to move on to the next stop on the blog hop for some more fun inspiration featuring sentiments.

PLEASE CLICK THE BLUE BOX FOR A POP UP LIST OF THE DESIGN TEAM.

Thanks for stopping by. Join me again to shine a spotlight on creativity!

Share with your friends:

no line watercolor

A few weeks ago a friend who is a wonderful artist gave a lesson in water color painting. I have been practicing with some beautiful floral images from Taylored Expressions Sketchbook Florals stamp set.

If you are not familiar with No Line Coloring, you stamp the image in a pale ink (some companies have an ink specifically for this), then water color the image and the inked lines blend in. It looks like you painted the image freehand. Here are a few I painted after my lesson.

One tip I got in my lesson was to blend colors on the wet paper. It really added to the depth of the image. After I did this one, I wanted to try some other color combos.

Another tip I received was to be patient. Wait for one area to dry before trying to paint an adjacent area. This is hard for me, but I’m getting there.

I spent my time at a recent craft retreat continuing to practice this technique. I’ll share some of those results soon.

Thanks for stopping by! Join me again to shine a spotlight on creativity!

Share with your friends:

stamp review crew: tasteful touches

Hello crafty friends! I’m here with the Stamp Review Crew for a fun blog hop featuring the Tasteful Touches stamp set. This is a fun and versatile set. At first glance, it looks like it is only for vintage-y type projects, but let you creativity loose and see it can be so much more.

I am getting desperate for spring, unfortunately I’m in MN and that is still a ways off. My projects this time of year seem to work to bring spring into my house as much as I can. I went with a bright springtime color combo of Flirty Flamingo, Daffodil Delight, and Coastal Cabana.

For my first card, embossed the flower image with white embossing powder on white card stock. Then, I did some ink blending with Stampin’ Up!’s new blending brushes.

I took the Opal Rounds embellishments and colored them with the coordinating Stampin’ Blends. A fun springtime Hello.

My next card has a similar blended background, but this time I achieved it with water coloring.

I did a light watercolor wash of the three colors. Once dry, I stamped the lace like image in each color. Then I took a watercolor brush over the stamped images to blur them out some.

A fun springtime duo to showcase a great stamp set! Now, it is time for you to continue through the blog hop. You can move on to Charlet by clicking the NEXt button below. Or, if you are doing the hop in reverse, you can head over to Cindy by clicking the PREVIOUS button below.

Thanks for stopping by! Join me again to shine a spotlight on creativity!

Share with your friends:

pink ombre

I have been practicing a lot lately with stencils and blending brushes. I love the gradient looks you can get. I tried what I call double layer blending. It was perfect for this Valentine card!

For this card, I first lightly blended Merry Merlot, Rococo Rose and Blushing Bride onto a white panel. Next, I laid my Taylored Expressions Mini Slim Cable Knit stencil over and added more of the same colors. The panel was then cut with a mini slim stitched rectangle die. The hearts are from Stampin’ Up!’s Stitched Be Mine dies. I hand wrote the word “love” with a black pen and added a few rhinestones for a bit of bling.

Have you tried double layer blending with stencils? I’ve got a few more ideas in the works with this. Thanks for stopping by! Join me again to shine a spotlight on creativity!

Share with your friends:

sunflower love

I’m back with another sunflower card! This giant image is so much fun to work with. It is great for coloring with markers or watercolor. Plus, the image looks great stamped on its own without any coloring. You can also stamp it on colored card stock.

For this card, I stamped it on Daffodil Delight card stock in Cinnamon Cider ink, leaves are stamped on Old Olive card stock in Mossy Meadow ink. I colored the flower center with a brown colored pencil and added highlights with a white one. For added texture I embossed the flower and leaves with the Subtle Embossing Folder.

Thanks for stopping by! Join me again to shine a spotlight on creativity!

Share with your friends:

birthday dots

Hello all! This is a crazy month as we prepare for our daughter’s wedding on Oct 2! Plus, we just finished the annual Stamp-n-Storage Warehouse Sale. Add in other life happenings and I’m not sure where the month went. I wanted to share the card I made for my husband Brett’s birthday earlier this month.

I love polka dots. The Scattered Dots Turnabout stamp from Concord & 9th is quickly becoming a favorite in my studio. As are the new C&9 inks! I absolutely LOVE the colors. For this card I used Midnight, Aqua Sky, Stardust and Dove. The present is from the collaborative set Happy Birthday by The Stamping Village.

It’s been awhile sine I have done a shaker card, so I thought this would be a good time to tackle one. I used 1/8″ and 1/4″ hand held circle punches to created the confetti for inside the shaker.

It is a happy coincidence that my husband’s initials are BH. So I took the cut letters from the front and added them to the inside to personalize the card.

I hand wrote his name with a white gel pen. It added a fun touch to the inside of the card. I really should add to the inside of cards more often. I think it really makes them more interesting. What do you think about decorating the inside of cards?

Thanks for stopping by! Join me again to shine spotlight on creativity!

Share with your friends:

thank goodness for grandma

A few weeks ago I had the opportunity to attend the Stampin’ Up! On Stage event in Las Vegas. It was so much fun getting to see old friends, make new ones and get to see the NEW Stampin’ Up! Mini Catalog! Check back for some fun sneak peeks soon.

I also had the chance to attend a fun event hosted by the TGIF Challenges design team. Fabulous make&takes, amazing displays, and more wonderful friends. We each made a card to swap for this event. Here is mine:

I used Grandma’s House stamp set and the bubblewrap water color technique. Colors are Coastal Cabana, Bermuda Bay, Old Olive, Lovely Lipstick, Basic Black.

I love swapping at these events. It is so much fun to meet new people and get so many great card ideas.

Thanks for stopping by. Join me again to shine a spotlight on creativity!

Share with your friends: