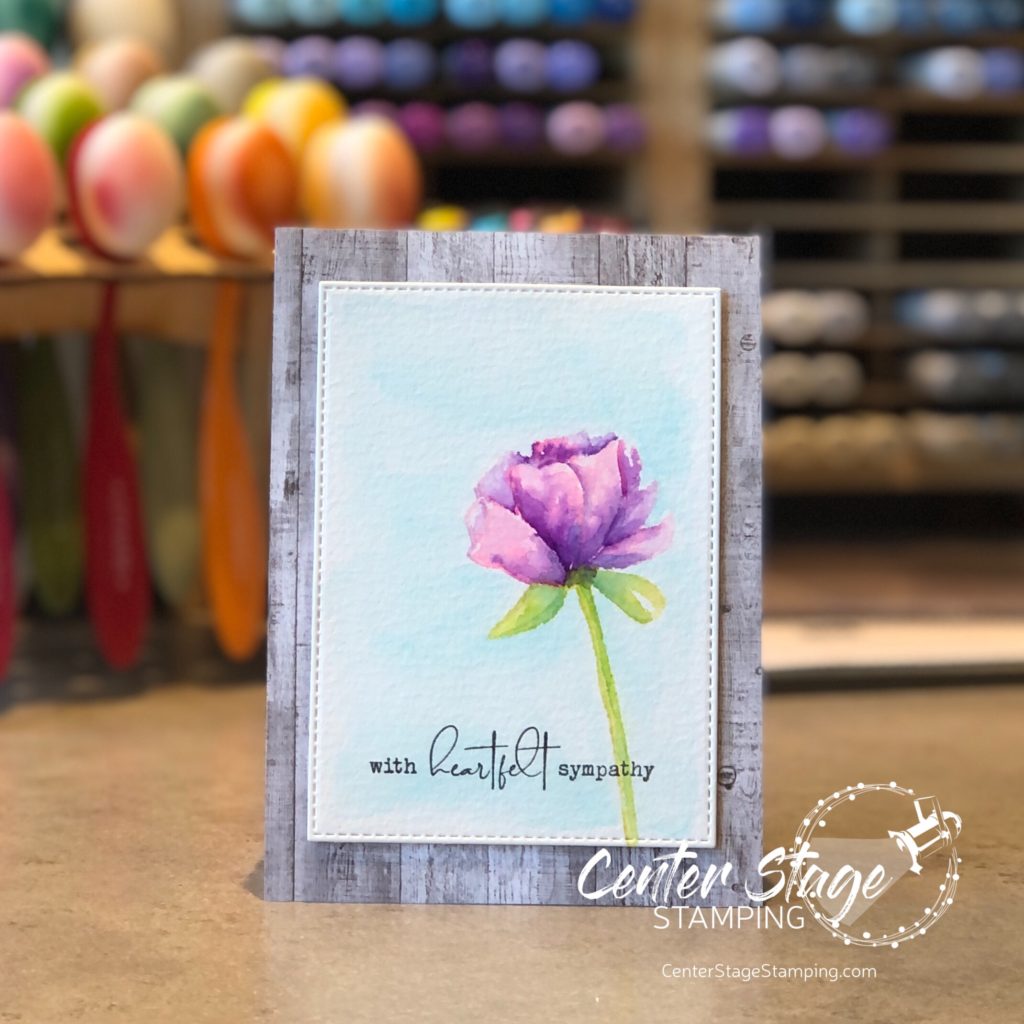
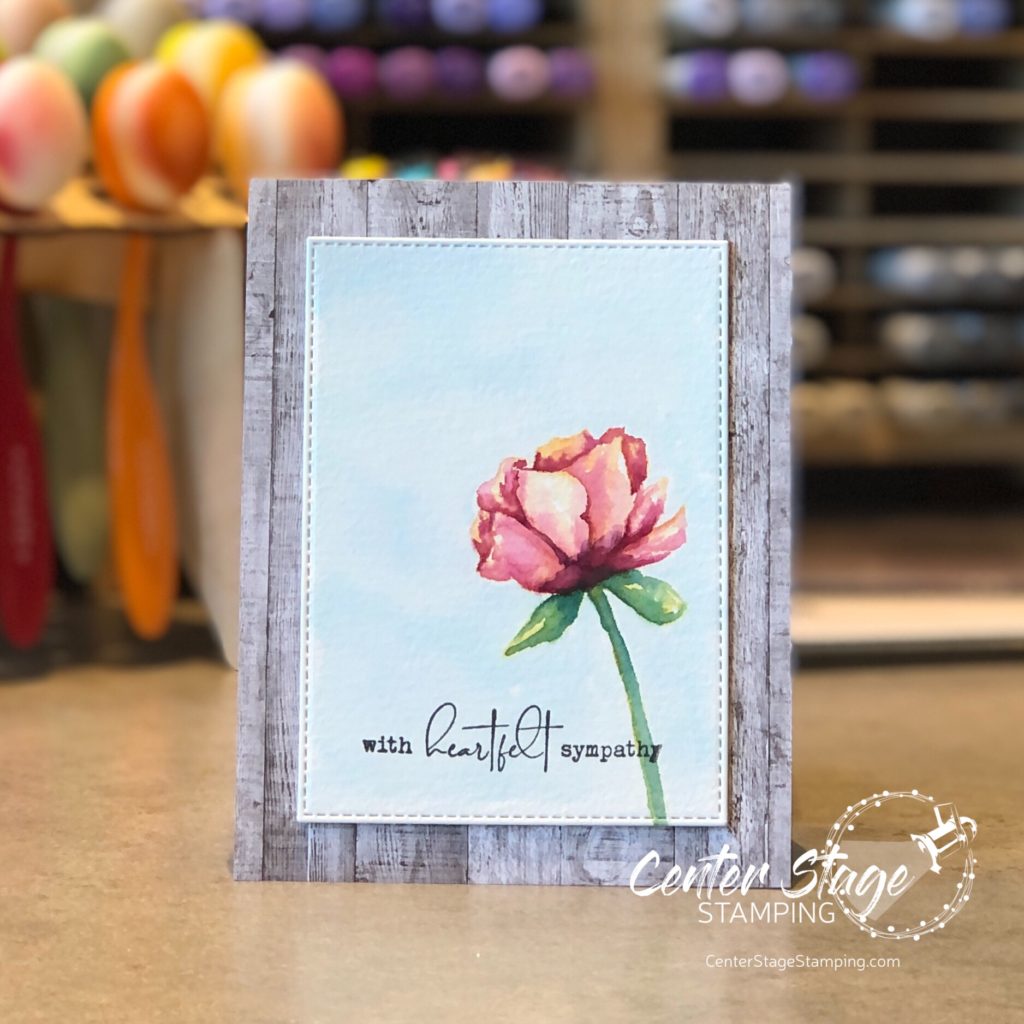
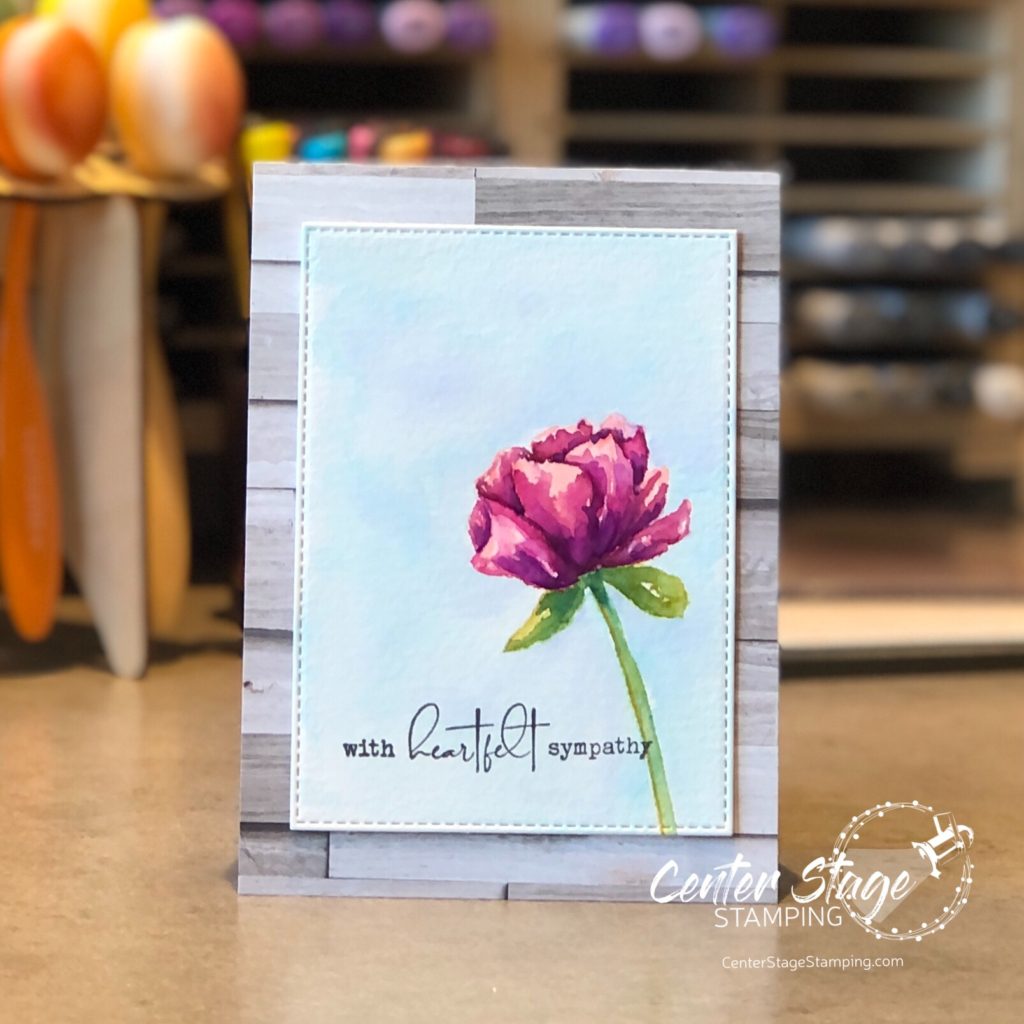
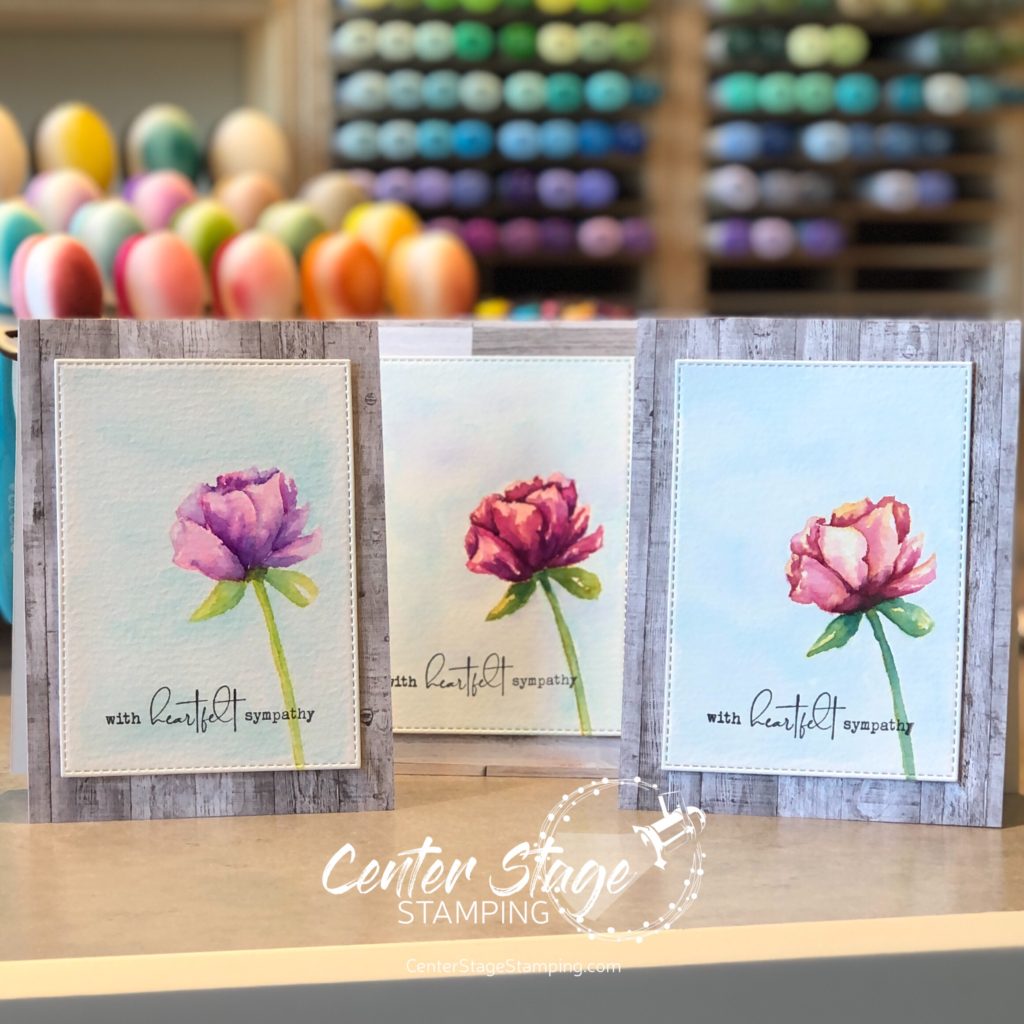
A few weeks ago a friend who is a wonderful artist gave a lesson in water color painting. I have been practicing with some beautiful floral images from Taylored Expressions Sketchbook Florals stamp set.
If you are not familiar with No Line Coloring, you stamp the image in a pale ink (some companies have an ink specifically for this), then water color the image and the inked lines blend in. It looks like you painted the image freehand. Here are a few I painted after my lesson.
One tip I got in my lesson was to blend colors on the wet paper. It really added to the depth of the image. After I did this one, I wanted to try some other color combos.
Another tip I received was to be patient. Wait for one area to dry before trying to paint an adjacent area. This is hard for me, but I’m getting there.
I spent my time at a recent craft retreat continuing to practice this technique. I’ll share some of those results soon.
Thanks for stopping by! Join me again to shine a spotlight on creativity!
Wow! The Paper Craft Crew has reached challenge number 400! That’s a lot of creative inspiration. Let’s celebrate with a fun Tic Tac Toe challenge. Pic a row and get creative.
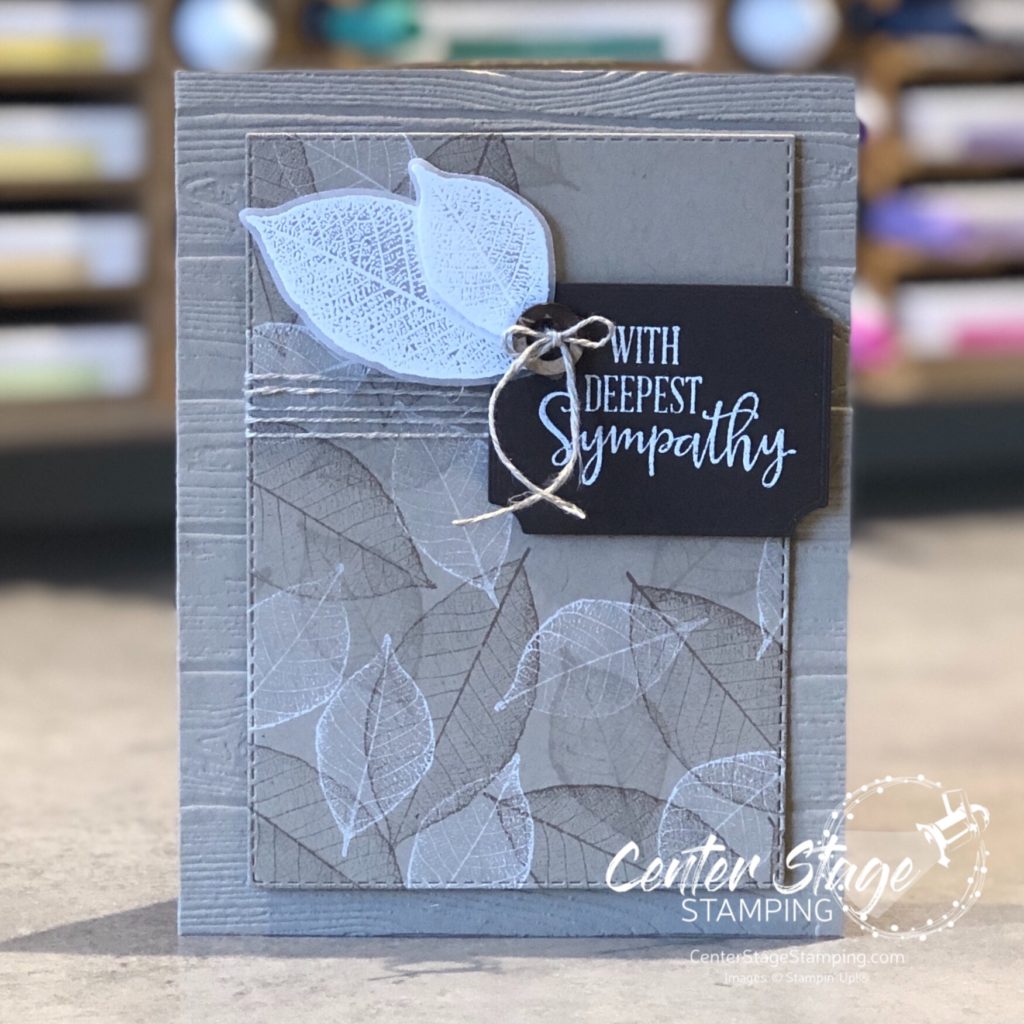
I decided to go straight across the middle: Monochromatic, Seasonal, Sympathy. I need to restock my sympathy cards. Never fun, but at least I can put some love into creating them.
I went with a neutral (monochrome) color scheme: White, Crumb Cake and Early Espresso. The (seasonal) leaves from Rooted in Nature are stamped in Crumb Cake, White and Versamark to get some depth. The two accent leaves are embossed in white on vellum. The sentiment (sympathy) is embossed in white on Early Espresso. The leaf panel is die cut with a stitched rectangle and the card base is embossed with the Pinewood Planks 3D emboss folder. Some linen thread and a wooden button compliment the natural feel of the card.
I invite you to join us on the Paper Craft Crew and play along! Thanks for stopping by. Join me again to shine a spotlight on creativity!
Hello crafty friends! I’m so happy to be hopping with the super creative Stamp Review Crew Design Team! Today we are shining a spotlight on Painted Poppies. This beautiful set is in the current Stampin’ Up! mini catalog and is part of a beautiful suite of products, including coordinating dies and some gorgeous designer series paper.
For stamp sets that are part of a product suite like this, I try to create a project or two not using any of the coordinating products. It helps me find more versatility in the stamp set. That’s what I did for today’s projects.
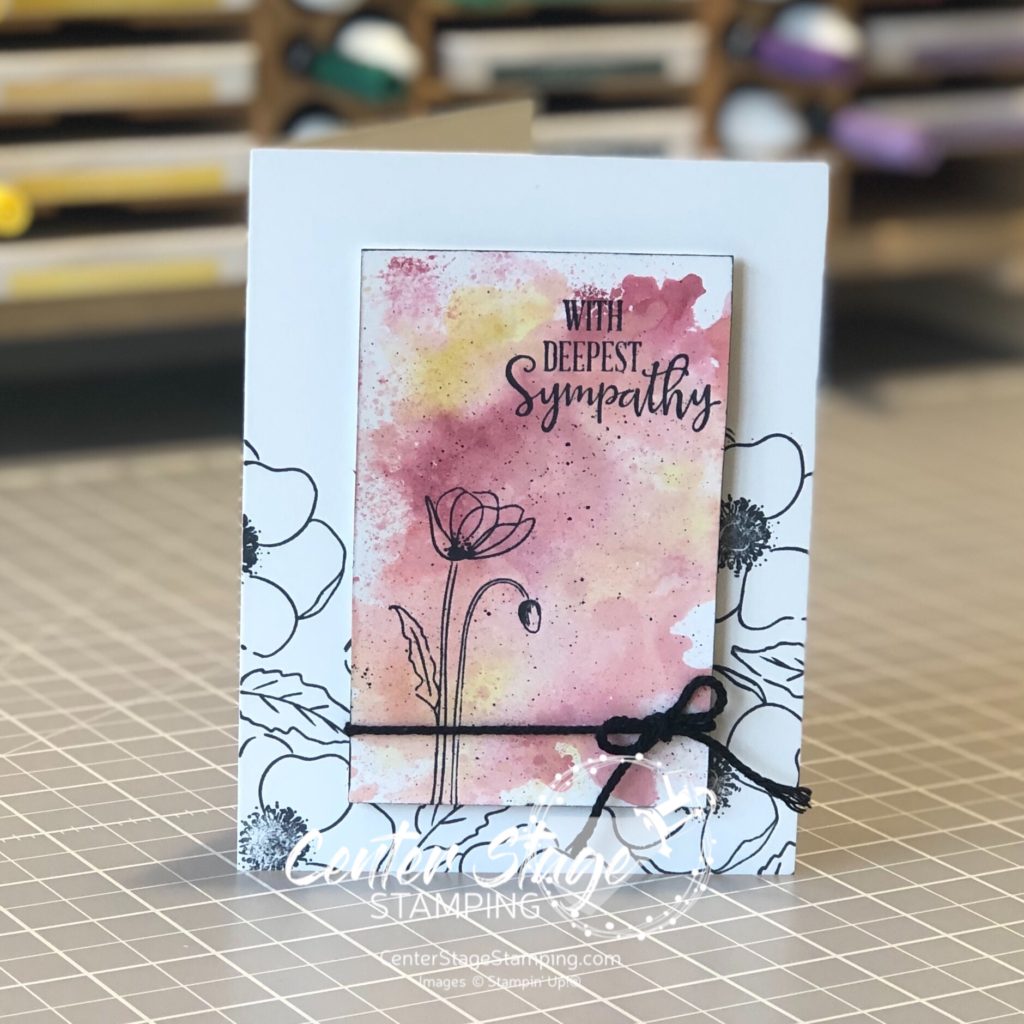
For this first card, I did a simple watercolor smooshing to create a background to stand out against images stamped in black.
I used Cherry Cobbler, Terracotta Tile and Crushed Curry Stampin’ Write markers and scribbled them on my silicon mat. Next I spritzed the mat with water and laid my Whisper White (thick) panel on to pick up the color. This technique works better with watercolor paper, but I wanted a smooth surface. You do have to be careful not to over saturate the Whisper White card stock or it will pill. Let the panel completely dry before stamping the image in Memento Black ink.
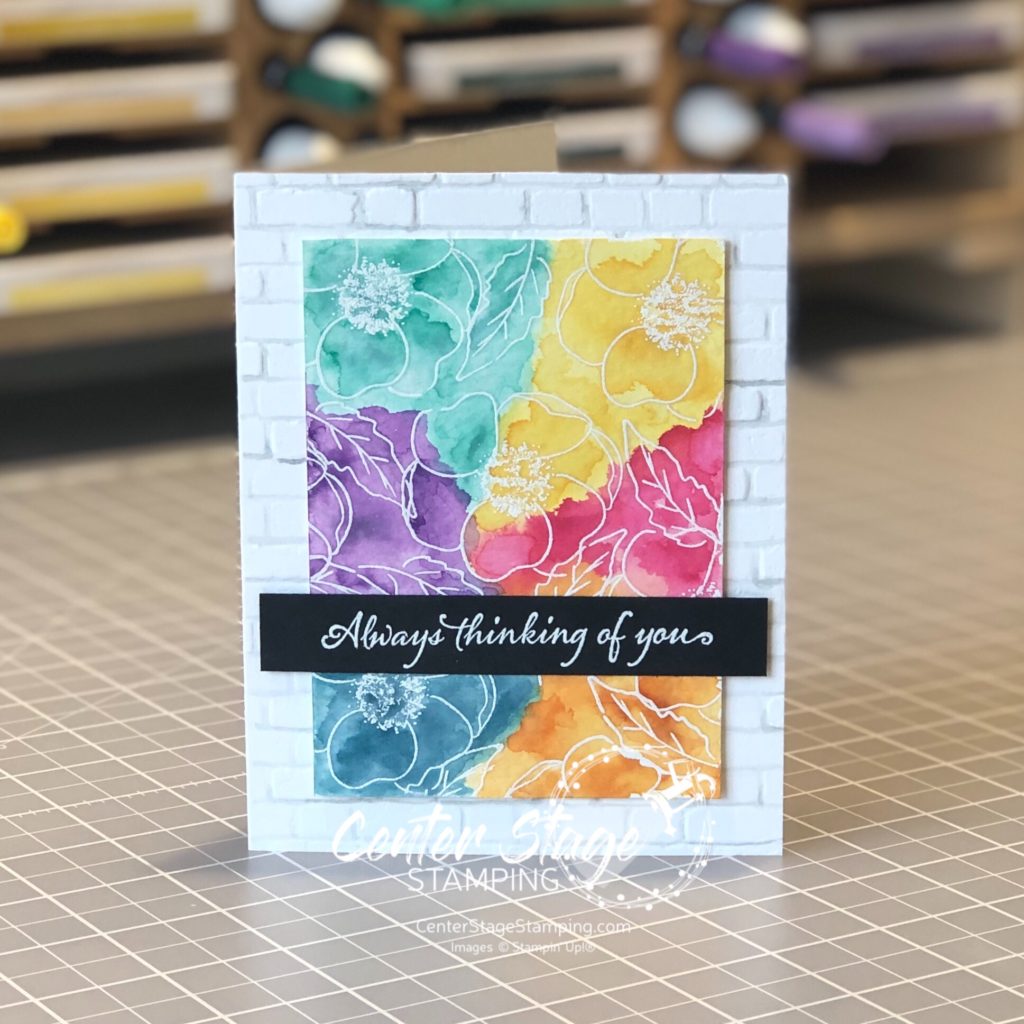
My second card uses a much bolder color scheme. I started by stamping the flower images in VersaMark ink and embossing them with white embossing powder on watercolor paper.
I did a watercolor wash across the panel, doing one color section at a time. Be sure to let dry between colors to control color bleeding. I used Daffodil Delight, Lovely Lipstick, Pumpkin Pie, Pretty Peacock, Gorgeous Grape, and Coastal Cabana. The card base was embossed with the Brick&Mortar 3D embossing folder. I painted the grout lines with a light wash of Smokey Slate to help create additional depth. The sentiment is from Very Versailles stamp set.
Thanks for stopping by! Be sure to check out the full blog hop for more inspirational projects featuring this beautiful stamp set! You can head on over to the talented Cindy by clicking on the NEXT button below or you can go back to the creative Nikki by clicking on the PREVIOUS button.
Thanks for stopping by! Join me again to shine a spotlight on creativity!
Hello friends! Welcome to another Stamp Review Crew blog hop. What is the Stamp Review Crew? We are an international group of paper crafters that get together to feature and review a single Stampin’ Up! stamp set on the first and third Monday of each month. All of our previous stamp set reviews are archived on the Stamp Review Crew blog. I get the honor of starting off the blog roll today.
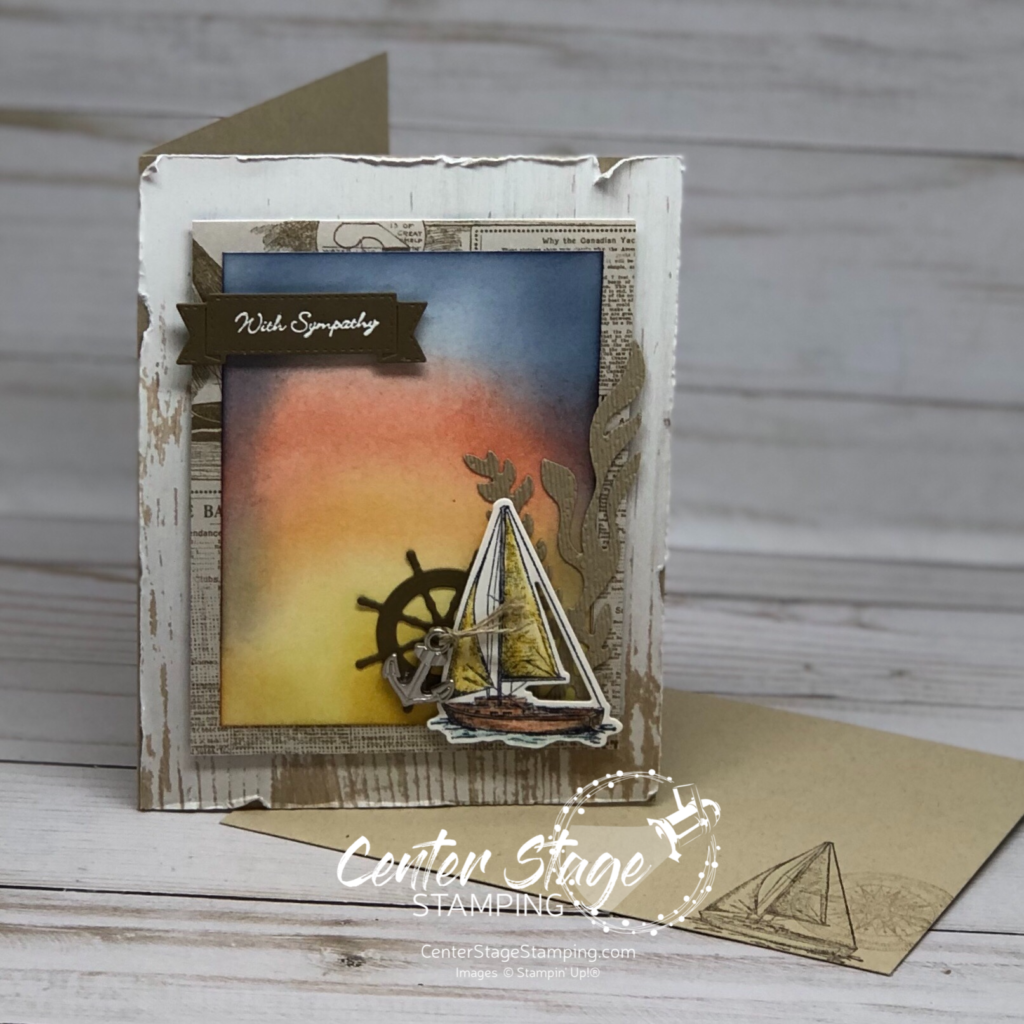
For this hop, we are giving the Sailing Home stamp set its moment center stage. This stamp set isn’t one I normally would gravitate towards. But, I am SO glad I got it and the full Come Sail Away product suite. I have had so much fun creating with it.
This first card is one I made for a custom order. I was asked to make a sympathy card. A boat sailing into the sunset is what was requested. Here is what I created.
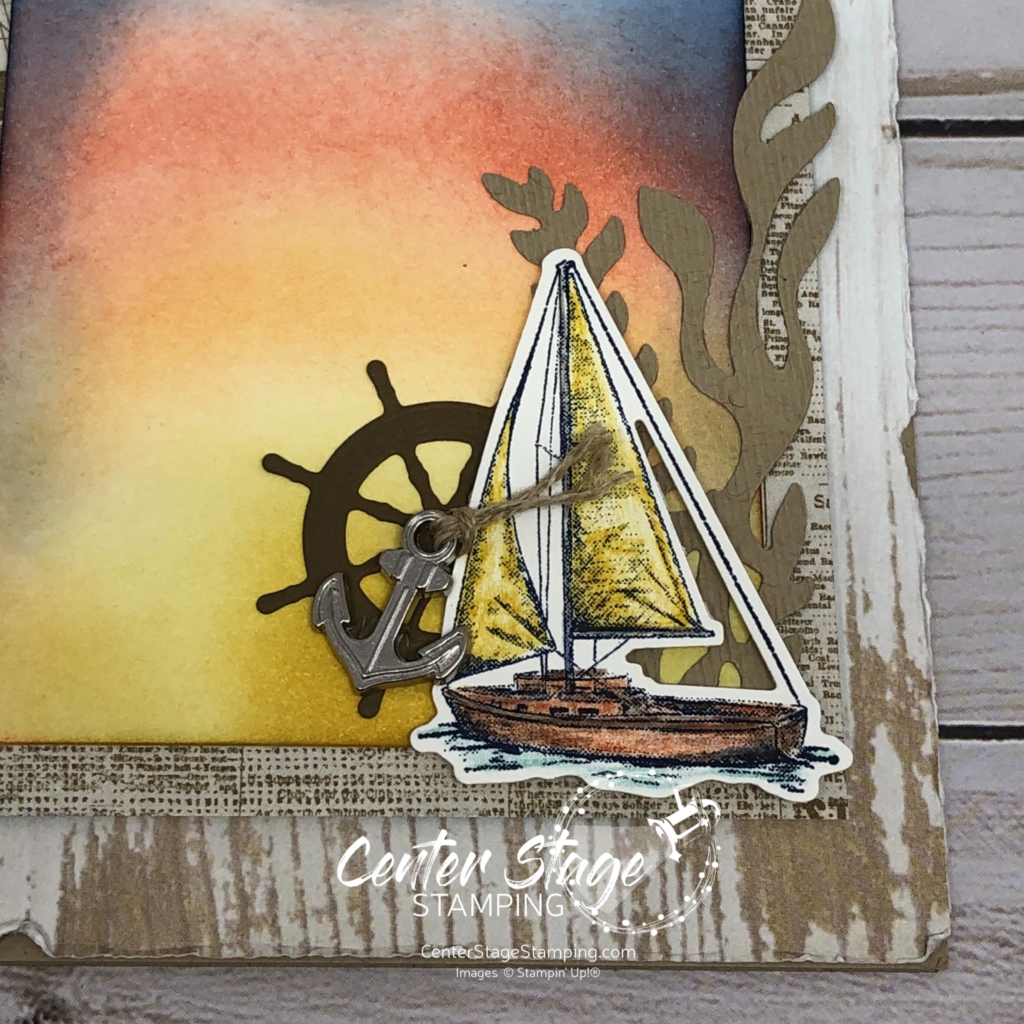
I created the sunset by sponging ink onto a Whisper White panel. I used Crushed Curry, Pumpkin Pie, Terracotta Tile, Balmy Blue and Night of Navy. I used some of the retired Wood Grains DSP and distressed the edges. The sentiment is from the retired Teeny Tiny Wishes. The boat was colored with water color pencils. Here is a closer look at the corner:
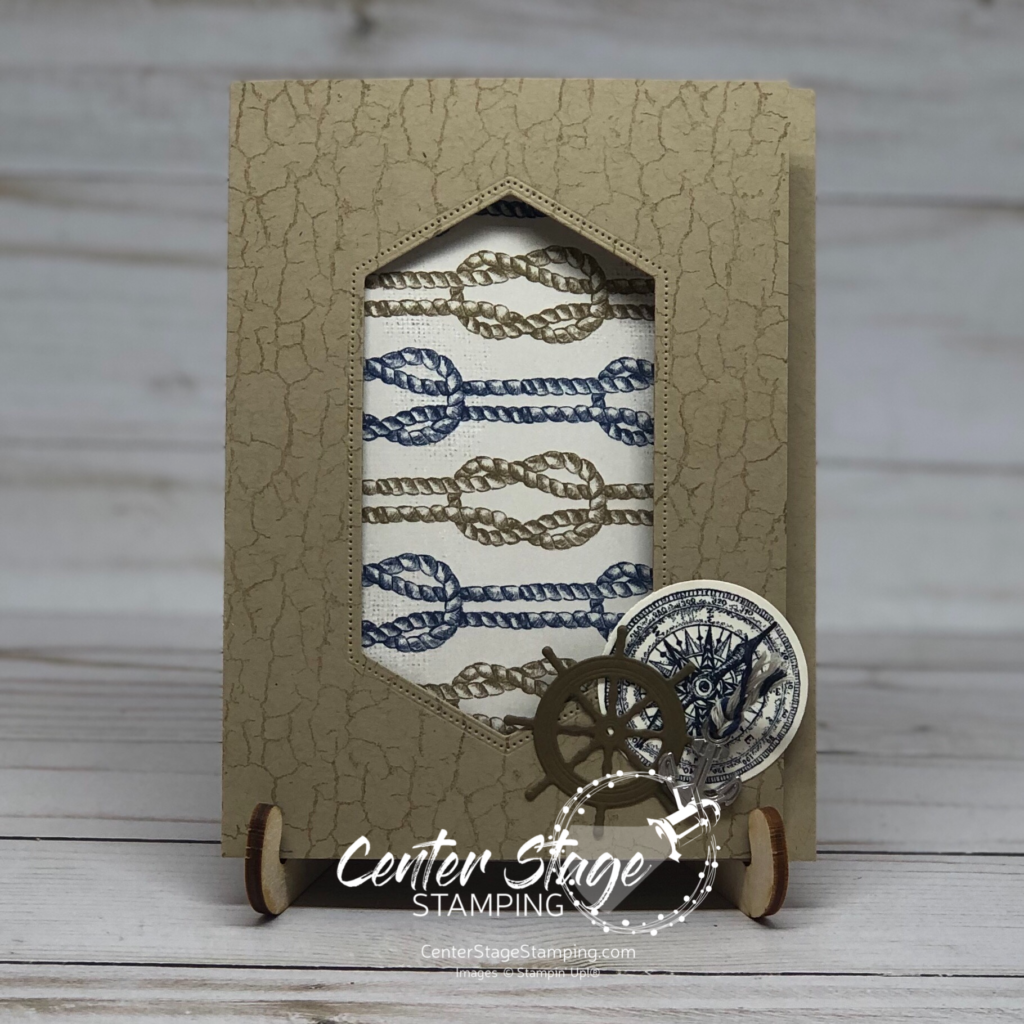
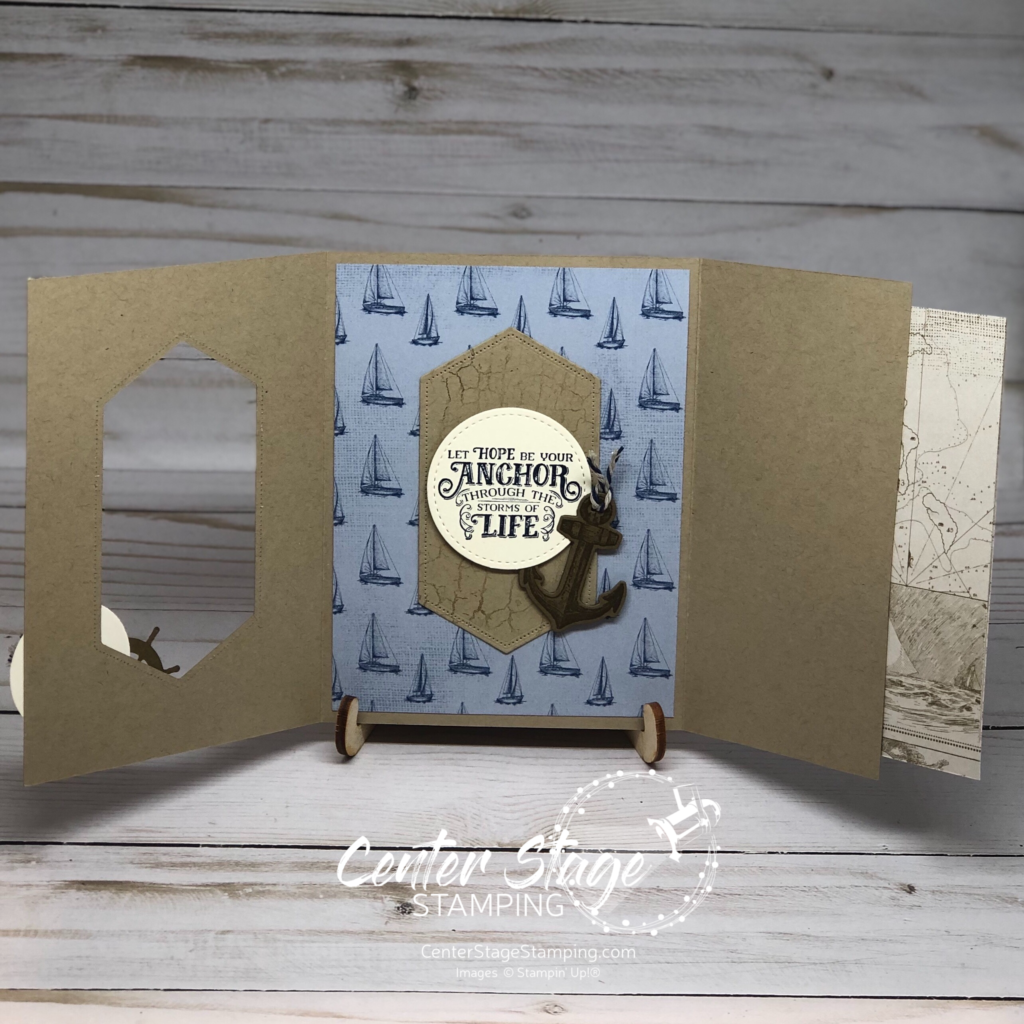
My second project today uses the card fold i learned from Ronda Wade and first showed on the Stamp Review Crew’s Bird Ballad blog hop. You can see that project HERE. I liked the fold so much so I kept playing with it.
I really like the Crackle Paint background stamp with the rope pattern Come Sail Away DSP. Here is the first open:
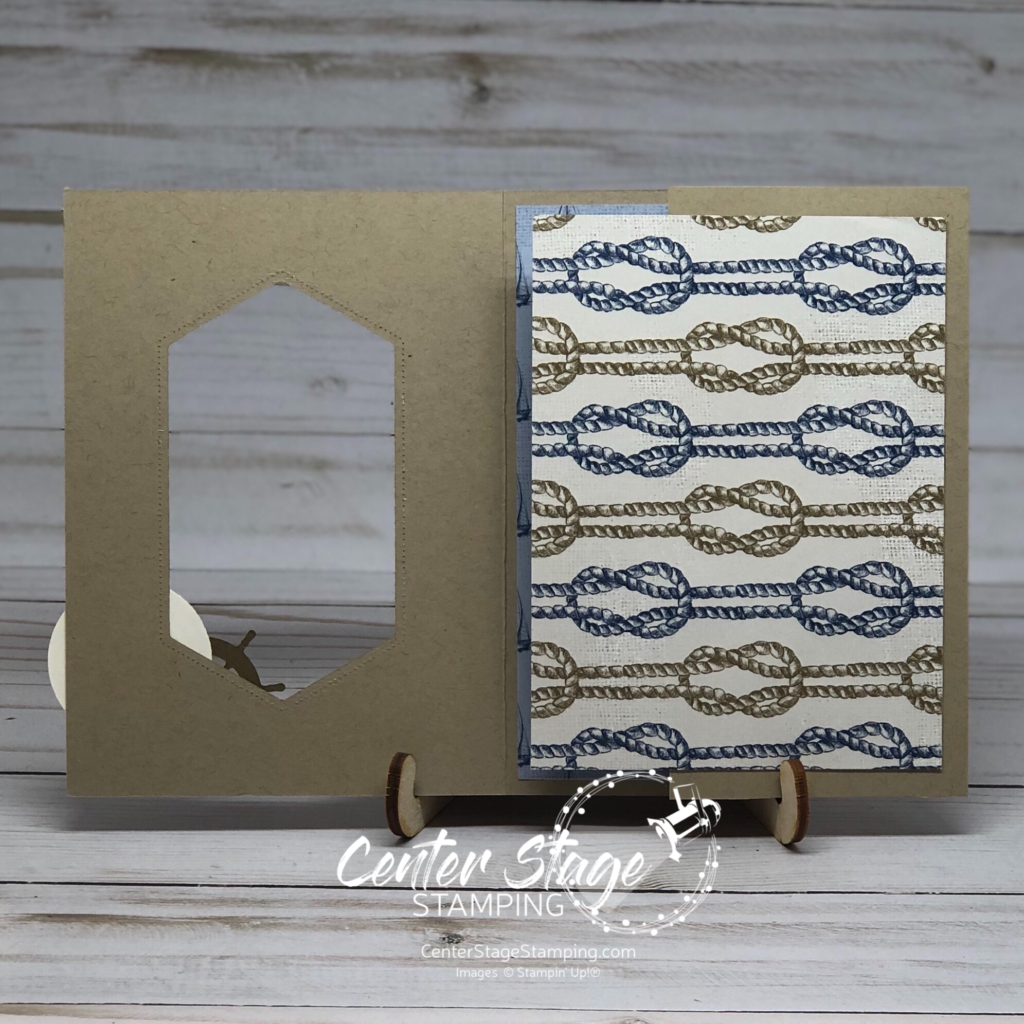
And full open:
I used the stitched label that was cut out from the front of the card as a layer for the sentiment. This card fold is such a great way to showcase gorgeous designer series papers!
Are you ready for more amazing inspiration with the Sailing Home set? I’m sending you over to the talented Ann, just click on the NEXT button below. If you like you can go back to the amazing Nikki by clicking on the PREVIOUS button. Which ever way you travel be sure to hit all of the stops along the way. So much creativity and inspiration awaits!
Thanks for stopping by. Join me again to shine a spotlight on creativity!