Annual Catalog

display samples – part 5

Today’s display samples feature the NEW Rooted in Nature stamp set.  This is a great set which offers a lot of versatility.  I love the sentiments in it.

Just for you - Center Stage Stamping

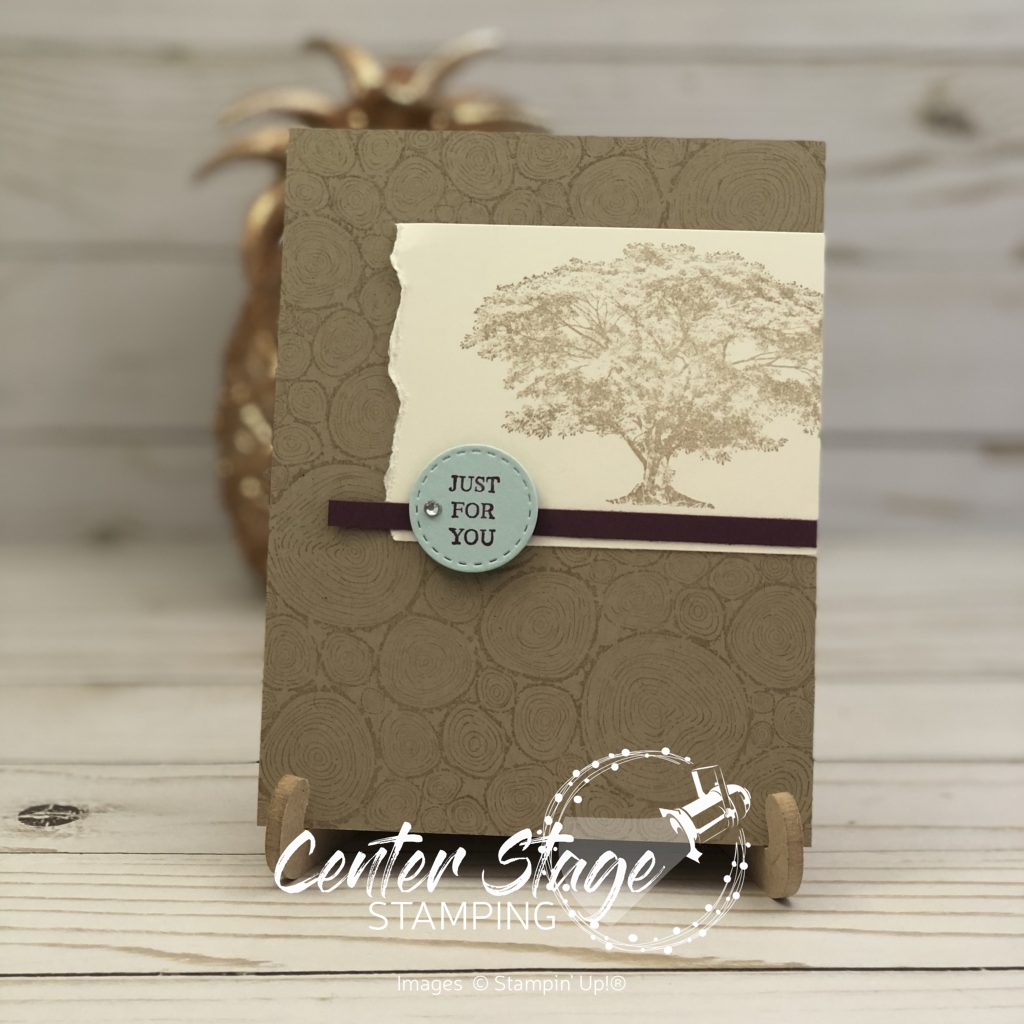
The Tree Rings background stamp pairs perfectly with this beautiful tree. I used a thin strip of Fresh Fig to ground the Vanilla Panel.  I die cut the small circle from the Stitched Label framelits in Soft Sky and stamped the sentiment in fresh Fig.

thinking of you copper - Center Stage Stamping

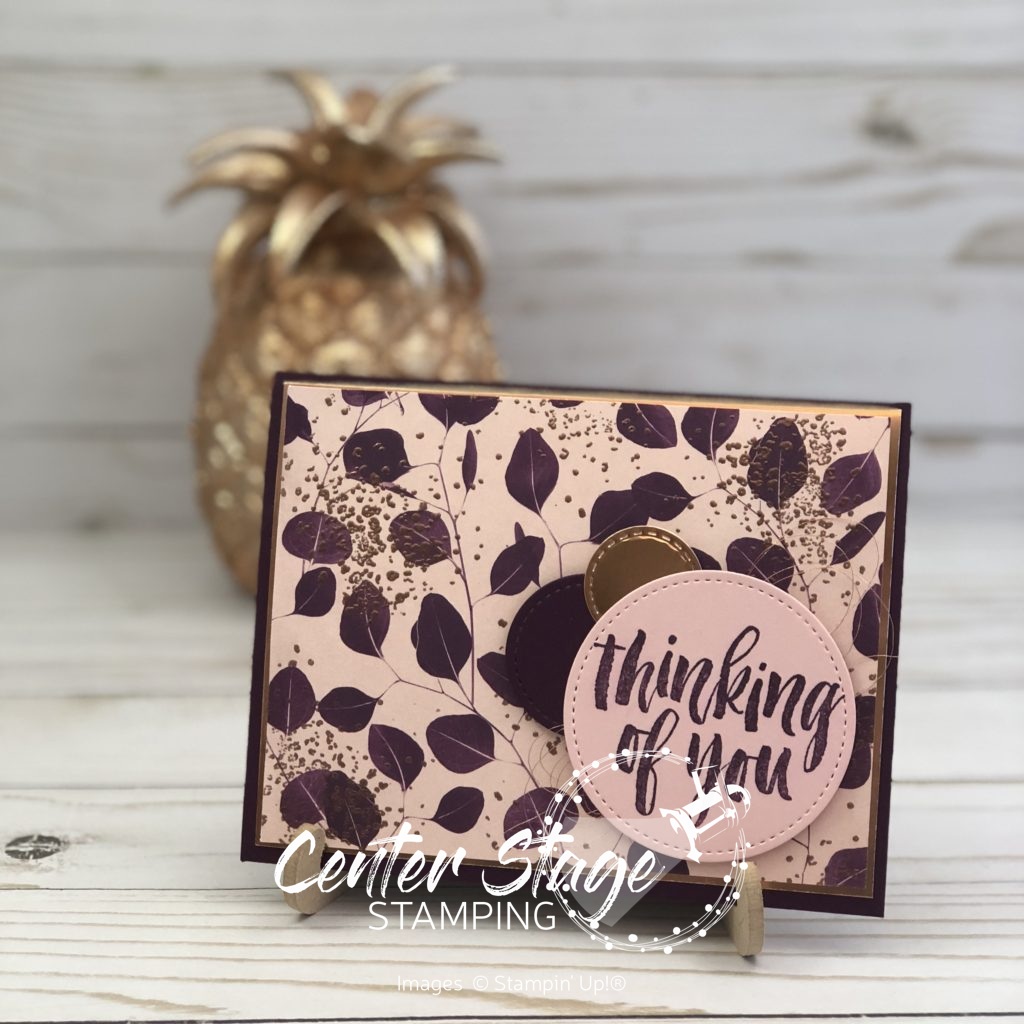
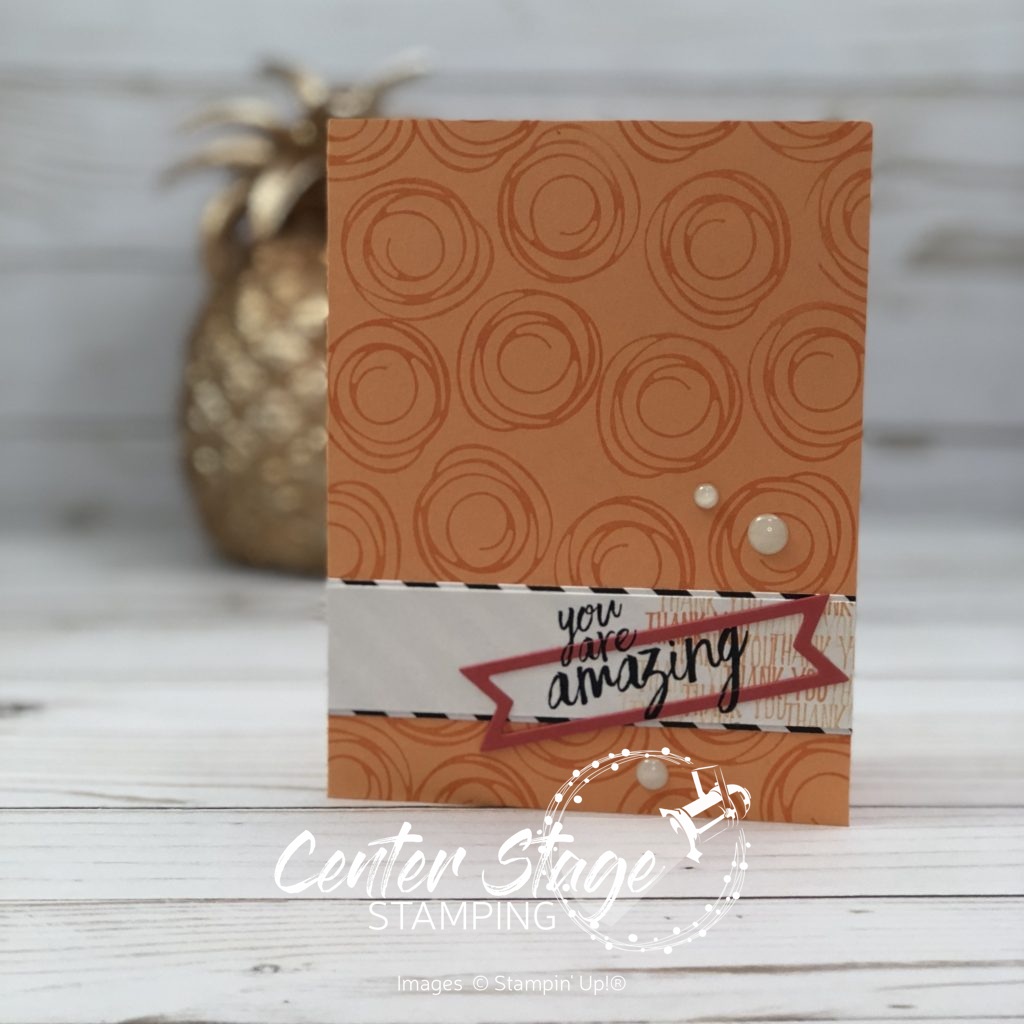
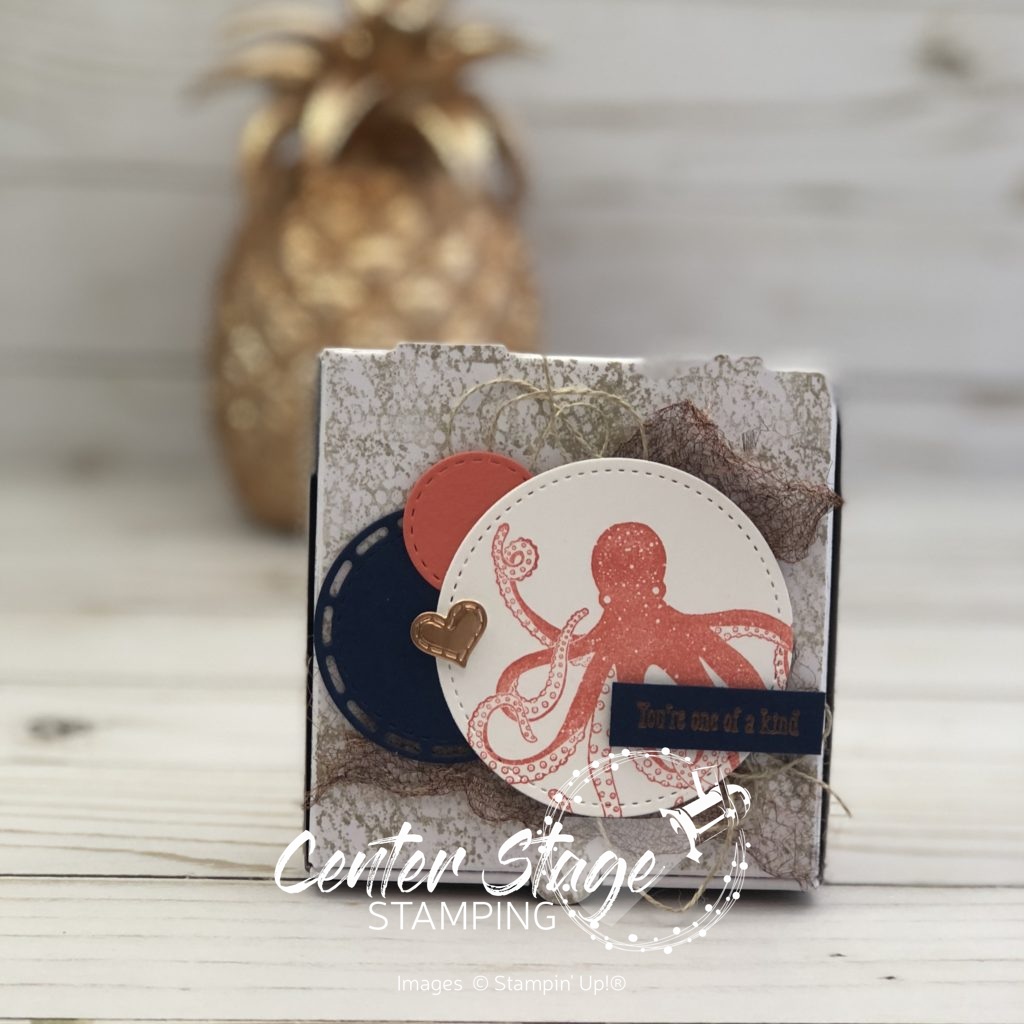
For this card, I started with a piece of the Nature’s Poem Designer Series Paper.  I stamped the splatter from Artisan Textures with Versa Mark and embossed with Copper embossing powder. The Circles are from the Stitched Shapes and Stitched Labels framelits.  I love the little bit of copper accents with Powder Pink and Blackberry Bliss.  I’m happy Blackberry Bliss is joining the core color line with the new catalog!

For You - Center Stage Stamping

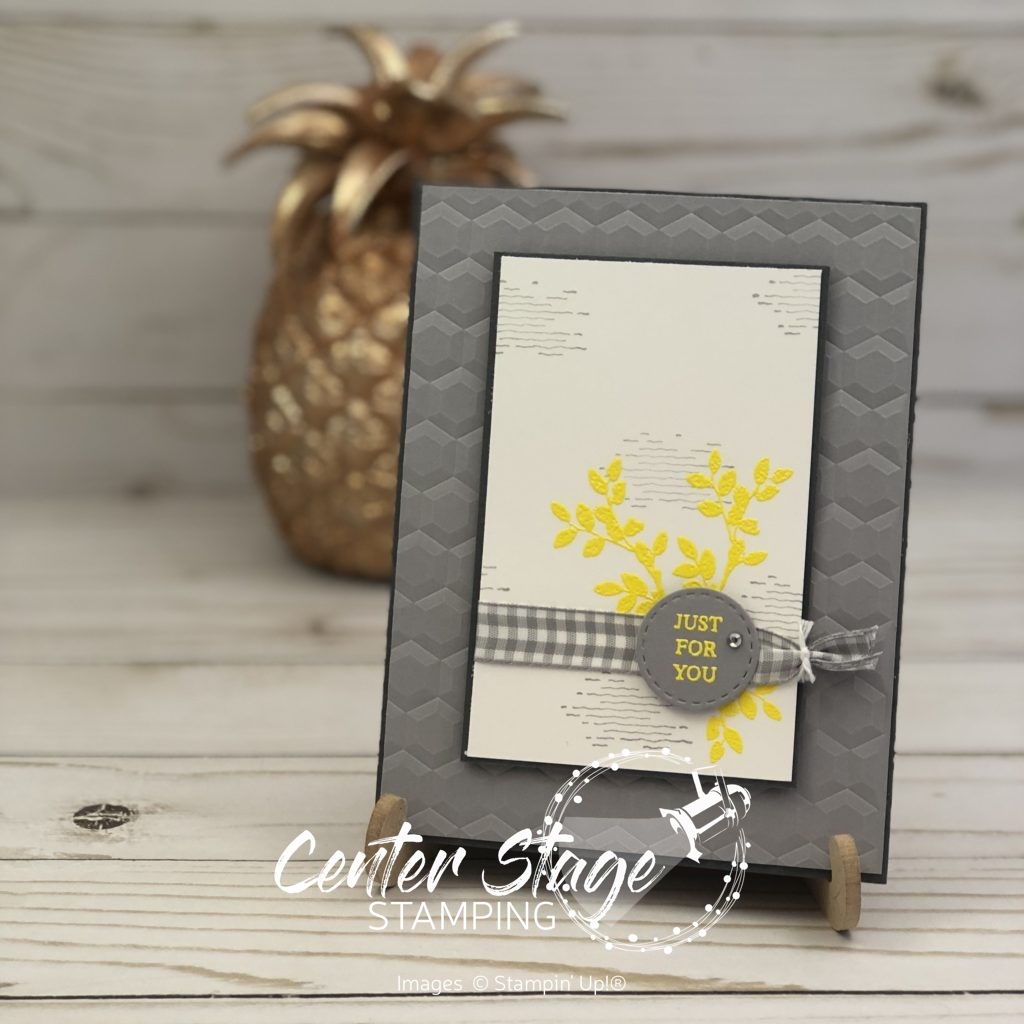
I love gray and yellow together.  The leaves are embossed with the new Pineapple Punch embossing powder.  Pineapple Punch is one of the new In Colors for 2018.  Such a bright cheerful yellow.  I used the lines from Artisan Textures to help break up the white space.

Thanks for stopping by! Happy Stamping!

-Mary


Share with your friends:

display samples – part 4

I’m back with a few more samples with the Artisan Textures stamp set.  This set is great for making your own designer background paper.

Thanks-  Center Stage Stamping

My color scheme for this card is Whisper White, Lemon Lime Twist and Pool Party.  I used All Things Thanks stamp set for the sentiment panel.

Beautiful Blessing- Center Stage Stamping

Why not use a stamp to color with?  I started with a piece of Petal Passion Designer Series Paper, which is just black and white.  I added Melon Mambo, Crushed Curry and Pear Pizazz with one of the stamps in the Artisan Textures set.  Coloring made simple.  I stamped the sentiment in white craft ink on a die cut from the Stitched Labels Framelits and added some doilies to finish it off.

just for you bag - Center Stage Stamping

This little treat bag started as a plain envelope!  I hope to do a quick tutorial post on this next week.  Again, I stamped the background, this time using Bermuda Bay, Sweet Sugarplum and Lemon Lime Twist.  The two circles are die cuts from the Stitched Labels Framelits.  The sentiment is for the NEW Rooted in Nature set. (I will have samples featuring that set tomorrow.) .

Thanks for stopping by!  Happy Stamping!

-Mary

Share with your friends:

display samples – part 3

Wow, what a weekend.  It’s the middle of April, and this weekend when had a two day blizzard that dumped 15+ inches. of. snow.  Seriously. I’m not joking.

This was the view from my deck early Saturday afternoon.  It just kept coming. It snowed all day Saturday and all day Sunday.  At times we couldn’t even see across the street!  I am so over this.  I just want sun and warmth.  I want to wear my sandals and go out in just shirt sleeves.  I don’t want to feel cold any more.

At least today’s Display Samples are bright and cheerful.  These creations feature the Artisan Textures stamp set.

Wonderful you - Center Stage Stamping

This first card I used the paint swatch stamp in Bermuda Bay, Pool Party and Lemon Lime Twist to creat a fun background.  I stamped the line image in Basic Black for some contrast.  The sentiment is from the Rooted in Nature stamp set. (another new set.  more samples of that coming later.)

You are amazing - Center Stage Stamping

On this card, I stamped several of the images in a cluster as a background for the sentiment.  I used a strip from the Petal Passion Designer Series Paper and stamped various words from the Thoughtful Banners stamp set.  This is a great card to let someone know you think they are amazing!

Amazing You - Center Stage Stamping

Today’s last cardagain uses the Artisan Textures images for a fun back ground.  Colors are Tranquil Tide, Fresh Fig and Crumb Cake.  I added some Embossing Paste with the brick stencil to add some more texture behind the Celebrate You Thinlit die cuts.  I added more texture from a bit of Linen Thread tied on the “amazing” and by stapling the “You” to the crumb cake panel.

Be sure to check back for more creations to build your anticipation for this great new set!

Thanks for stopping by! Happy Stamping!

-Mary

Share with your friends:

Inky Friends Blog Hop

I am interrupting my display samples to join my Inky Friends in another blog hop.  This time we are putting the retiring 2016-18 in colors in the spotlight: Dapper Denim, Peek-a-boo Peach, Flirty Flamingo (Will becoming part of the core color line!), Emerald Envy, and Sweet Sugarplum.  We have some fun projects showing off these colors, so make sure you follow the blog hop for all the inspiration!  You may have come here from the talented Tanya or from the Sensational Shelley if you are traveling backwards through the hop.


I am putting Peek-a-boo Peach in the spotlight.  I love how fresh and fun this color is.

You are Amazing - Center Stage Stamping


This card uses Swirly Bird and All Things Thanks stamp sets. I used the small swirl to create a fun background.  The banner die cut is a fun way to highlight part of the sentiment.

Floral Hello - Center Stage Stamping

I love Peek-a-boo Peach with the Wood Textures Designer Series Paper.  The dainty flowers of the Floral Sentiments set help showcase this great color.

I hope you are inspired to give Peek-a-Boo Peach a little love.  Make sure you continue through to all the blogs in our hop for more great color projects!

Thanks for stopping! Happy Stamping!

-Mary


Share with your friends:

display samples – part 2

Well, it feels like spring may have actually arrived.  Today it’s supposed to be 50 degrees out.  But, it is just a dream.  There is a storm a brewin’ and we are expected to get 4+ inches – of SNOW!  Come on.  It is the middle of April for cryin’ out loud.  I can’t take this any more.  I think I’m heading South, to a beach… Oh yeah, I can’t.  I have a play going into performances next week.  Sigh.  Guess I’ll have to settle for looking at my display samples for Sea of Textures and use my imagination.

Sea of Textures- Center Stage Stamping

This card used just about every stamp in the set.  I sponged Pool Party around the edges of the panel and added some of the clear epoxy shapes to complete the underwater feel.  I stamped the net and distressed the crumb cake panel and wrapped it with linen thread.

I kept this same feel for this next project.

One of a kind treat box - Center Stage Stamping

I started with one of the pizza boxes and stamped it in Crumb Cake.  The octopus is stamped on one of the Stitched Shapes Framelits circles.  The other die cuts are from the Stitched Labels Framelits. Sentiment is embossed in copper on a Night of Navy die cut.  I pulled apart some of the Copper Trim to get the netting look and finished off with a bit of linen thread.

I’m off to dream of sunshine, beaches and warmth. Thanks for stopping by! Happy Stamping!

-Mary


Share with your friends:

display samples – part 1

I am excited to share my display stamping creations with you! Let’s start with some ideas for the new set, Sea of Textures.  I’ll admit this took me WAY out of my comfort zone.  This set sat on my desk for three weeks before I made anything.  I would stare at it thinking “what am I supposed to do with that?”  But, I love a challenge and soon the ideas started coming.

I started pretty simple with this first card.  I did a quick water color wash on water color paper in pool party. Next I stamped the octopus in Calypso Coral and fussy cut him out. (There are coordinating dies coming!   Making it much easier to cut this guy out.)  Next I gave him a little sign to hold.  Finished off the card with some linen thread and a few of the clear epoxy shapes.

Sea of Textures - Center Stage Stamping

For this next card , I once again fussy cut that octopus out.  (Again, wish I had the dies!) I thought having one tentacle coming out of the circle fit with the sentiment.  Pool Party and Tranquil Tide pair well for a watery feel.  Reach out - Center stage Stamping

This next card I went for a very different look.  I used Stampin’ Write markers to color the various color stripes directly on the stamp.

Sea of Texture - Center Stage Stamping

Bermuda Bay and Lemon Lime Twist help this card to really pop.  Notice that little die cut the sentiment is on?  That is from the new Stitched Label Framelits!  If you look closely at the Lemon Lime Twist panel, you can see it is embossed with the new Maps Etc. Dynamic Textured Impressions folder.

Thanks for stopping by! Make sure you come back soon, I have 18 more projects to share. Happy Stamping!

-Mary


Share with your friends:

friends, fun, fabulous

What a fantastic weekend!  Stampin’ Up! On Stage Milwaukee was a blast! I had a great weekend with great friends.  Stamping friends are the best!

Great celebration for Stampin’ Up!’s 30th anniversary.  I can’t wait for the BIG Celebration in November in ORLANDO!

I was blessed to be chosen as a Display Stamper for Milwaukee.  Stampin’ Up! sent a box of stamps, paper and accessories form the NEW catalog and I made samples to help inspire other demonstrators.  I will be sharing my creations here over the next few weeks.  Make sure you check back to see them all!

Big high light of the weekend is getting the NEW 2018-19 catalog!!  Oh. My. Word! So much fun coming!  I can’t wait to get my hands on new goodies and start creating! 

Thanks for stopping by! Happy Stamping!

-Mary

Share with your friends:

Birthday Cupcake

Hey, Hey, It’s my Birthday!  On the sad side, it is the first birthday I don’t have any of my kids around. On the happy side, I am going to Chanhassen Dinner Theatre tonight to see Newsies!  Going to see a show is the perfect birthday celebration for me!  Brett and I celebrated last night with a pre-birthday dinner at Zella’s (Local Restaurant).  They even brought me a red velvet birthday cupcake, complete with candle!  I don’t remember the last time I actually had a candle to blow out. It was very tasty! (And, they DIDN”T sing at me.  Bonus!)

The past two months, I have focused a lot on sharing Sale-a-Bration and Occasion catalog stuff, and have made some very fun birthday projects.  But let’s not forget the great sets in the Annual catalog.  In honor of the delicious treat above, I thought I would share two cards using one of my favorites: Sweet Cupcake.

Birthday Cupcake - Center Stage Stamping

I love the simplicity in this one.  It really lets the cupcake stand out.  Flirty Flamingo makes for some great looking frosting!

I really stepped things up for this next card.

Cupcake Wish- Center Stage Stamping

I love all the little details on this one. The coordinating framelits really help make this card extra special.

Sweet Cupcake- Center Stage Stamping

Is it strange that I really don’t want to give these two away.  Can I give myself a birthday card?  I’ve bought myself a birthday present before – so, Why not! Thanks for stopping by!  Happy stamping!

-Mary


Share with your friends:

Hidden Gems Blog Hop

I’m back with my Inky Friends for another Blog Hop.  This time we are featuring Hidden Gems – sets that are often overlooked in the annual Stampin’ Up! calendar. Be sure to make your way through all of the stops on our hop.  You may find a new favorite set or two along the way.

I am featuring Celebration Time.  This set is a lot of fun for birthday projects and the coordinating framelits add to it’s versatility.

Celebration Time - Center Stage Stamping

This first project has a very classy look thanks to the silver stripes from the Sale-A-Bration Springtime Foils Specialty DSP.  The black panel is embossed with the Petal Pair Textured Impressions embossing folder.  I couldn’t get it to photograph well.  I cut out the cake framelit in silver and white (which had been stamped with the sentiment).  I trimmed off the bow and base on the white and layered it on the silver.  A paper doily, some silver sequin trim and a few rhinestones finish off this elegant card.

Celebration Time - Center Stage Stamping

For this next card, I played around with some watercoloring.  I started with a wash of Pool Party on panel of watercolor paper.  Once it was dry, I stamped “celebrate” in Calypso Coral.  I flicked some Bermuda Bay ink from my aquapainter for a little more depth.  For the cake I cut out the framelit in Pool Party and Watercolor paper. I Slowly built up layers of Calypso Coral to create the ombre look on the cake.  The little flower is actually on of the pieces for the top of the party hat. There are also a few of the clear epoxy shapes scattered on the card.  Simple, but fun!

Celebration Time - Center Stage Stamping

This time I decided to focus on some of the bolder images in the set.  Pair them with Lemon Lime Twist and Tempting Turquoise and you have a bold, fun card.  This flower was created using both of the tops for the party hat.

Celebration Time Tags - Center Stage Stamping

For my final project, I made some fun gift tags.  I hope you see what a great set Celebration Time is.

Celebration Time - Center Stage Stamping

I now send you over to Mickey Roberts  featuring Pocket Full of Sunshine. Don’t forget to check out all of the other great sets along the hop.  Or you can click on the previous button and go to Sharleen and her Jar of Love.

Share with your friends:

Canvas Stamping

Sometimes I branch out from making cards and the rare scrapbook page. Every once in a while I get inspired to create a home decor piece.

Breathe Canvas - Center Stage Stamping

For this project, I started with a 4 inch square canvas.  I did a water color wash with Soft Sky ink across the canvas.  Next I stamped the branch and flowers from the Colorful Seasons stamp set.  It is difficult to get a full image on the canvas because of the edge of the wood under the canvas, but don’t worry.  Next I went over the stamping with my aqua painter to bleed out the image and get more of a water color look.  I stamped “breathe” in black memento ink and traced over it with a Black Journaling Pen to fill in the gaps on the canvas.  a few Rose Red die cut flowers with Crushed Curry baker’s twine knots.  A bit of Linen Thread wrapped around the canvas finishes it off.  All in all, this project came together really quick.  The most time was waiting for the initial water color wash to dry.

Thanks for stopping by! Happy Stamping!

-Mary

Share with your friends: