• Center Stage Stamping

Inky Friends DC 4

I’m back with my Inky Friends for another design challenge. This time it’s a color scheme found on page 79 of the 2017-18 Annual Catalog.

This one had me stumped for a bit.  I rarely use Marina Mist or Blushing Bride. But, I like a challenge and it is good to step out of your comfort zone occasionally.  After some thought, I settled on this:

Lavender Thank You - Center Stage Stamping

I used Lots of Lavender set with the addition of Basic Gray for the outline and sentiment.   Stop by the Inky Friends blog and see what the other designers created with this color scheme.  There really is a lot you can do with it!  Then play along and share your creation.

Thanks for stopping by!  Happy Stamping!

-Mary

Heartfelt Blooms

With just ten days of Sale-a-Bration left, I wanted to share some of the other projects I have made – ones that do not use Party Pandas.  (What can I say, they are sooooo cute.) Today I have a card I made with the Heartfelt Blooms set.  This set is AMAZING!  It has a photorealistic look.

Heartfelt Thanks - Center Stage Stamping

A fairly simple card looks very detailed with this set.  I colored the Pearls with the light Rich Razzleberry Stampin’ Blends and went over them with the light Smoky Slate to get a color close to Sweet Sugarplum.  The ribbon is from the Sale-a-Bration Ribbon pack.  This card would be great for a lot of different occasions.

Thanks for stopping by! Happy Stamping!

-Mary

Birthday Cupcake

Hey, Hey, It’s my Birthday!  On the sad side, it is the first birthday I don’t have any of my kids around. On the happy side, I am going to Chanhassen Dinner Theatre tonight to see Newsies!  Going to see a show is the perfect birthday celebration for me!  Brett and I celebrated last night with a pre-birthday dinner at Zella’s (Local Restaurant).  They even brought me a red velvet birthday cupcake, complete with candle!  I don’t remember the last time I actually had a candle to blow out. It was very tasty! (And, they DIDN”T sing at me.  Bonus!)

The past two months, I have focused a lot on sharing Sale-a-Bration and Occasion catalog stuff, and have made some very fun birthday projects.  But let’s not forget the great sets in the Annual catalog.  In honor of the delicious treat above, I thought I would share two cards using one of my favorites: Sweet Cupcake.

Birthday Cupcake - Center Stage Stamping

I love the simplicity in this one.  It really lets the cupcake stand out.  Flirty Flamingo makes for some great looking frosting!

I really stepped things up for this next card.

Cupcake Wish- Center Stage Stamping

I love all the little details on this one. The coordinating framelits really help make this card extra special.

Sweet Cupcake- Center Stage Stamping

Is it strange that I really don’t want to give these two away.  Can I give myself a birthday card?  I’ve bought myself a birthday present before – so, Why not! Thanks for stopping by!  Happy stamping!

-Mary


Eclectic Birthday

Sale-a-Bration is soon coming to an end, and I realized that there are several sets I haven’t played with yet.  I had better get to work!   Today’s card is a quick and easy birthday greeting with the Eclectic Expressions Sale-a-Bration set.   This card size is 3 1/2″ x 5 1/2″.  Color scheme is Bermuda Bay, Lemon Lime Twist and Pumpkin Pie.

Eclectic Expressions - Center Stage Stamping


I love the style of this set.  It can be used for great backgrounds or as a focal point.  I definitely need to create more with this one.

Thanks for stopping by! Happy stamping!

-Mary

Panda Birthday

I have another Party Pandas card to share with you. I seriously can not get enough of these little guys.  They are so cute!

Party Panda - Center Stage Stamping

I like how the little panda is partly off the panel.  Looks like he is stretching up with his balloon.  I stamped the balloon on Lemon Lime Twist, stamped the confetti image in it and fussy cut it out.  It is popped up on a mini dimensional.  The main Lemon Lime Twist card base is embossed with the Oh My Stars embossing folder.  A strip from the Picture Perfect DSP stack helps set off the image panel.  What a cheerful birthday greeting!

Sale-a-Bration is almost over – don’t miss your chance to get these adorable Pandas (or any of the other great Sale-a-Bration items) for FREE with a qualifying purchase.  You can hop on over to my Stampin’ Up! store from the pull down tab at the top of this page and grab yours today!

Hidden Gems Blog Hop

I’m back with my Inky Friends for another Blog Hop.  This time we are featuring Hidden Gems – sets that are often overlooked in the annual Stampin’ Up! calendar. Be sure to make your way through all of the stops on our hop.  You may find a new favorite set or two along the way.

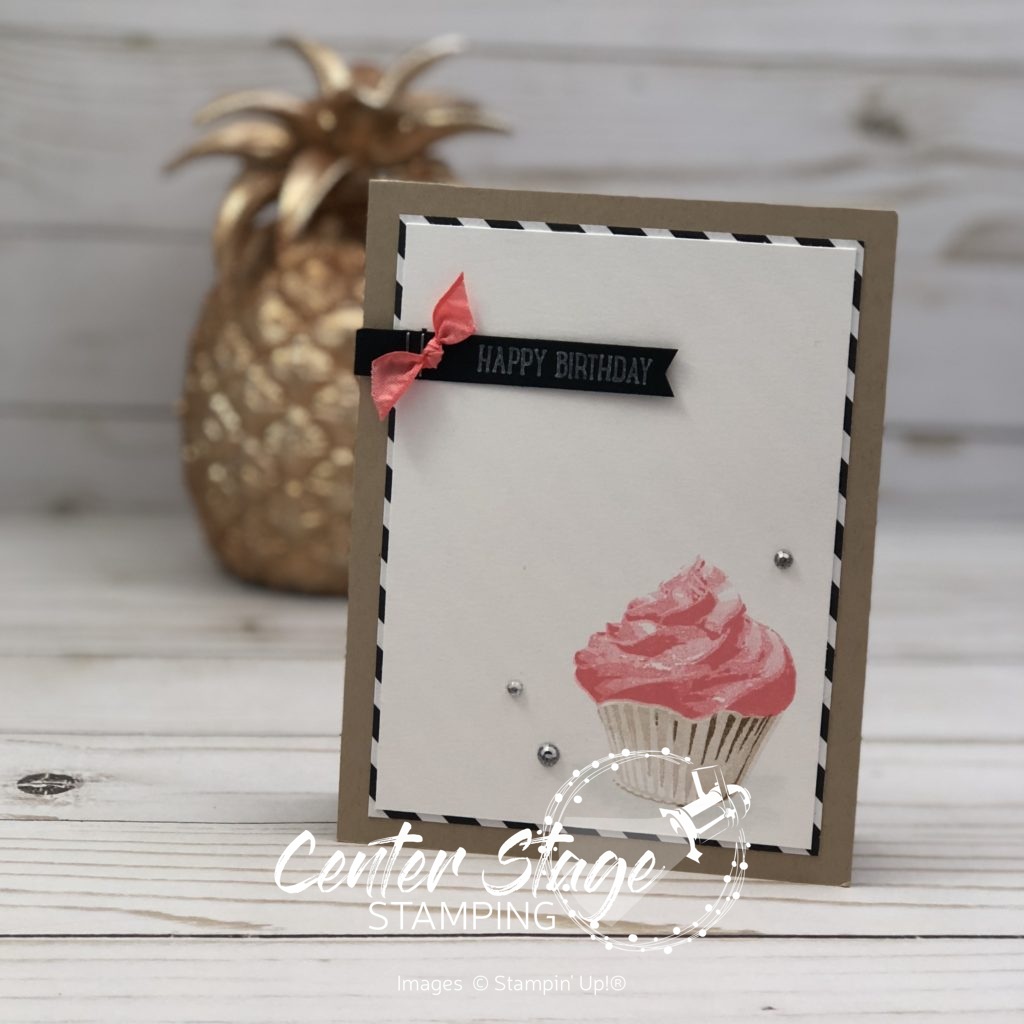
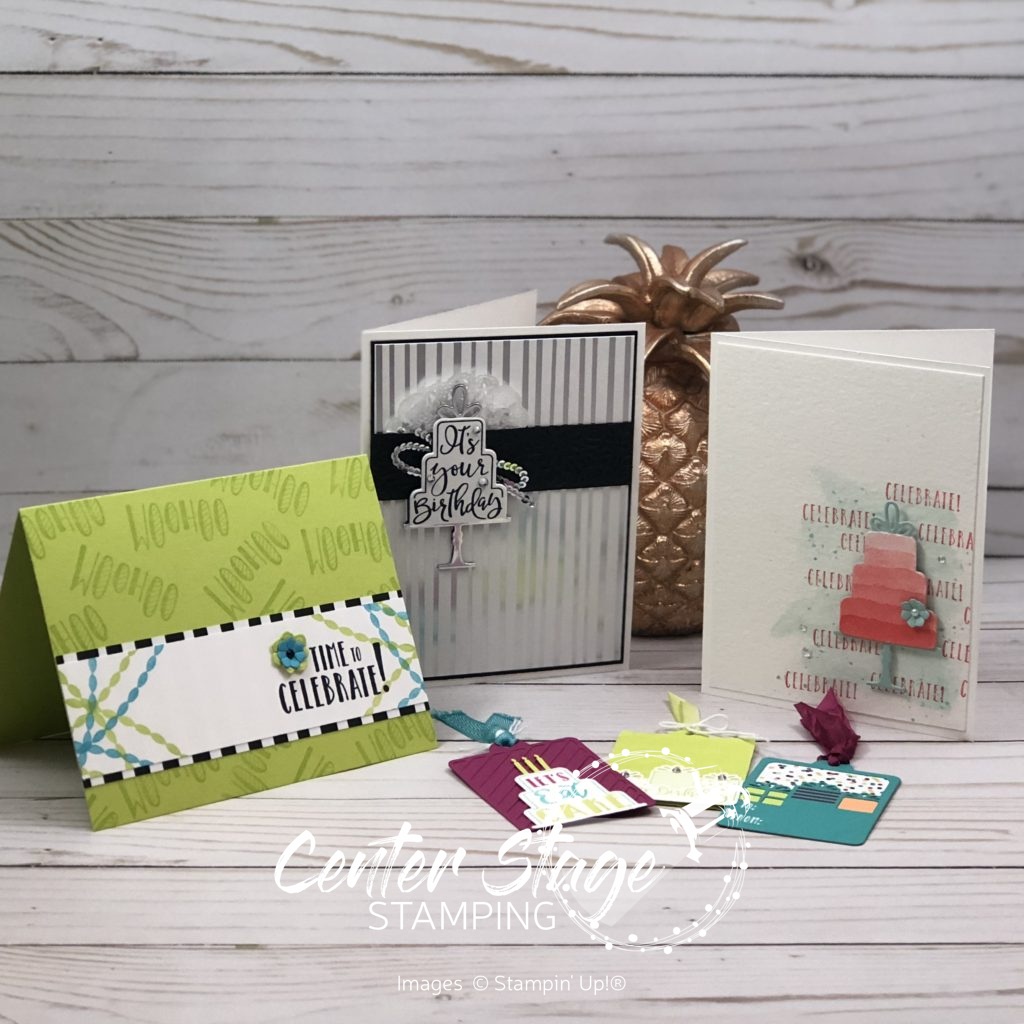
I am featuring Celebration Time.  This set is a lot of fun for birthday projects and the coordinating framelits add to it’s versatility.

Celebration Time - Center Stage Stamping

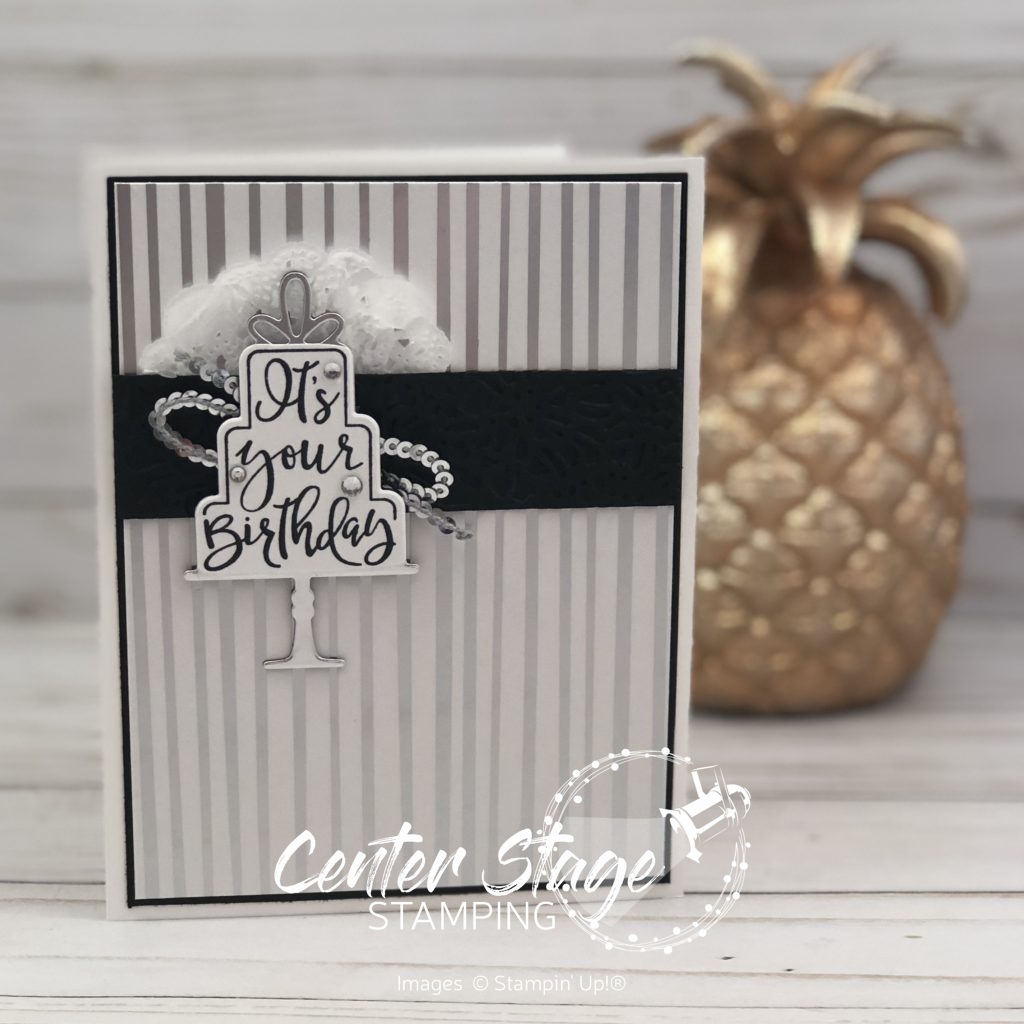
This first project has a very classy look thanks to the silver stripes from the Sale-A-Bration Springtime Foils Specialty DSP.  The black panel is embossed with the Petal Pair Textured Impressions embossing folder.  I couldn’t get it to photograph well.  I cut out the cake framelit in silver and white (which had been stamped with the sentiment).  I trimmed off the bow and base on the white and layered it on the silver.  A paper doily, some silver sequin trim and a few rhinestones finish off this elegant card.

Celebration Time - Center Stage Stamping

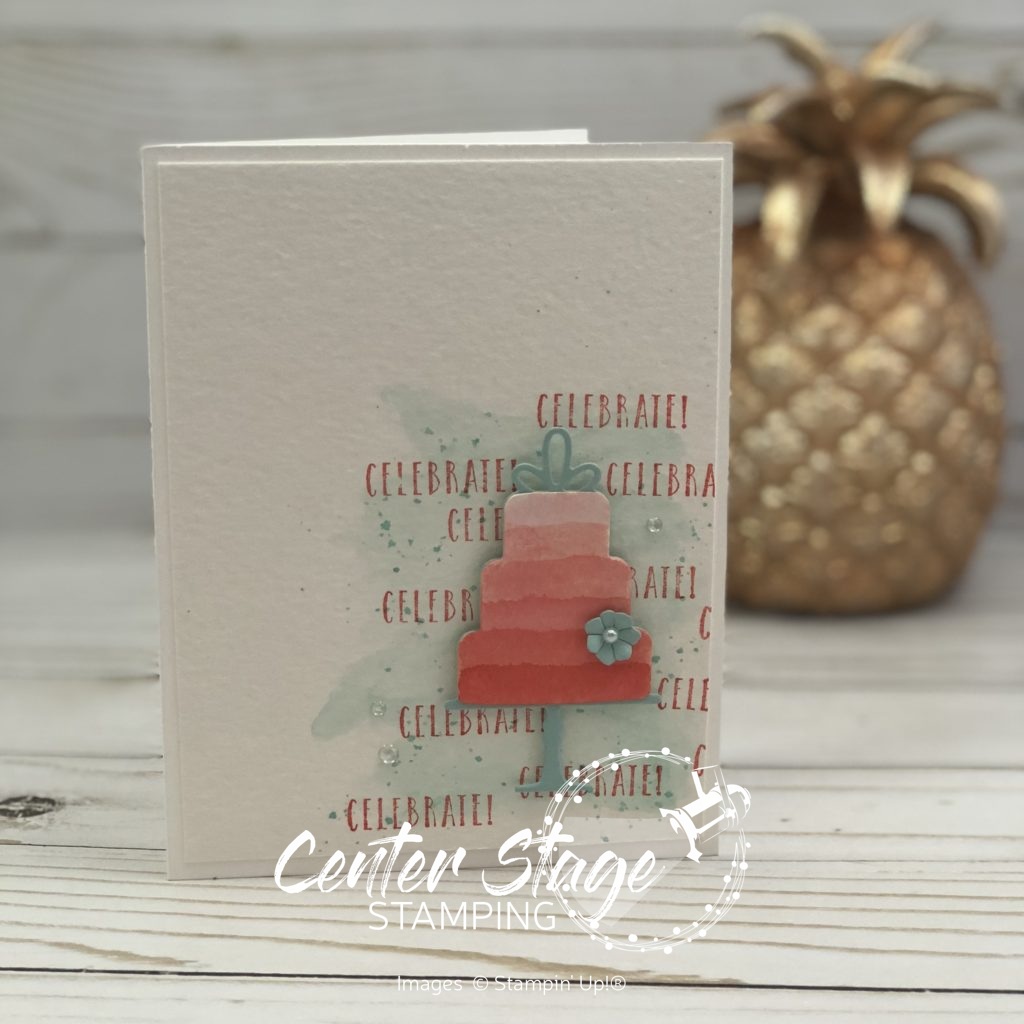
For this next card, I played around with some watercoloring.  I started with a wash of Pool Party on panel of watercolor paper.  Once it was dry, I stamped “celebrate” in Calypso Coral.  I flicked some Bermuda Bay ink from my aquapainter for a little more depth.  For the cake I cut out the framelit in Pool Party and Watercolor paper. I Slowly built up layers of Calypso Coral to create the ombre look on the cake.  The little flower is actually on of the pieces for the top of the party hat. There are also a few of the clear epoxy shapes scattered on the card.  Simple, but fun!

Celebration Time - Center Stage Stamping

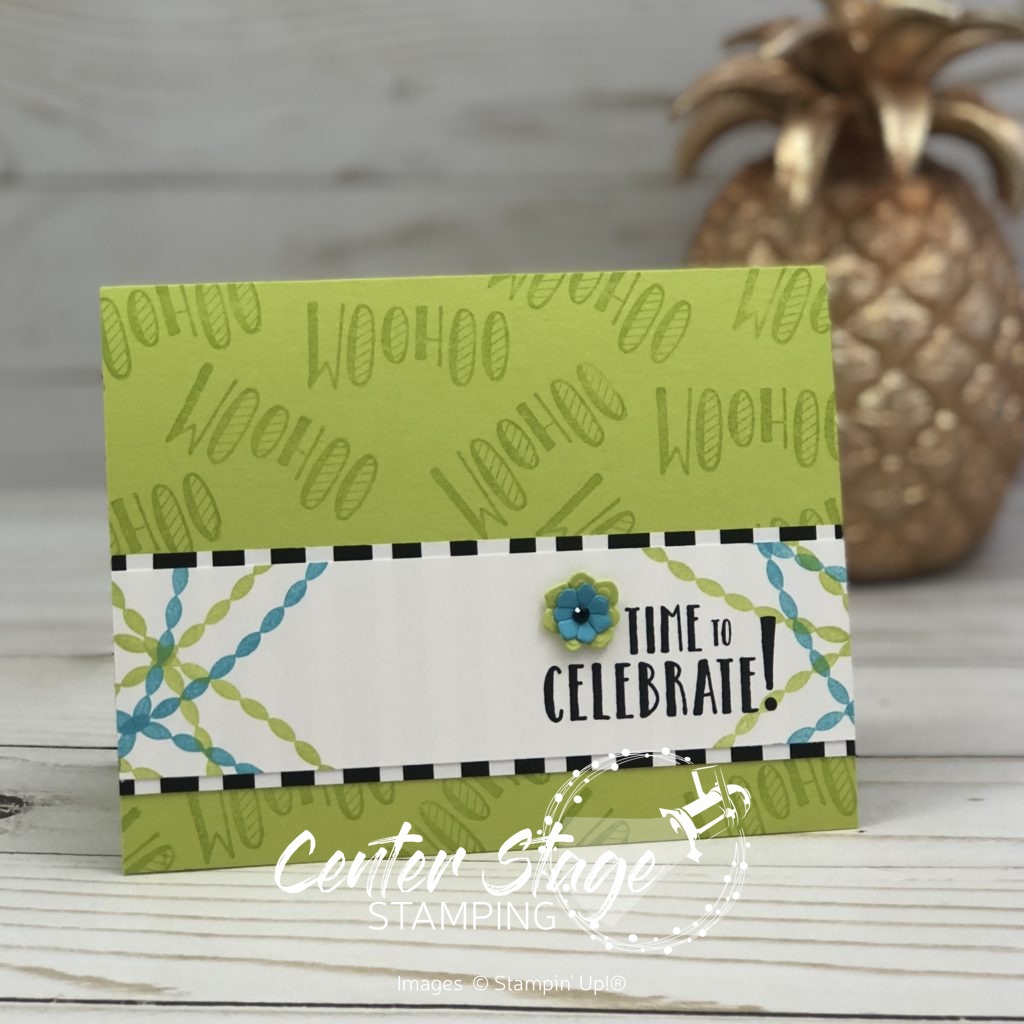
This time I decided to focus on some of the bolder images in the set.  Pair them with Lemon Lime Twist and Tempting Turquoise and you have a bold, fun card.  This flower was created using both of the tops for the party hat.

Celebration Time Tags - Center Stage Stamping

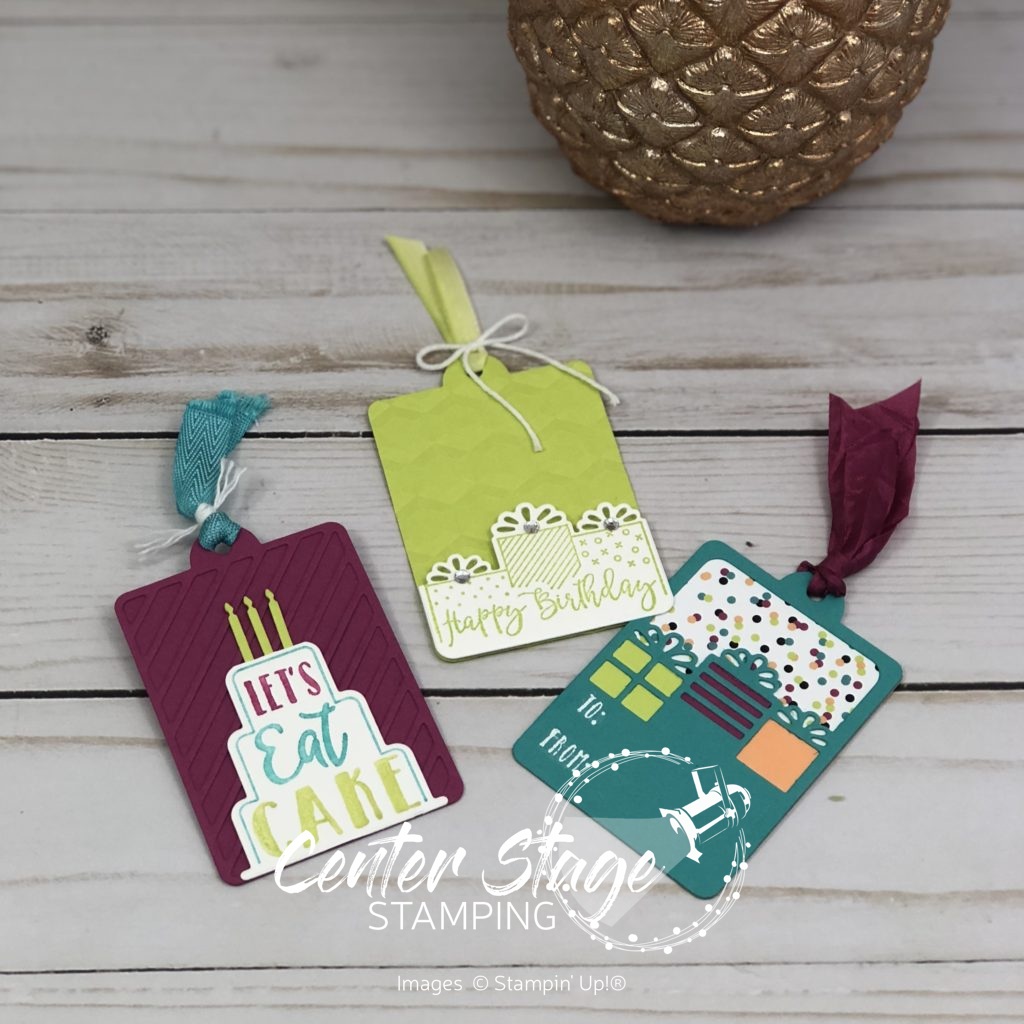
For my final project, I made some fun gift tags.  I hope you see what a great set Celebration Time is.

Celebration Time - Center Stage Stamping

I now send you over to Mickey Roberts  featuring Pocket Full of Sunshine. Don’t forget to check out all of the other great sets along the hop.  Or you can click on the previous button and go to Sharleen and her Jar of Love.

You’re Grand

Sharing one last project with the Truly Tailored Suite today.  How about a little treat box filled with goodies to let someone know how “grand” they are.

Grand Day - Center Stage Stamping

I started with on of the adorable little pizza boxes.  I sponged Night of Navy all over it and let it dry over night.  I layered the DSP and stamped image on top.  I created the bow tie by punching out a piece of DSP with the Tailored Tag punch and cutting it in half and adding the tiny center piece. A couple of True Gentleman buttons finish off the box.  And then I had to find the perfect treat to put inside –

Grand Day - Center Stage Stamping

100 Grand bars, of course (three will fit nicely in this little box).

Make sure you stop by on Friday.  It’s time for another Inky Friends blog hop and we have some great projects lined up.  Thanks for stopping by! Happy Stamping!

-Mary

A Dapper Day

The title of today’s post definitely refers to the card I made, not the weather.  Freezing rain, high winds, snow coming – Yuck!  But that means more time in my studio. I have another card featuring the Truly Tailored suite.  What can I say, I was on a roll.

Dapper Day - Center Stage Stamping

I started with a Night of Navy card base and added a Navy panel I embossed with the Simple Stripes embossing folder.  I used Stampin’ Write Markers in Night of Navy, Tranquil Tide, Chocolate Chip and Crushed Curry on the sentiment stamp and cut it out with the Stitched Shapes framelits.  Finished off with a True Gentleman button and some Linen Thread.  Fun greeting for the dapper gent in your life.

Thanks for stopping by! Happy Stamping!

-Mary

Lookin’ Sharp

I was on a roll with the Truly Tailored Suite.  I finally have several masculine cards in my stash!  I saw a card similar to this one on Pinterest and knew this product suite would be great for my version.

How cool is that!?  The True Gentleman Designer Series Paper is perfect for the fabric of this shirt card.  I used the Tailored Tag punch to do the bottom of the pocket. I added one detail that you really don’t notice, but I think it makes a difference when you see the card in person.  I went over the edges of all the dsp with a Night of Navy marker to cover the white core of the paper.  I think it made it seem more like fabric.    There is a thin strip added under the buttons and at the top of the pocket to help the seams stand out.  The collar is adhered with a dimensional strip at the top (I also colored the Night of Navy to hide the white).

Thanks for stoping by! Happy stamping!

-Mary

Classy Kind of Guy

I often find it difficult to design cards for men.  I tend to like a lot of accessories and BLING!! Thankfully, the Truly Tailored Suite in the Stampin’ Up! Occasions catalog makes it so much easier to create something more masculine, like today’s card.

Truly Tailored - Center Stage Stamping

I started with two patterns from the True Gentleman designer series paper.  I just LOVE those little bow ties – so cute!  Next i stamped the image from the Truly Tailored stamp set and punched it out with the coordinating Tailored Tag punch. The image actually has a comb over, but I wanted to keep the tie theme.  So, I stamped the bow tie, fussy cut it out and adhered it over the comb.  I think a tie is a little more “classy” than a comb. The Night of Navy Corduroy Ribbon covers the seam of the two pattern papers and two Nigh of Navy enamel dots finish off the details. This card came together pretty quick, the coordinating products in the suite made it easy!

Thanks for stopping by! Happy Stamping!

-Mary