Month: October 2018

happy 21

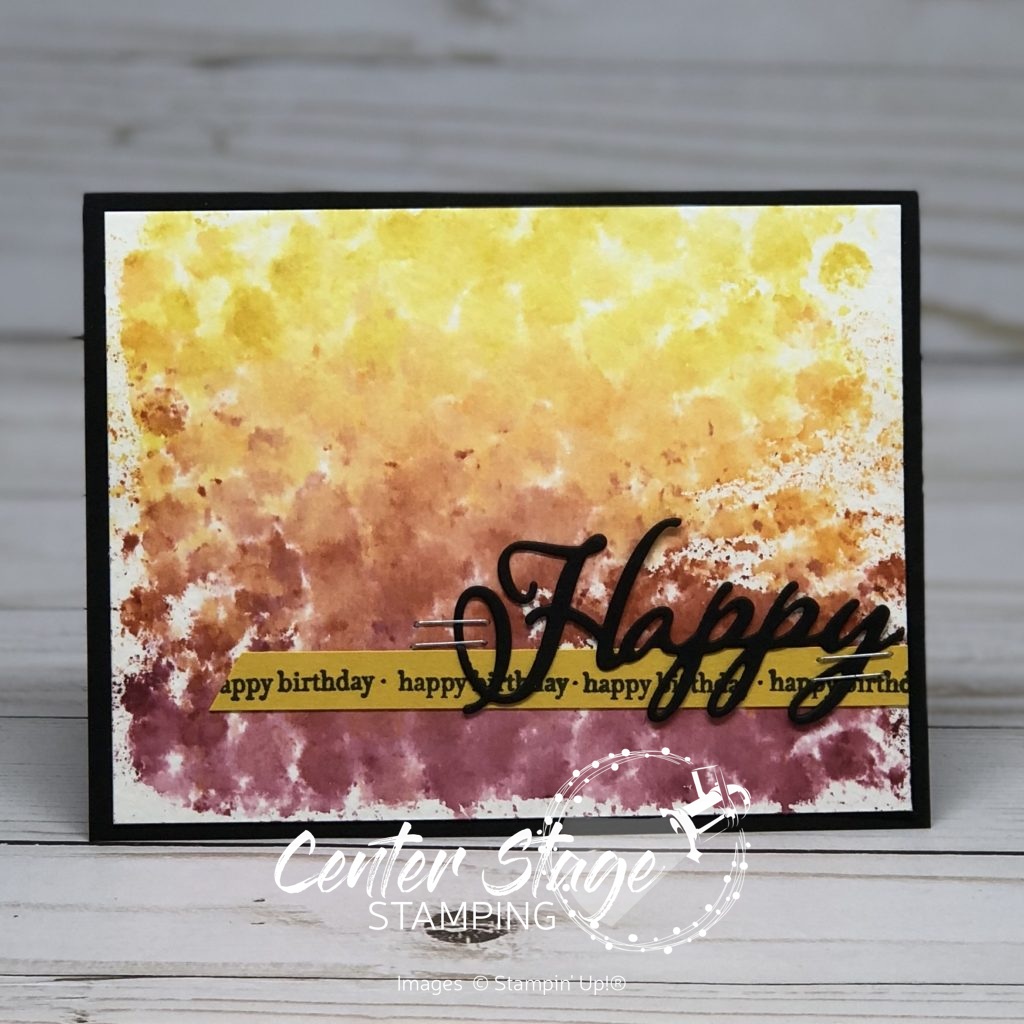
This past weekend was my daughter Rachel’s 21st birthday.  When did that happen?  21!? Life continues forward far to quickly.  I love you to the moon and back, Rachel!  I wanted to share the “card” I made for her.  She really likes pineapples, so I used that as my starting point.  I decided to make an explosion box and somehow incorporate 21 pineapples.

Rachel's Pineapple box - Center Stage Stamping

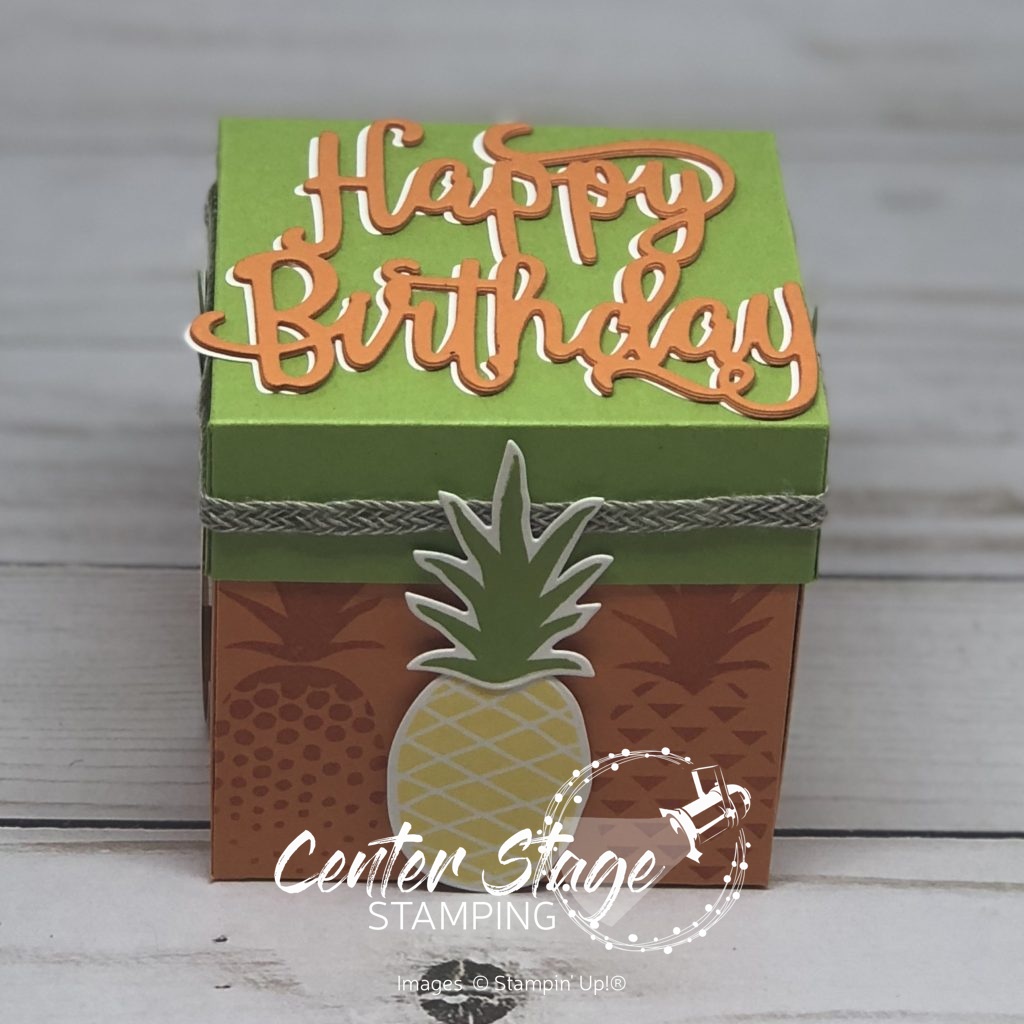
I used Concord and 9th’s Pop Art Pineapple for the 12 pineapples around the exterior of the box. They are stamped in Stampin’ Up! Pumpkin Pie ink on Pumpkin Pie card stock.  Four pineapples are stamped in Pineapple Punch and Granny Apple Green and cut out with the coordinating dies.  I added the Happy Birthday Thinlit and some Braided Linen Trim to the Granny Apple Green box top.  But what about the inside?  When I saw this folded pineapple by Martha Inchley on Pinterest, I knew I had the perfect center for the explosion box.  Thank you, Martha for sharing your pattern!!

Rachel's Pineapple box: inside - Center Stage Stamping

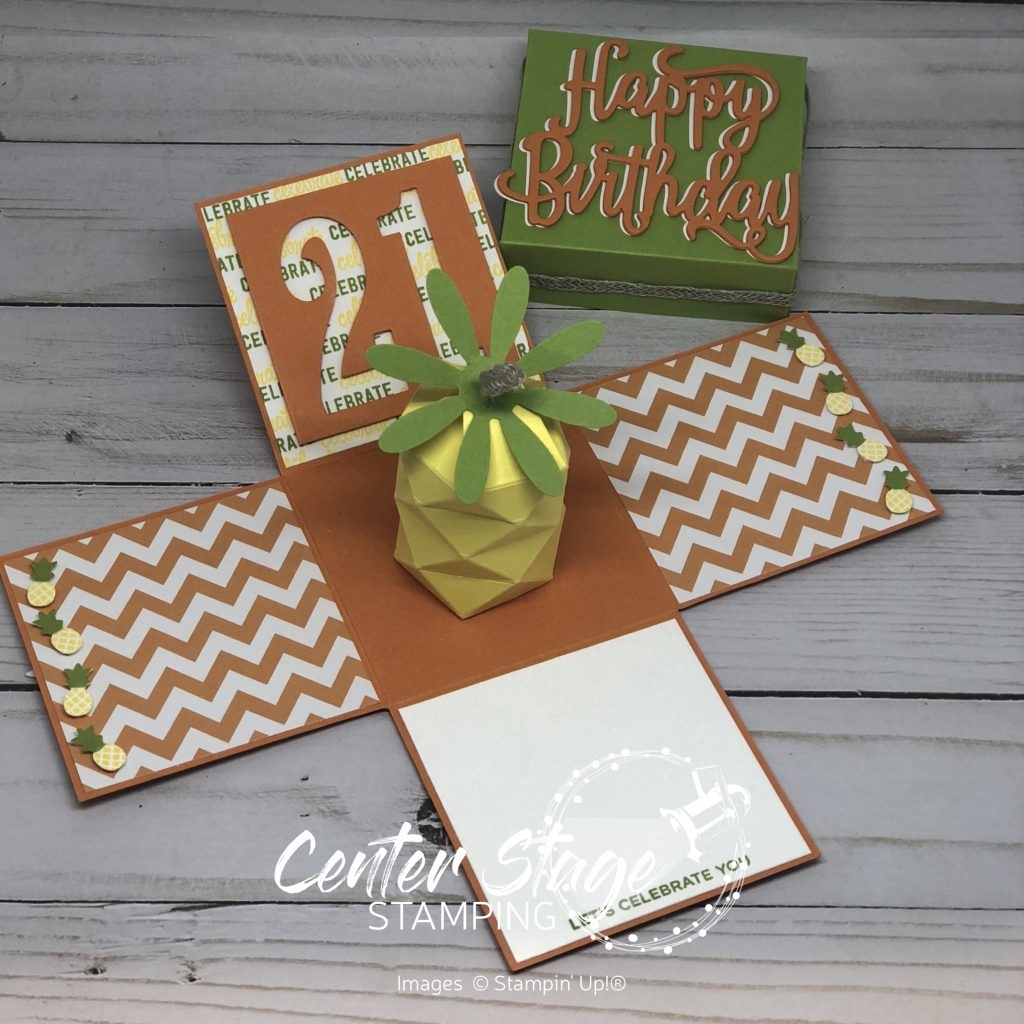
I added eight tiny pineapples in Pineapple Punch and Granny apple Green and punched out with the retired tiny pineapple punch.  I am so happy with how it turned out.  What’s more, Rachel loved it!  Thanks for stopping by! Join me again to shine a spotlight on creativity!

Share with your friends:

stamp review crew: little twinkle

It’s time for a bonus round with the Stamp Review Crew!  Join us for an inspirational blog hop shining the spotlight on Little Twinkle!  This is a very fun set and is part of the sweet Twinkle Twinkle product suite. (See what I did there?) I have previously shared a couple of cards I made with this suite.  You can see them HERE and HERE.  This time around I wanted to try something different.  I decided I wasn’t going to use the coordinating Tinkle Twinkle Designer Series Paper or similar colors – with the exception of Night of Navy.  I also wanted to see if I could come up with something other than a baby card.

Little Twinkle: Little Star - Center Stage Stamping

This card started with a White card base embossed with the Oh My Stars embossing folder.  I stamped the sentiment and stars in Night of Navy on a smaller white panel.  I used stars and dots punched from the Twinkle Builder punch in Lemon Lime Twist, Gorgeous Grape (for some reason, the Gorgeous Grape stars look Navy in the photo) and Coastal Cabana and glued them on randomly. The Take Your Pick Tool came in handy for this task!  I added a strip of Night of Navy striped pattern from the Neutrals DSP stack and tied some Night of Navy Medium Bakers Twine.  I love the bright color pops on this card.

Little Twinkle: a Star is Born - Center Stage Stamping

For this next card, I decided to have a go with my Brushos.  Would you believe I have had them since April and this is the first time I have used them!  Crazy, huh?  I started with a pice of watercolor paper.  I wet it down and sprinkled some Prussian Blue brusho on.  I moved it around with my aqua painter and added more Brusho until I got the depth of color I wanted.  Once this panel was completely dry, I stamped the small stars and embossed them in gold.  I stamped the star in Night of Navy and cut it out.  I added some Gold Foil, Gold Glimmer Paper and Gold sequin trim behind the star for  extra texture contrast. The watercolor paper panel  is layered on Gold Glimmer paper and a Nigh of Navy card base.  This would be a great card for many different occasions!

I hope now you look beyond just baby cards for this fun set.  Make sure you travel through the entire blog hop for more amazing Little Twinkle inspiration! You can head on over to Tanya or go back to Stesha and remember you can always find the full blog hop list on the Stamp Review Crew page.

Thanks for stopping by!  Join me again to put a spotlight on creativity!


Share with your friends:

inky friends: dc 11


It is time for another design challenge with My Inky Friends!  This one is based on a card layout on page 122 of the 2018-19 Stampin’ Up! catalog.  Here is my creation.

Inky Friends DC11: Dashing Deer - Center Stage Stamping

I used Dashing Deer and Detailed Deer Thinlits.  I think this is my favorite Christmas bundle in the Holiday Catalog.  The Crumb Cake card base has a Crumb Cake layer that I ran through the Corrugated Dynamic Textured Impressions Embossing Folder.  The sentiment is from Merry Christmas to All.  I colored it and the swag with Cherry Cobbler, Mossy Meadow and Crumb Cake markers to get the multi color images.  It is hard to see in the photo, but the Cherry Cobbler circle was stamped with the Burlap background stamp before I cut it out with the Stitched Shapes circle.  I finished off with a few strips of Festive Farmhouse designer series paper and some Linen Thread.

Make sure to check out what the rest of the design team has created for this challenge and then play along!  Make your own creation based on the sketch and share it by linking it to the My Inky Friends page.

Thanks for stopping by! Join me again to shine a spotlight on creativity!


Share with your friends:

bubble wrap background

Hello!  I’m back with a quick tutorial for that fantastic watercolor background featured on this card yesterday:

Happy Birthday: bubble wrap water color - Center Stage Stamping

Would you believe it is done with bubble wrap?!  Seriously… it is!  It is really easy, you just have to resist the urge to pop all of the bubbles!  You will need watercolor paper, markers (I used Crushed Curry, Pumpkin Pie and Rich Razzleberry) a spritzer filled with water and of course bubble wrap.


Bubble wrap background: supplies - Center Stage Stamping

Use your markers to color directly on the bubble wrap, starting with the lightest color.  Make sure you color on the bumpy side, not the smooth or you won’t get the dot effect.

Bubble wrap background: color on bubble wrap - Center Stage Stamping

Next spritz the water color paper with water.  Make sure to get it good and saturated.  less water means a more dotted, less blended outcome.

Bubble wrap background: spritz paper - Center Stage Stamping

Next press the bubble wrap colored side down onto the wet watercolor paper.  You can lift and set back down to fill in light areas or to blend colors more.

Bubble wrap background: step3 - Center Stage Stamping

Let the paper dry fully before assembling the card.

Bubble wrap background: step 4 - Center Stage Stamping


Every time you do this it will turn out a little different.  Use less water if you want more of the dots to show, More water if you want it more blended.  Color options are endless.  Let me know if you give it a try!  I’m off to finally pop that bubble wrap…then go get some more!

Bubble wrap background - Center Stage Stamping

That’s a wrap for today.  Join me again to put a spotlight on creativity!


Share with your friends:

october creative class projects

I taught a Creative Class at Stamp-n-Storage on Saturday, October 20.  We had a great time stamping and creating five fall themed cards.  I thought I would pop on today and share those projects with you.

Country Home: Thankful for all the good things - Center Stage Stamping

Coffee Cafe: thanks a latte - Center Stage Stamping

Rooted in Nature: Be Bold fall - Center Stage Stamping

Wishing You Well: just a note - Center Stage Stamping

Happy Birthday: bubble wrap water color - Center Stage Stamping

We had a lot of fun putting these cards together.  Especially that last one!  I was able to teach a fun new water color technique.  I will be back on Wednesday with a quick tutorial for this.

Stamp-n-Storage Oct Creative Class projects - Center Stage Stamping

Here is everyone with their finished projects!  They all did a great job.

Stamp-n-Storage Oct Creative Class group photo

The next Stamp-n-Storage Creative Class is Saturday, November 17 at 1:00PM.  You can find more details and register for the class over on the Stamp-n-Storage website HERE.  I’d love to have you join us!

That’s a wrap for today.  Join me again to put a spotlight on creativity!


Share with your friends:

a season of good cheer

Hello crafty friends!  I have a quick and easy card to share with you today.  The Joyous Noel designer series paper does the work to give this card a wow.  Don’t you just love those copper accents?  They really make this card POP!

First Frost: Season of Cheer - Center Stage Stamping

The DSP has a layer of Basic Black card stock underneath it to help give it a bit more depth.  I cut a Stitched Shapes circle out of Crumb Cake and punched out the leaf punch on the edge of the circle.  I put a circle of Tranquil Tide dots pattern from the 2017- 19 In Colors DSP stack behind the leaf outline.  The sentiment is stamped in Memento Black Ink.  I took one of the Galvanized Buttons and covered it with Copper Shimmer Paint.  Once dry, i threaded it with Linen Thread and adhered it to the stitched circle.

That’s a wrap for today.  Join me again to put a spotlight on creativity!

Share with your friends:

happy 20 my son

I am trying to wrap my head around the fact that my son…my youngest child…my baby boy…turned 20 on Monday.  I no longer have any teenagers.  When did this happen?  I swear he was just starting Kindergarten.  Now, he is in his second year of college.  I wanted to share the card I made for him.  Full disclosure: it uses some retired paper and ink colors.

Happy 20 - Center Stage Stamping

I made a shaker card with 20 candles in the “0”! The “Happy Birthday” (stamped in Crumb Cake) is from Picture Perfect Birthday. The banner is from Birthday Banners and sentiments are from Broadway Birthday. I used a white gel pen to make the dots around the shaker panel. I am happy with the final result, but it took me a while to get there.  It is hard making a card for a 20 year old boy…um, young man….er, guy. I think I need more time to full grasp this milestone.  But, another is right around the corner.  In 10 days, my middle child turns 21!!  Someone hit the pause button.  Time is moving too fast.

Thanks for stopping by! Join me again to put a spotlight on creativity!

Share with your friends:

stamp review crew: dashing deer

Welcome to another Stamp Review Crew blog hop!  This time we are featuring the fantastic Dashing Deer stamp set!  I have been having a lot of fun creating with this set.  And to think, I almost didn’t get it.  What was I thinking?!  I am so glad I came to my senses and ordered it right away.  I LOVE it!  I have featured it on two previous blog post that you can find here and here.  For today’s spotlight, I decided to showcase two different looks for the set.  The first is a very deep, rich card pairing Dashing Deer with the Joyous Noel Designer Series Paper.

Dashing Deer: Christmas Wishes - Center Stage Stamping

I started with a Crumb Cake card base.  I embossed the Tranquil Tide panel with the Pinewood Planks Textured Impressions Embossing Folder and used my Layering Circles Framelits to cut out a circle in the panel.  I backed this with some of the Joyous Noel DSP.  I stamped the little deer in Soft Suede and cut him out with the coordinating Detailed Deer Thinlit.  I added a few dots of Copper Shimmer Paint for some extra detail. I cut out the twig spray from the Frosted Bouquet Thinlits in copper foil paper and adhered it poking out of the circle.  The sentiment is embossed in White on Merry Merlot card stock with a smaller strip at the top of the card with a True Gentleman button tied with Linen Thread.  My second card has a much lighter color scheme.

Dashing Deer duo - Center Stage Stamping

For this card I wanted a winter white woods look. The white panel is embossed with the Woodland embossing folder.  I stamped the large deer with Gray Granite ink on Sahara Sand card stock.  The smaller deer is stamped with Sahara Sand ink on Sahara Sand card stock.  I added some Frost White Shimmer Paint dots on the smaller deer.  The sentiment is stamped in Early Espresso ink on Sahara Sand card stock with Linen Thread wrapped on the ends.  I love these two deer together.

I am now going to send you over to the wonderfully creative Tanya.  Wait until you see what she can do with this great set!  Or you can go back to Lou and her beautiful projects.  Either way, make sure to go all the way through the blog hop – you won’t want to miss any of the inspiration for the gorgeous stamp set!  You can find the full blog hop order on the Stamp Review Crew page.

That’s a wrap for me.  Join me again to put a spotlight on creativity!

Share with your friends:

inky friends: handmade holidays blog hop

Welcome to My Inky Friends: Handmade Holidays Blog Hop!  You will find lots of inspiration for you Holiday crafting!  You should have arrived here from Paula and her wonderful Country Home projects.  Weren’t they great?  If you are starting the hop here, make sure you go through and check out all the stops.  You don’t want to miss a thing.

My projects are putting the fantastic set Merry Christmas to All in the spotlight.  This is a great holiday greeting set and the coordinating Merry Christmas Thinlits take it to the next level.  I just love the dimension and texture of die cut words. I paired this great set with the amazing Joyous Noel designer series paper.  I love the new Merry Merlot color.  Paired with a touch of copper, it is perfect for elegant holiday projects.  I decided to create a card, gift package and ornament trio. Let’s start with the card.

Merry Christmas to All: Merry & Bright - Center Stage Stamping

Isn’t that paper gorgeous!? I also used a bit of Neutrals 6×6 DSP (the Crumb Cake dot panel) I layered a Pearlized Doily with a Stitched Shapes circle cut from Wood Textures DSP.  A tiny bit of Copper Glimmer Paper draws out the copper foil in the Joyous Noel DSP.  I also added a tiny tree from the Festive Farmhouse Elements.  The sentiment is stamped on the Wood Texture DSP in Early Espresso Ink.  I think it gives a wood burned look to the image.Merry Christmas to All: pillow box - Center Stage Stamping

Next up is a cute little gift card pouch.  I started with one of the Kraft Pillow Boxes.  I just love those little white polka dots.  I kept some of the elements from the card, but changed them up a bit to make the belly band wrapped around the pillow box.

Merry Christmas to All: Merry ornament - Center Stage Stamping

Finally, I made this fun medallion ornament. I started with two 4″x12″ strips of the DSP.  I scored them every half inch, fan folded them the assembled them into the medallion.  Once again I used the Pearlized Doily and a Stitched Shape circle, this time cut out of Crumb Cake card stock. I added a few snowflakes from the Blizzard Thinlit with added rhinestones.

Merry Christmas to All: gift trio - Center Stage Stamping

A fabulous trio perfect for holiday gifting!   I am now sending you over to Rhonda and her fun projects with the tiny take-out box!  They are so much fun!

Thanks for stopping by!  Join me again to put a spotlight on creativity!


Share with your friends:

thank you elephant

Just a quick post today to share this adorable guy!

Little elephant: thank you - Center Stage Stamping

With Basic Gray as a backdrop and pops of pool Party, Lemon Lime Twist and Grapefruit grove, this cute little elephant steals the show.  I decided to keep the card pretty simple with a few fun details to spotlight my little pachyderm friend. I punched out a Whisper White 1-3/4″ circle and a Lemon Lime Twist 1-3/4″ circle, then trimmed down the Lemon Lime Twist one and fringed the top edge for the grass. The little Basic Gray elephant is punched out with the coordinating Elephant Builder punch and made it a breeze to give him a Pool Party ear.  I fussy cut the Grapefruit grove heart sentiment.  This little guy is definitely deserves to be center stage!

That’s a wrap for today.  Join me again to put a spotlight on creativity!

Share with your friends: