Stampin’ Blends

osat blog hop: turning a new leaf

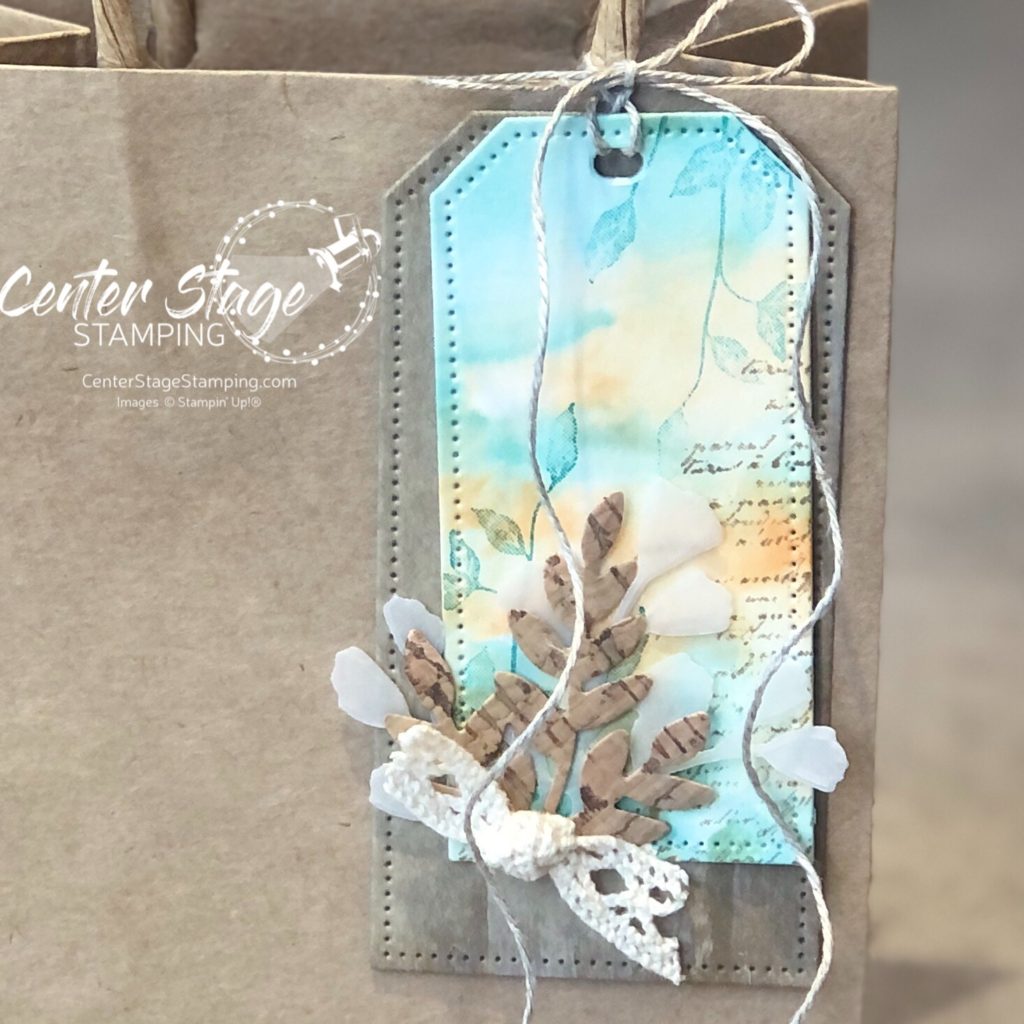
Welcome friends! I’m glad you stopped by today. It’s time for this month’s blog hop with the One Stamp at a Time team. The theme for this month is “Turning a New Leaf” – projects featuring leaves. My first thoughts of leaves bring me to fall, deep colors of turning leaves. Rich red, orange, yellow, brown… But, I’m not ready for that just yet. So, I opted for a different color scheme. I used Bermuda Bay and Pumpkin Pie. I really like how these colors work together.

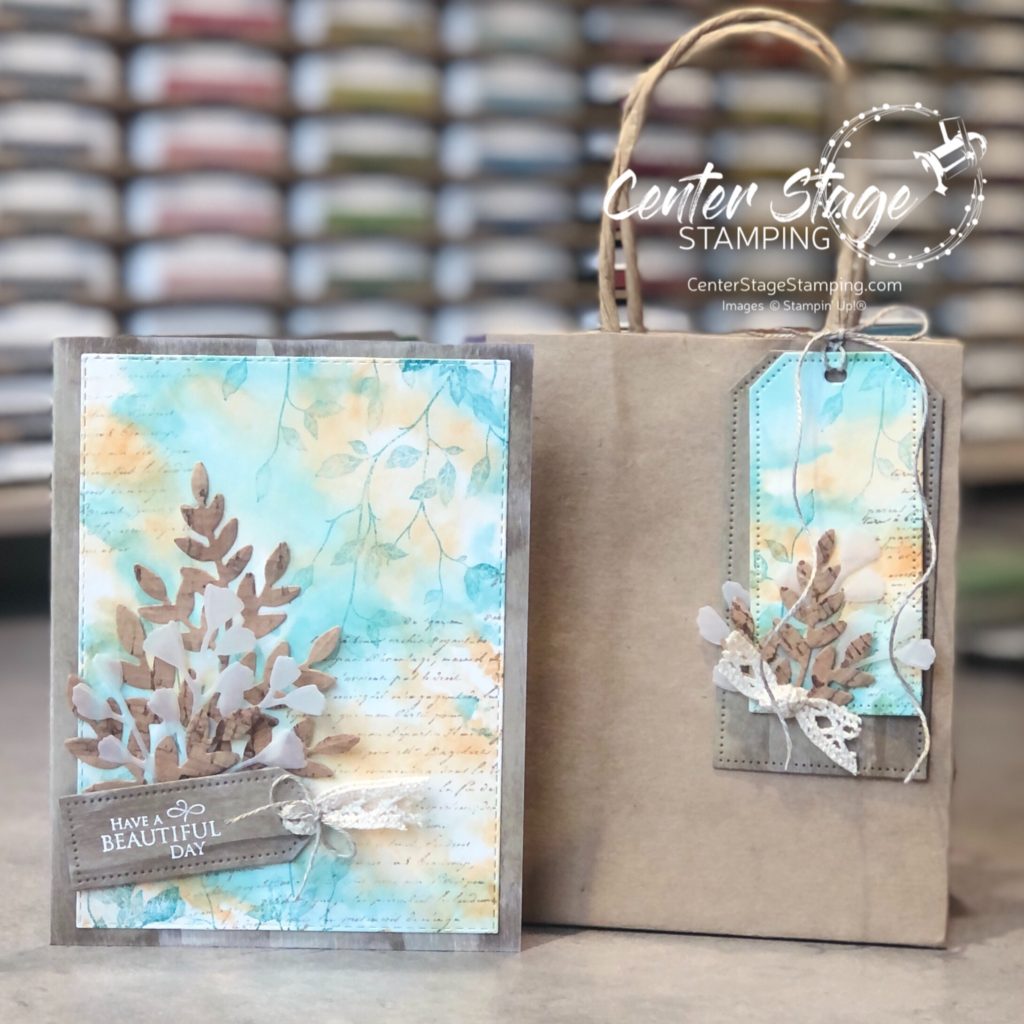
To make the colored panel, I scribbled Pumpkin Pie and Bermuda Bay Stampin’ Blends on a plastic ziplock bag. Then, I spritzed it with Isopropyl alcohol ( I used 90%), took a piece of shimmer white card stock and laid it onto the bag to soak up the ink. Once it was dry I stamped images from Very Versailles stamp set.

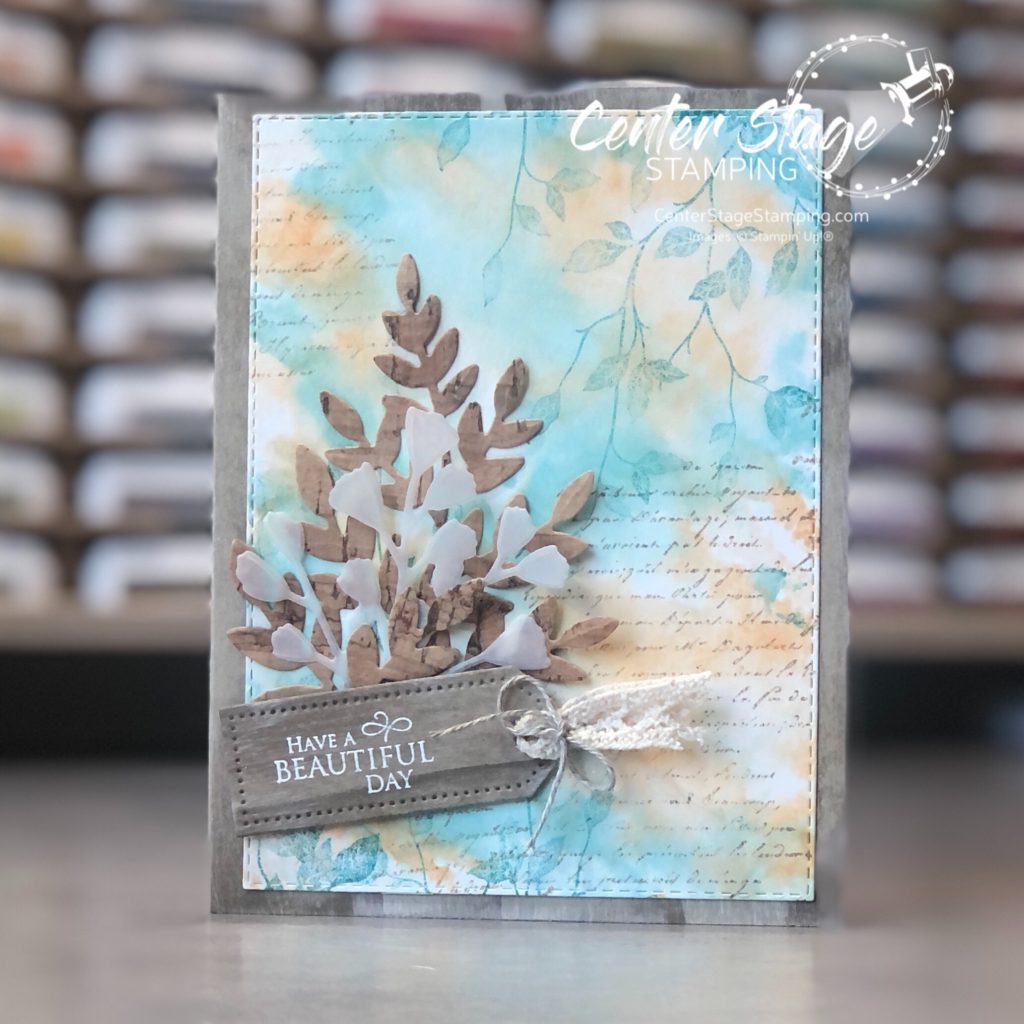
I used the Forever Flourishing dies to cut leaves out of vellum and the new cork paper.

I made my own wood grain paper for the card and tag base. Take a piece of Crumb Cake card stock and lightly drag Crumb cake ink pad and Whisper White ink pads across.

It was fun trying a couple of new techniques! Give them a try and let me know what you think.

Now, continue your way through the OSAT blog roll!

PLEASE CLICK THE BLUE BOX FOR A POP UP LIST OF THE DESIGN TEAM.

Thanks for stopping by! Join me again to shine a spotlight on creativity!

Share with your friends:

stamp review crew: pampered pets

Hello, and welcome to another fun blog hop with the Stamp Review Crew! Today we are shining a spotlight on the Pampered Pets stamp set.

I love dogs. So, this was a must have set for me. And, of course, the dogs are the focus of my cards.

For my first card, I stamped the Buffalo Check background stamp in black ink on Real Red card stock and die cut a stitched heart. I added some Crumb Cake ink with my blender brush to create a shadow behind the heart. The adorable pup is colored with Stampin’ Blends markers. My inspiration for coloring him was Jock from Lady and the Tramp.

For this card, I drew inspiration from our pup Elphie’s bandana she got after her last grooming. But, I went with my favorite red and black buffalo plaid. I actually used a leftover bit from the die cut heart on the first card. I trimmed it by hand to make the dog’s scarf. To color the dog, I die cut the dog and dish from printer paper and used the negative as a stencil to blend some ink to color them.

We are a dog family. We have our 5 year old Yorkie, Elphie. We have said good bye to two Shih Tzus – Maggie and Pippin. Our son has Jemma, a beagle mix, the sweetest fog on the planet. and our daughter and son-in-law have three dogs – Ruffy, a Yellow Lab; Belle, a Pitbull/ Australian Cattle dog mix; and Mose, a German Shorthair Pointer. And all of these four legged friends get along wonderfully. A miracle that I am grateful for.

This photo was from Christmas 2019. Belle wasn’t cooperating, she is hiding in the lower left corner. Brett is holding our sweet Pippin, she crossed the rainbow bridge this past October. Miss her sleeping at my feet each night. as you can see, our daughter also has a bunny. In this pic, animal outnumbered humans. This year, we lost Pip, and added our granddaughter and another son-in-law, so humans outnumber animals! (I didn’t use this years Christmas pic, because the three big dogs wouldn’t cooperate and aren’t in it. LOL. Oh well.

I will now let you move on through the blog hop. You can go on to Jay by clicking the NEXT button below. Or, you can go back to Cindy by clicking the PREVIOUS button.

Thanks for stopping by! Join me again to shine a spotlight on creativity!

Share with your friends:

stamp review crew: swirly frames

Hello crafty friends! We are going to send out 2019 with one last Stamp Review Crew blog hop for the year! What a year of inspiration it has been. Join the SRC design team as we shine a spotlight on Swirly Frames.

Swirly Frames is generally a set to use as a back ground or subtle detail. It was a fun challenge to take a set that is usually in a supporting role and put it center stage. For my first card, I drew inspiration from the upcoming Stampin’ Up! Sale-a-bration catalog and the stunning Lily Impressions Designer Series Paper. This paper looks like it came from an art gallery. So I thought why not make a card simulating an art display.

I overlapped some squares and added bits of the dsp to look like they were framed. A few Glitter Enamel Dots add some fun detail. Colors used are Gorgeous Grape, Lovely Lipstick, Granny Apple Green, and Coastal Cabana.

My next card was inspired by art projects we did in elementary school. we would draw a bunch of random shapes and color in sections that overlapped. I decided to do the same with the two circle stamps in the Swirly Frames set.

I colored the circles with Stampin’ Blends: dark highland Heather, Light Bermuda Bay, dark Lovely Lipstick, dark Granny Apple Green. The WISH is from the Broadway Lights die set.

I think Swirly Frames is great in a leading role, don’t you?

Now it is time for you to continue on with the SRC blog hop. Head on over to Cindy and her fantastic creations by clicking on the NEXT button below. Or you can go back to Holly and her inspiring projects by clicking on the PREVIOUS button.

Thanks for stopping by! Join me again to shine a spotlight on creativity!

Share with your friends:

time to shine

Flowers are finally blooming in Minnesota! Daisies are one of my favorites. I especially love Gerbera Daisies. Naturally, I was excited to get the new Daisy Lane stamp set at Stampin’ Up! On Stage event in April. And even more excited to add the new Medium Daisy punch to my collection. Put them together and I had a ton of fun creating. I was able to make my own garden of cards that will never wilt! Here is one of those creations.

I stamped the medium daisy in Memento Black ink and colored the flower centers and the background with my Stampin’ Blends. (Daffodil Delight and Seaside Spray) I love that you can create custom backgrounds with the Blends. I punched two medium daisies out of Whisper White and layered them. For the center, I punched out a bunch of Daffodil Delight dots with my 1/8″ handheld punch (retired) and glued them in the flower center. The sentiment is on Daffodil Delight. I layered a piece of retired black and white paper behind the sentiment. I love stripes and flowers together.

What is your favorite flower? Take some time to create a paper flower garden of your own. Thanks for stopping by. Join me again to shine a spotlight on creativity!

Share with your friends:

inky friends: thankful for… blog hop

Today, I am joining My Inky Friends Thankful For… blog hop. You are in for a great variety of inspiration on today’s hop.  We are each featuring a Stampin’ Up! stamp set or product that we are thankful for.  If you are following in order, you have arrived here from Holly and her wonderful projects.  Weren’t they great.  If you are starting here make sure you check out all the stops and see what everyone is thankful for!

I am thankful for… Stampin’ Blends!  These markers are so amazing and really easy to use.  They make me feel like a real artist!  There is so much you can do with them!

First off, how about no-line coloring.  I’ve seen it done with watercolors and thought why not try it with my Stampin’ Blends!  I love the outcome!

Country Home: no line with blends - Center Stage Stamping

I stamped the milk can and flowers in Sahara Sand that was stamped off to make it lighter.  Then I colored it in.  I used the stamps as a guide if I could no longer see the inked outline.  I really like how the milk can turned out! It’s even better in person.

Next up, I went with basic coloring.  Postcard Palls is a great set for this.  Isn’t that little otter just adorable!  The Stampin’ Blends make it possible to get so much depth with the shading.

Postcard Palls: Otter - Center Stage Stamping

Finally, I made my own designer paper – the flowers and background are colored with Stampin’ Blends.  The possibilities are endless!Perennial Birthday: stampin' blends - Center Stage Stamping

If you haven’t tried Stampin’ Blends yet, you need to.  They make coloring so much fun!  I now send you over to Cindy and her fantastic creations!

Thanks for stopping by!  Join me again to put a spotlight on creativity!


Share with your friends:

thank you blooms

I can’t believe it is the end of August.  Boy, the summer just flew by.  And here we are going into Labor day weekend.  At least my youngest two will be home for the long weekend.  And on Saturday we are going to see……HAMILTON!!  I have been looking forward to this coming to Minneapolis for over a year.  And I was fortunate to be able to get tickets for the four of us to go!  Eeeeek!  (I’m just a little bit excited.) I am not throwin’ away my shot!


We were doing a photo shoot in my studio for the upcoming Stamp-n-Storage catalog a couple of weeks ago.  And I was told to “grab some stuff and look like I was working on a project”.  So, I pulled out some things and just started stamping.  When the photo shoot was done, I had to finish up the card.  This is the finished product:

Thank you blooms - Center Stage Stamping

The card base is embossed with the Subtle 3D Dynamic Textured Impressions Embossing Folder.  The striped layer is from the Twinkle Twinkle designer series paper pack. For the flower panel, I stamped the flowers from Perennial Birthday in Gray Granite.  Next I colored them with my Stampin’ Blends in Flirty Flamingo and Granny Apple Green (the lighter shade). Then I grabbed my Light Pool Party Stampin’ Blend and colored the background.  Ta Da – I made my own DSP!!!!  I embossed the greeting in white on a piece of Gray Granite card stock and adhered it to the card.  So easy!  Have you tried coloring with Stampin’ Blends yet?  You really need to.  They are fabulous!

Hey, I just realized my manicure even coordinates with this card!

That’s a wrap for today.  Thanks for stopping by. Come back soon and join me in putting a spotlight on creativity!

Share with your friends:

kanga and little roo

Life has been really crazy over here lately.  In the past month we: moved our daughter and son-in-law into their first house; moved our other two children off to college, in opposite directions from our house; moved our business, Stamp-n-Storage, to it’s new location; and continued working on my craft studio remodel.  I have mostly moved back in, but there are still trim details to finish up.  I can’t wait to give you a full tour!  For now, how about a little teaser?

I just LOVE how the top of my Ikea Kallax came together. (thank you Hobby Lobby!)  It really makes me happy to look at.  Which is good, since I spend a lot of time in here!

At the beginning of August, before our youngest two moved, we all went to see the new Winnie the Pooh movie, Christopher Robin, together.  Talk about hitting you right in the feels!  Such a sweet movie.  I love Pooh Bear even more now.  I thought I would share today’s card in honor of a sweet mother and son duo from the Hundred Acre Wood – Kanga and Roo. (Ok, so in this case, Roo is a Koala, use your imagination)

Kanga Happy Birthday - Center Stage Stamping

Coloring this duo was so easy with my Stampin’ Blends and the Animal Expedition DSP. A delightful birthday greeting for any age!

That’s a wrap for today.  I’m heading back to work in my studio – creating and cleaning!  Plus I am working on a special project for a class I am teaching for the Grand Opening of Stamp-n-Storage’s first retail space!  Check out details on the class and other Grand Opening activities here.

Thanks for stopping by! Come back soon and join me in putting a spotlight on creativity!


Share with your friends:

animal outing thank you

Hello! Let’s kick off this week with a fun thank you card featuring the super cute Animal Outing set.

Animal Outing Thank You - Center Stage Stamping

I stamped the giraffe and branches with Memento Black ink and colored them with my Stampin’ Blends.  I love these markers.  They make it so easy to get a very artistic look with the shading you can do.  I cut them out with one of the circles form the Stitched Shapes Framelits.  The dotted panel is from the Brights Designer Series Paper stack in Daffodil Delight.  The Crumb Cake panel is embossed with the Petal Burst Textured Impressions Embossing Folder and I roughed up the edges before adhering it to the Whisper White card base.  I masked off just the “thank you” from the “thank you big time” sentiment and stamped it in Whisper White ink on basic Black card stock.  I love how the giraffe looks like he is saying “thank you”! Or maybe he’s singing.

Animal Outing Thank You close up - Center Stage Stamping

Thanks for stopping by! Happy Stamping!

-Mary

Share with your friends:

Hello Baby Bear

I did it!  I survived another Middle School musical production and now I get to enjoy a week free from rehearsals.  My husband, Brett is gone this week.  Stamp-N-Storage is on the road, heading to pop up sales in Florida, Georgia, and North Carolina.  Let me know if you happen to get to one of these.  Hopefully, in the future I will be able to travel along to some of these.  For now, I’m spending some quality time in my studio.

I realize I have been really focused on products from the Occasions and Sale-A-Bration catalogs.  They are new and I am having a lot of fun.  I still have a lot to share with you.  But let’s not forget about all of the awesome stuff in the Annual Catalog.  Today’s card shines a spotlight on one of my favorite sets – Pieces and Patterns.  I LOVE the little dinosaur and bear in this set.  I thought the little bear would be great on a baby card, but not your typical baby card.  I decided to go with a non-traditional baby color scheme and used colors from the Coffee Break designer series paper.

Hello baby bear - Center Stage Stamping

I started with an Early Espresso card base and added a panel of Early Espresso that I ran through the Pinewood Planks 3D Textured Embossing Folder. here is a better shot of the texture folder.

Hello baby bear - Center Stage Stamping

Next I punched a 2 1/4″ circle out of thick Whisper White card stock and one out of Coffee Break designer series paper.  Isn’t that chevron pattern so cute! I cut the patterned circle in half and glued it to the bottom of the white circle and added a thin strip of Soft Sky across the circle.  I colored the little bear with the Crumb Cake Stampin’ Blends.  I love the shading detail you can achieve with these markers.  It is SO easy.  Finished off with the sentiment, a Linen Thread bow and a tiny Pearl that I colored with the Lighter Pool Party Stampin’ Blend, since there isn’t a Soft Sky Blend at this time. (Fingers crossed for next year’s catalog!  What a sweet greeting for a new little someone.

Thanks for stopping by – Happy Stamping!

-Mary

Share with your friends: