My Inky Friends

inky friends: last chance blog hop

The new Stampin’ Up! catalog is coming! That means lots of exciting, fun new stamp sets to create with. It also means that we need to say good-bye to others. For today’s Inky Friends Last Chance Blog Hop we are going to showcase some of those wonderful sets that are bidding us farewell.

My projects put the super fun set Blow Out The Candles on stage. I think this set was really overlooked in the catalog. Which is a shame. It is some much fun! Be sure to grab it for yourself before it is gone for good.

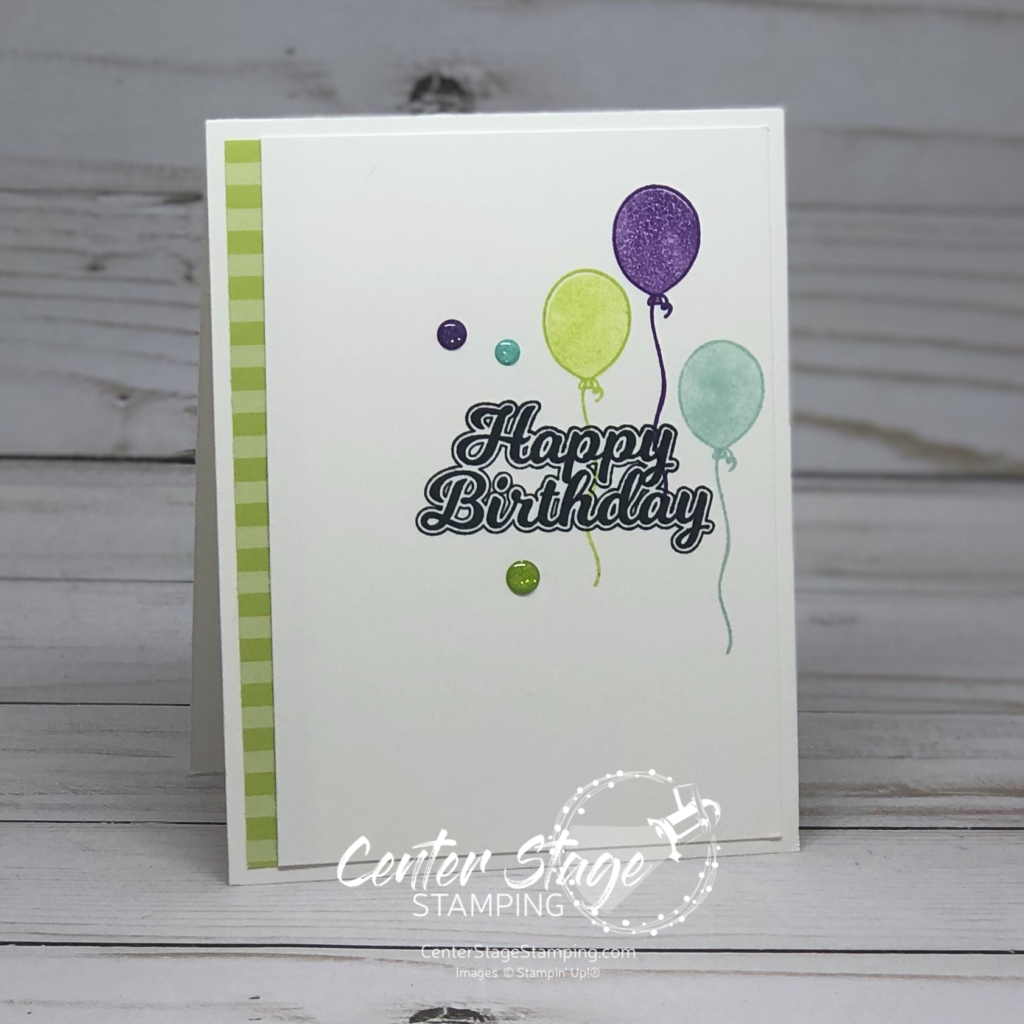
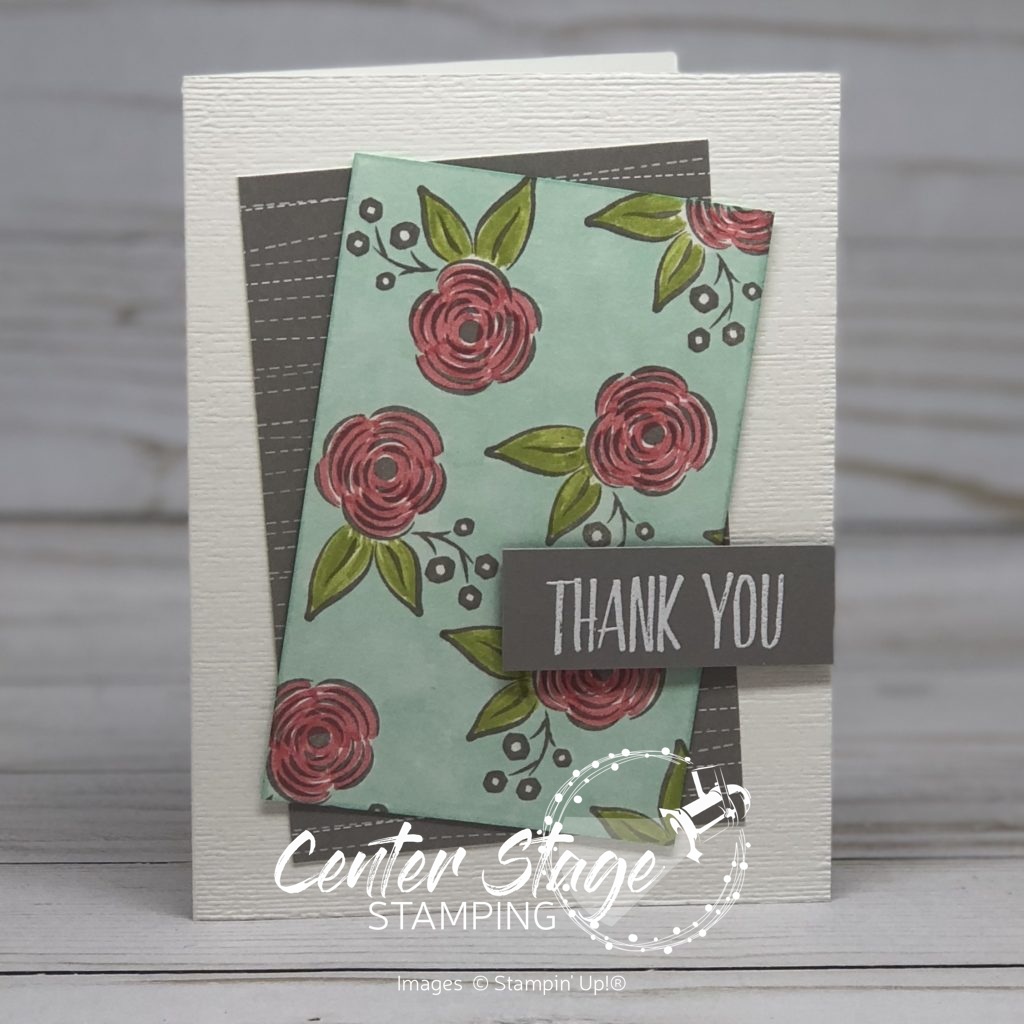
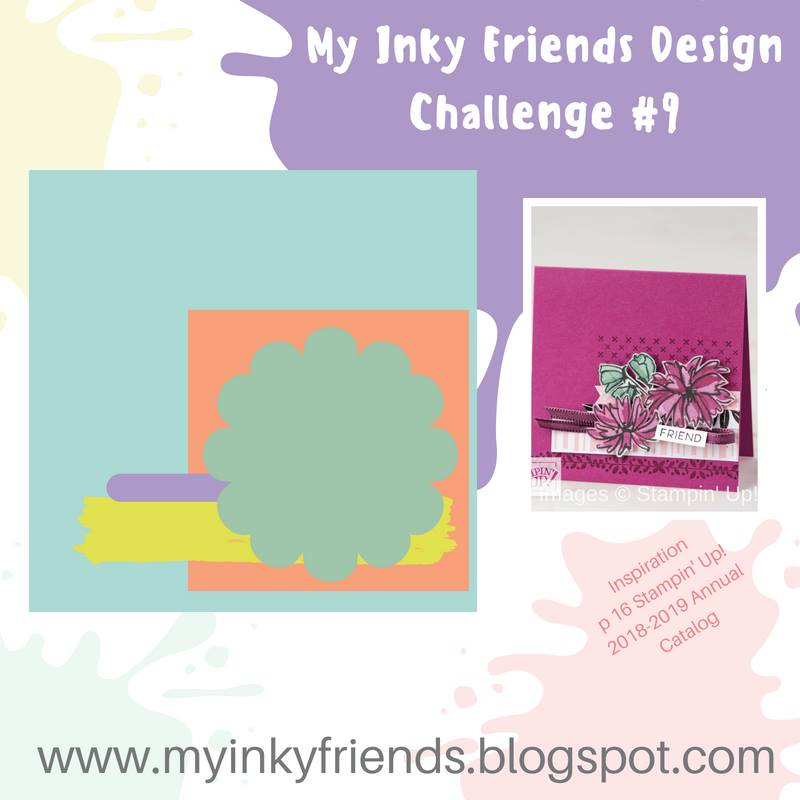
My first card is a really quick one with a bright color scheme. Pool Party, Gorgeous Grape, and my FAVE Lemon Lime Twist. This would be great to make a bunch of cards to have on hand in different color schemes.

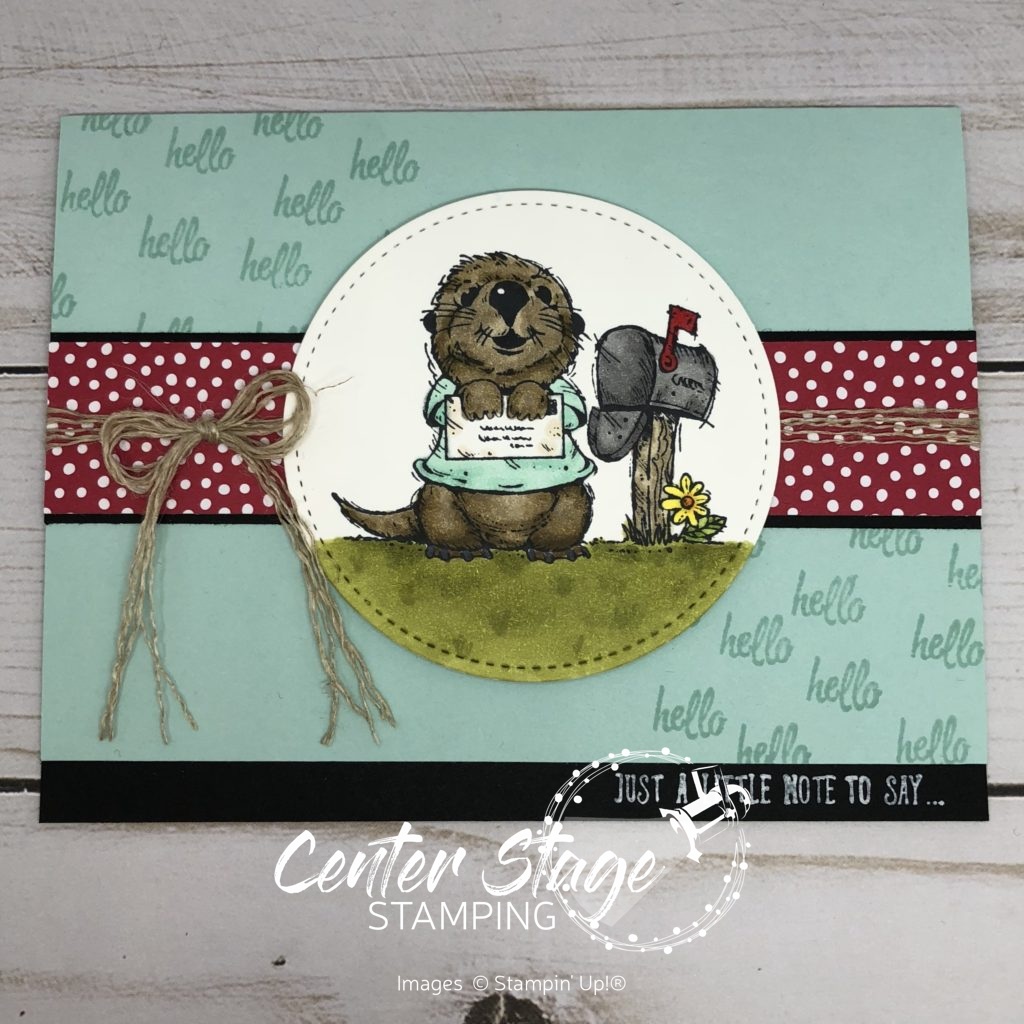
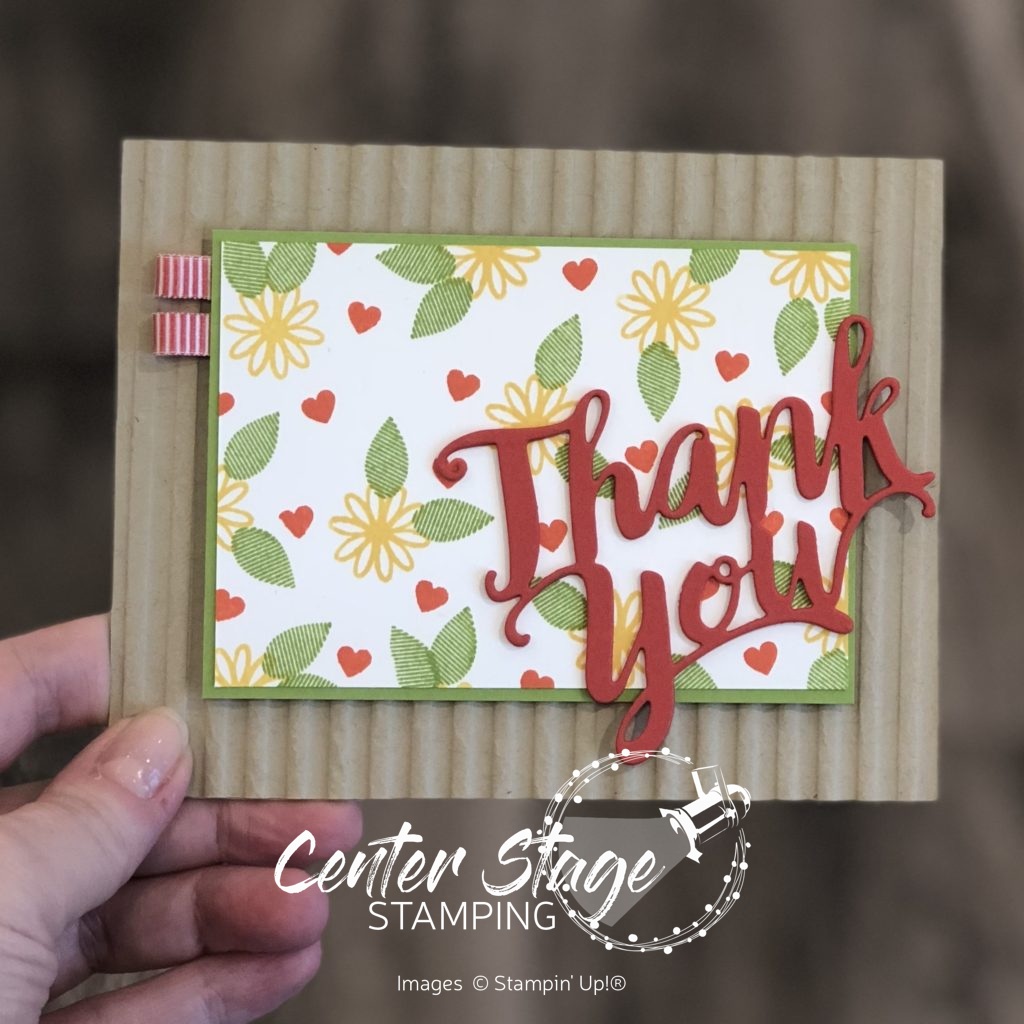
I stepped things up with this next card. I absolutely LOVE how it turned out!!

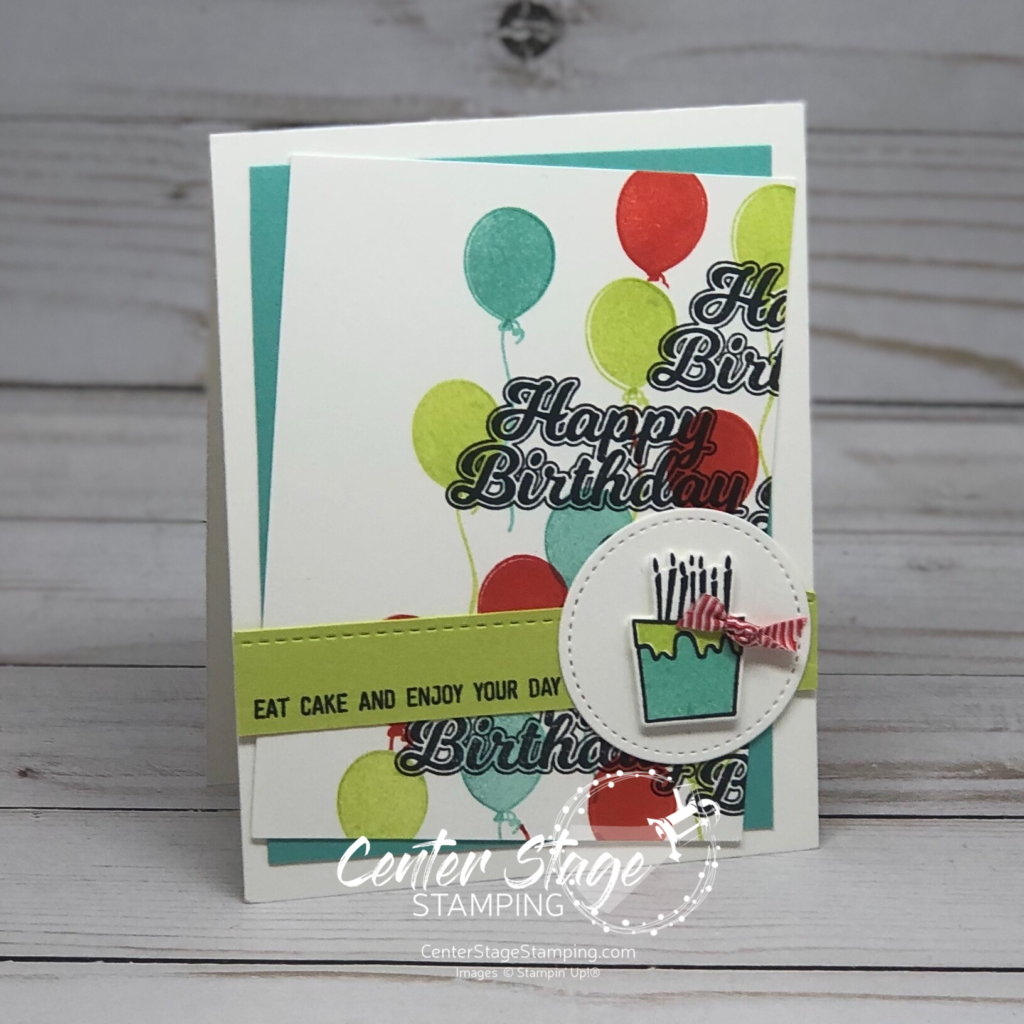
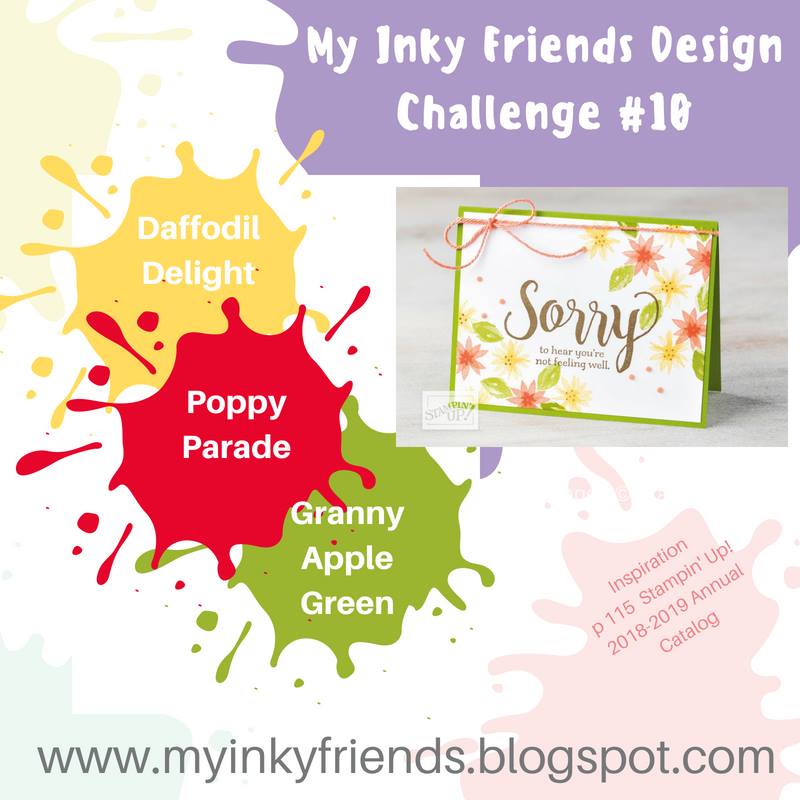
I wanted another bright color palette, so I went with Coastal Cabana, Poppy Parade and (surprise) Lemon Lime Twist. I also used the Stitched Shapes and Stitched Labels framelits for some added detail. Finished off with a tiny little knot of Poppy Parade striped ribbon.

Thanks for stopping by! Be sure to check out the rest of the stops on the blog hop for more amazing inspiration. From here you can go on to Rhonda or back to Sara. You can find the full blog roll on the Inky Friends page.

Join me again to shine a spotlight on creativity!

Share with your friends:

inky friends: dc 15

Digging out from one snowstorm with another right around the corner – sounds like a perfect time to hunker down in my studio. My Inky Friends ave another design challenge to help kick your crafting mojo in gear. This time it is one of my favorite color combos chosen from a sample on page 37 of the 2019 Occasions catalog. Right now those colors are making me think of spring. In the midst of all this snow, I’ll take what I can get. Here is my project with this color scheme.

I made that fantastic watercolor background with a technique I featured in this post. The flower and sentiment are from the All That You Are stamp set in the Occasions catalog.

Check out what the rest of the Inky Friends design team has created, then create your own project putting the color combo center stage. Be sure to share your creation by linking to the My Inky Friends design challenge 15 page.

Thanks for stopping by. Join me again to shine a spotlight on creativity!

Share with your friends:

Inky Friends: dc 14

My Inky Friends are back with a new design challenge! This one is a layout based on a card on page 3 of the new Stampin’ Up! Occasions Catalog. Be sure to check out all of the great inspiration over at My Inky Friends and then play along and share your creation based on this fun sketch!

I simply love the card this sketch is based on, so my first instinct was to reach for florals. But then I stopped and thought, “I need to push myself to something different”, so I reached for the new Geared up Garage. I always struggle with making cards for men. But, this set and sketch came together for a fun card that is perfect for the gear head in your life.

Thanks for stopping by! Join me again to shine a spotlight on creativity!

Share with your friends:

inky friends: thankful for… blog hop

Today, I am joining My Inky Friends Thankful For… blog hop. You are in for a great variety of inspiration on today’s hop.  We are each featuring a Stampin’ Up! stamp set or product that we are thankful for.  If you are following in order, you have arrived here from Holly and her wonderful projects.  Weren’t they great.  If you are starting here make sure you check out all the stops and see what everyone is thankful for!

I am thankful for… Stampin’ Blends!  These markers are so amazing and really easy to use.  They make me feel like a real artist!  There is so much you can do with them!

First off, how about no-line coloring.  I’ve seen it done with watercolors and thought why not try it with my Stampin’ Blends!  I love the outcome!

Country Home: no line with blends - Center Stage Stamping

I stamped the milk can and flowers in Sahara Sand that was stamped off to make it lighter.  Then I colored it in.  I used the stamps as a guide if I could no longer see the inked outline.  I really like how the milk can turned out! It’s even better in person.

Next up, I went with basic coloring.  Postcard Palls is a great set for this.  Isn’t that little otter just adorable!  The Stampin’ Blends make it possible to get so much depth with the shading.

Postcard Palls: Otter - Center Stage Stamping

Finally, I made my own designer paper – the flowers and background are colored with Stampin’ Blends.  The possibilities are endless!Perennial Birthday: stampin' blends - Center Stage Stamping

If you haven’t tried Stampin’ Blends yet, you need to.  They make coloring so much fun!  I now send you over to Cindy and her fantastic creations!

Thanks for stopping by!  Join me again to put a spotlight on creativity!


Share with your friends:

inky friends: dc 11


It is time for another design challenge with My Inky Friends!  This one is based on a card layout on page 122 of the 2018-19 Stampin’ Up! catalog.  Here is my creation.

Inky Friends DC11: Dashing Deer - Center Stage Stamping

I used Dashing Deer and Detailed Deer Thinlits.  I think this is my favorite Christmas bundle in the Holiday Catalog.  The Crumb Cake card base has a Crumb Cake layer that I ran through the Corrugated Dynamic Textured Impressions Embossing Folder.  The sentiment is from Merry Christmas to All.  I colored it and the swag with Cherry Cobbler, Mossy Meadow and Crumb Cake markers to get the multi color images.  It is hard to see in the photo, but the Cherry Cobbler circle was stamped with the Burlap background stamp before I cut it out with the Stitched Shapes circle.  I finished off with a few strips of Festive Farmhouse designer series paper and some Linen Thread.

Make sure to check out what the rest of the design team has created for this challenge and then play along!  Make your own creation based on the sketch and share it by linking it to the My Inky Friends page.

Thanks for stopping by! Join me again to shine a spotlight on creativity!


Share with your friends:

inky friends: handmade holidays blog hop

Welcome to My Inky Friends: Handmade Holidays Blog Hop!  You will find lots of inspiration for you Holiday crafting!  You should have arrived here from Paula and her wonderful Country Home projects.  Weren’t they great?  If you are starting the hop here, make sure you go through and check out all the stops.  You don’t want to miss a thing.

My projects are putting the fantastic set Merry Christmas to All in the spotlight.  This is a great holiday greeting set and the coordinating Merry Christmas Thinlits take it to the next level.  I just love the dimension and texture of die cut words. I paired this great set with the amazing Joyous Noel designer series paper.  I love the new Merry Merlot color.  Paired with a touch of copper, it is perfect for elegant holiday projects.  I decided to create a card, gift package and ornament trio. Let’s start with the card.

Merry Christmas to All: Merry & Bright - Center Stage Stamping

Isn’t that paper gorgeous!? I also used a bit of Neutrals 6×6 DSP (the Crumb Cake dot panel) I layered a Pearlized Doily with a Stitched Shapes circle cut from Wood Textures DSP.  A tiny bit of Copper Glimmer Paper draws out the copper foil in the Joyous Noel DSP.  I also added a tiny tree from the Festive Farmhouse Elements.  The sentiment is stamped on the Wood Texture DSP in Early Espresso Ink.  I think it gives a wood burned look to the image.Merry Christmas to All: pillow box - Center Stage Stamping

Next up is a cute little gift card pouch.  I started with one of the Kraft Pillow Boxes.  I just love those little white polka dots.  I kept some of the elements from the card, but changed them up a bit to make the belly band wrapped around the pillow box.

Merry Christmas to All: Merry ornament - Center Stage Stamping

Finally, I made this fun medallion ornament. I started with two 4″x12″ strips of the DSP.  I scored them every half inch, fan folded them the assembled them into the medallion.  Once again I used the Pearlized Doily and a Stitched Shape circle, this time cut out of Crumb Cake card stock. I added a few snowflakes from the Blizzard Thinlit with added rhinestones.

Merry Christmas to All: gift trio - Center Stage Stamping

A fabulous trio perfect for holiday gifting!   I am now sending you over to Rhonda and her fun projects with the tiny take-out box!  They are so much fun!

Thanks for stopping by!  Join me again to put a spotlight on creativity!


Share with your friends:

inky friends: dc 10

My Inly Friends are back with their 10th design challenge!  This is a color challenge based on a sample on page 115 of the Stampin’ Up! 2018-19 Annual catalog.  A very bright combination of colors! You can head over to the My Inky Friends page to see what all of the Design Team created with this color inspiration.  Here is my creation:

Inky Friends DC 10: Thank You - Center Stage Stamping

I used the A Big Thank You stamp set and coordinating Thank You Thinlit.  The small images work great to create your own background paper. The Crumb Cake card base is embossed with the Corrugated Dynamic Textured Impressions Embossing Folder.  I just love the texture and dimension it gives.  I added two little ribbon loops on the top left corner of the image panel to finish it off.  I let the die cut thank you hang off the image panel a bit to pull it into the card base some.  I think it helps it stand out more.

Head over to the My Inky Friends page and check out the other design team creations, then have a go at this color combo yourself!  Be sure to upload your creation to the My Inky Friends page so we can share in your creativity!

That’s a wrap for today.  Join me again to put a spotlight on creativity!

Share with your friends:

inky friends: 2018 holiday catalog showcase

Welcome to My Inky Friends 2018 Holiday catalog Showcase blog hop!  We are shining the spotlight on some of the great new stamp sets in the Stampin’ Up! Holiday Catalog.  If you are following the hop in order, you have come here from Cindy and her wonderful Winter Woods display.  Now, join me as I put the fantastic Wishing You Well set center stage.

I love a versatile set and this one really is great for any season.  So, let’s take a look at some of it’s many talents.

Wishing You Well, just a note - Center Stage Stamping

I love this wreath with the Wood Textures designer series paper!  Lemon lime twist and Berry Burst create a vibrant contrast to the wood.  A wonderful card just to let someone know you are thinking of them.  But, change out the greeting and this would work for a Christmas card as well.  See, versatile!


Since this is the HOLIDAY Catalog showcase, I naturally had to make a Christmas card.  I went with traditional green and red, but chose to work with bright and bold Lemon Lime Twist (I seriously can not get enough of this color!) and Poppy Parade.

Wishing You Well: Season's Greeting - Center Stage Stamping

I love how the bit of striped Poppy Parade paper peeking out from the main panel echoes the striped Poppy Parade ribbon!  The three little pearls were colored with my Poppy Parade Stampin’ Blends marker.  Voila – perfect coordination!  This would be an easy card to mass produce.  Simple, but with some fun little details to make it interesting.


That’s a wrap for me.  I will now send you over to Twila who is showcasing one of my favorite sets – Dashing Deer.  Thanks for stopping by!  Come back again and join me in putting a spotlight on creativity!

Share with your friends:

inky friends: dc9

Time for a design challenge from My Inky Friends! For this challenge, we are featuring a square sketch, inspired by page 16 of the Annual Catalog.

I decided to use some new items from the Stampin’ Up! Holiday catalog which goes live tomorrow!  It is chock full of fantastic goodies for all of your holiday projects!  For this challenge, I used the Dashing Deer Bundle – stamp set and coordinating thinlits – and the Joyous Noel Specialty Designer Series Paper. Oh. My. Goodness.  It is sooooooo pretty!  The copper foil accents are stunning.

Dashing Deer Happiest Christmas

Colors are Sahara Sand, Gray Granite and Copper.  A close up look at a few details:

Dashing Deer Happiext Christmas close up - Center Stage Stamping

The vellum circle is cut out with one of the Stitched Shaped Framelits.  The sprig is from the Frosted Bouquet Framelits (part of the Frosted Floral Suite) cut out of Copper Foil.  For the Soft Suede strip I crumpled it up then separated the layers so it has a look of suede (difficult to see in the photo). I used the Bright Copper Shimmer Paint and the stylus end from the Take your Pick too. to put the copper details on the image at the bottom of the card.

Finished project is a 5″x5″ card.  I love the neutral tones on this.  What a fantastic Christmas greeting to send.

Head over to My Inky Friends blog and check out the other projects based on this sketch.  I hope you will join us and play along.  Create your project based on this sketch then upload a link to it on My Inky Friends blog to share it with us.  We love to see your projects!

That’s a wrap for today.  Join me again to put a spotlight on creativity!

Share with your friends:

inky friends – dc8

Hey everybody!   It’s time for another My Inky Friends challenge! This inspiration for this one is a color combo found on page 119 of the 2018-19 Stampin’ Up! catalog.

I have to admit this was a tough combo for me.  I wasn’t sure how to handle the balance of these colors.  I finally decided less is more and went with a white back ground and small amounts of these colors.

Love and Thanks - Center Stage Stamping

I embossed a white panel with the Pinewood Planks Textured Embossing Folder.  I wrapped a bit of the Night of navy Gingham Ribbon tied offf with some Linen Thread and layered it on a Whisper White card base.  I cut out three leaves from the Tropical Thinlits in Soft Suede, Old Olive and Grapefruit Grove and centered them on the ribbon.  The sentiment is from Tropical Chic.  I masked off part of it, stamped it in Night of Navy ink, and fussy cut around it.  It is popped up on dimensionals over the leaves.  The finishing touch is the three Grapefruit Grove pearls from the Share What You Love Artisan Pearls.

Head on over to My Inky Friends blog to see what the rest of the design team did with this color challenge and then play along.  I’d love to see what you come up with!

Thanks for stopping by! Happy Stamping!

-Mary

Share with your friends: