Holiday Catalog

country home hello

The gloomy rainy weather continues – ugh.  It really makes it hard to get anything done, including creating.  Anyone else feel like that?  I need a jolt of sun and warmth.  SOON!  I am counting the days until I leave for Orlando and Stampin’ Up! On Stage!  And of course Disney and Universal with some of my best friends!  Bring on the sun and fun – and Butter Beer!

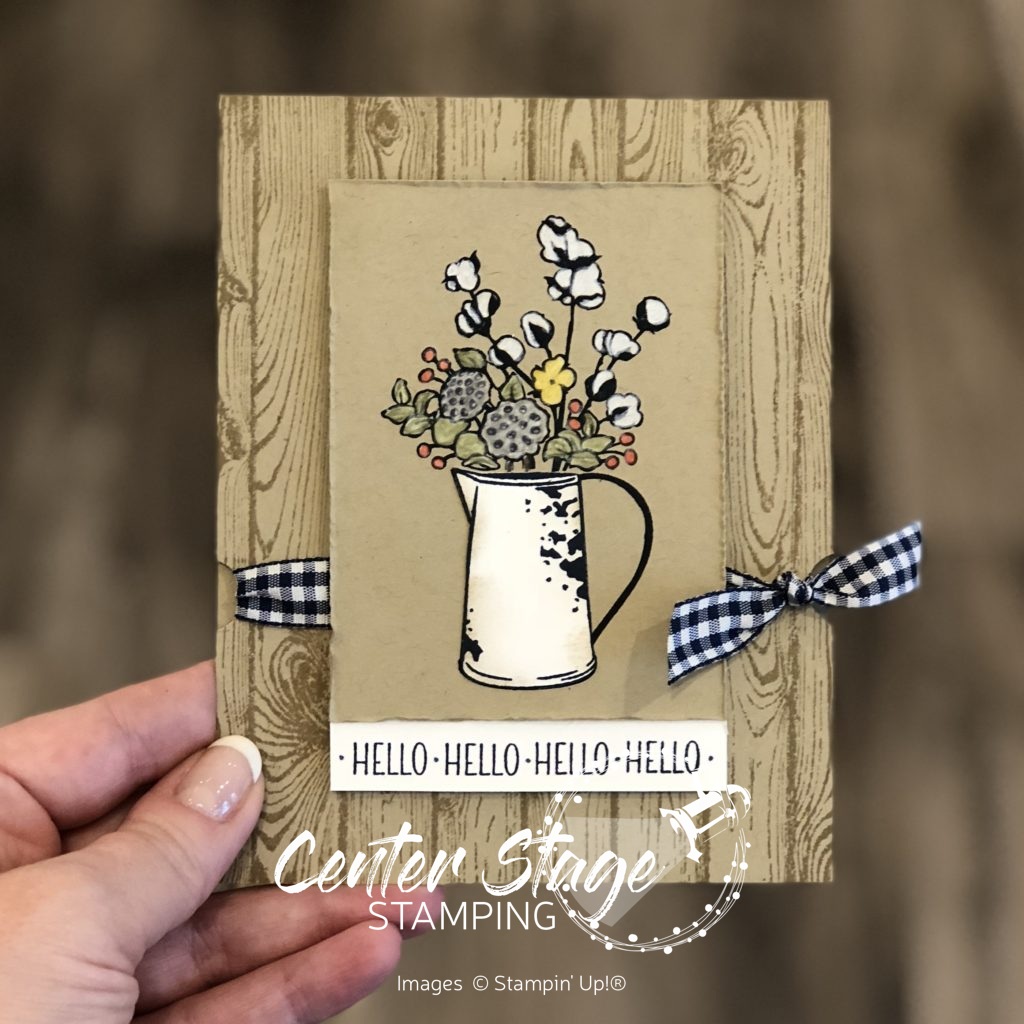
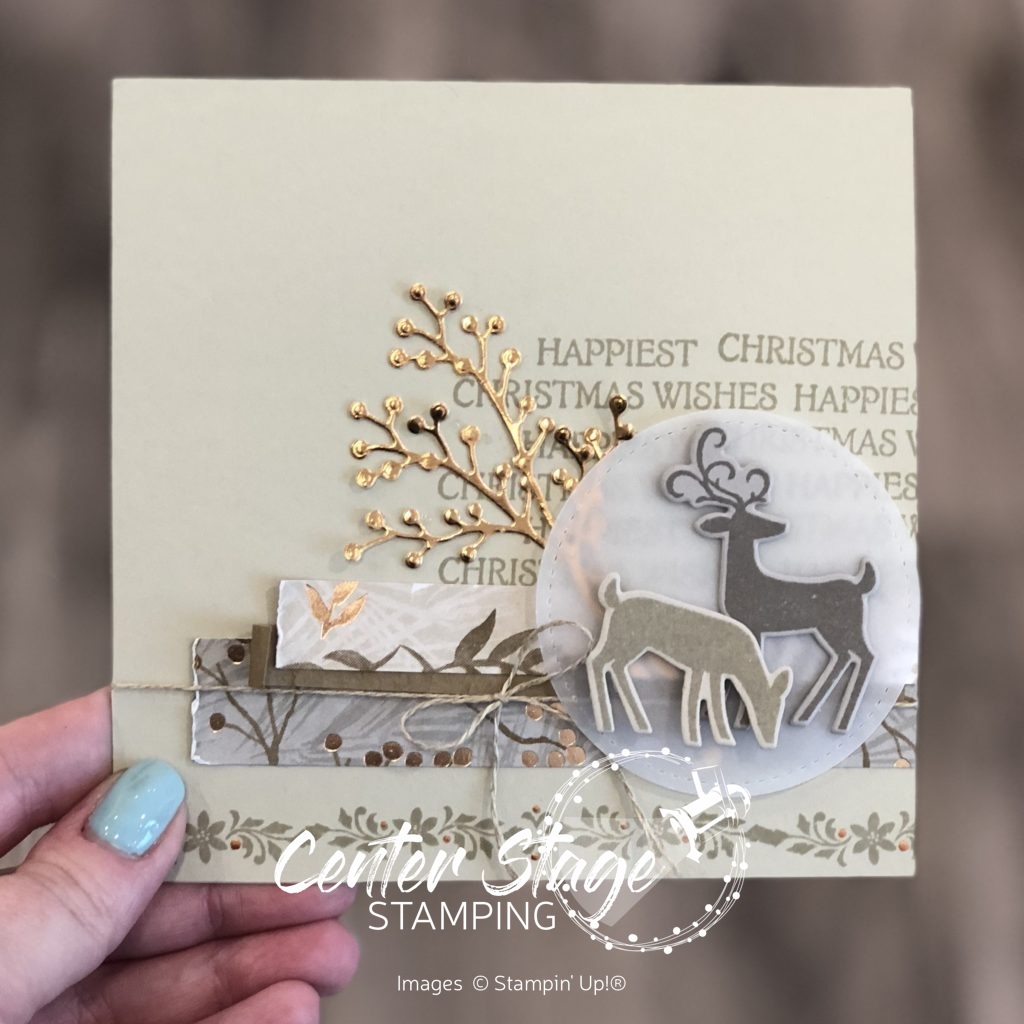
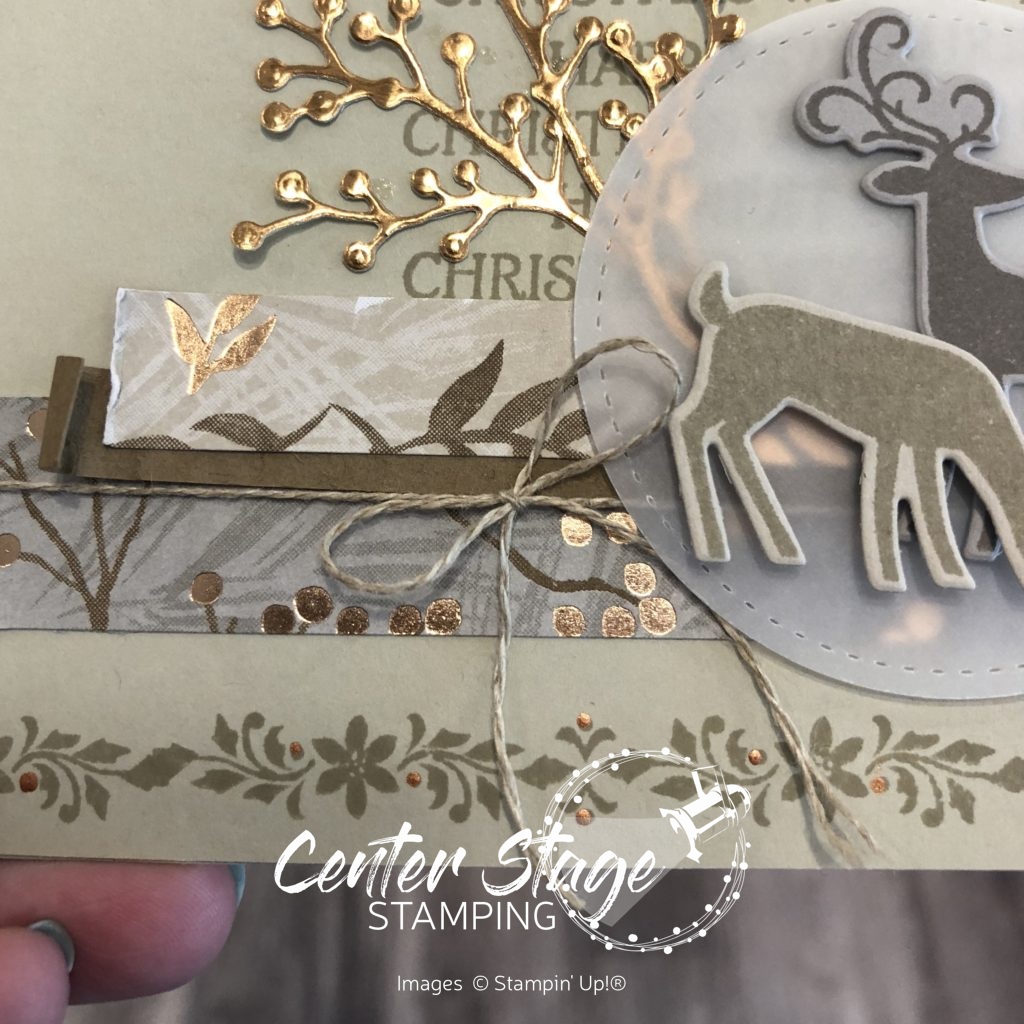
Today’s card takes a different approach to the popular Country home stamp set.  I wanted to do something without the milk can or pitcher.  This set is more versatile than you might think.

Country Home Hello - Center Stage Stamping

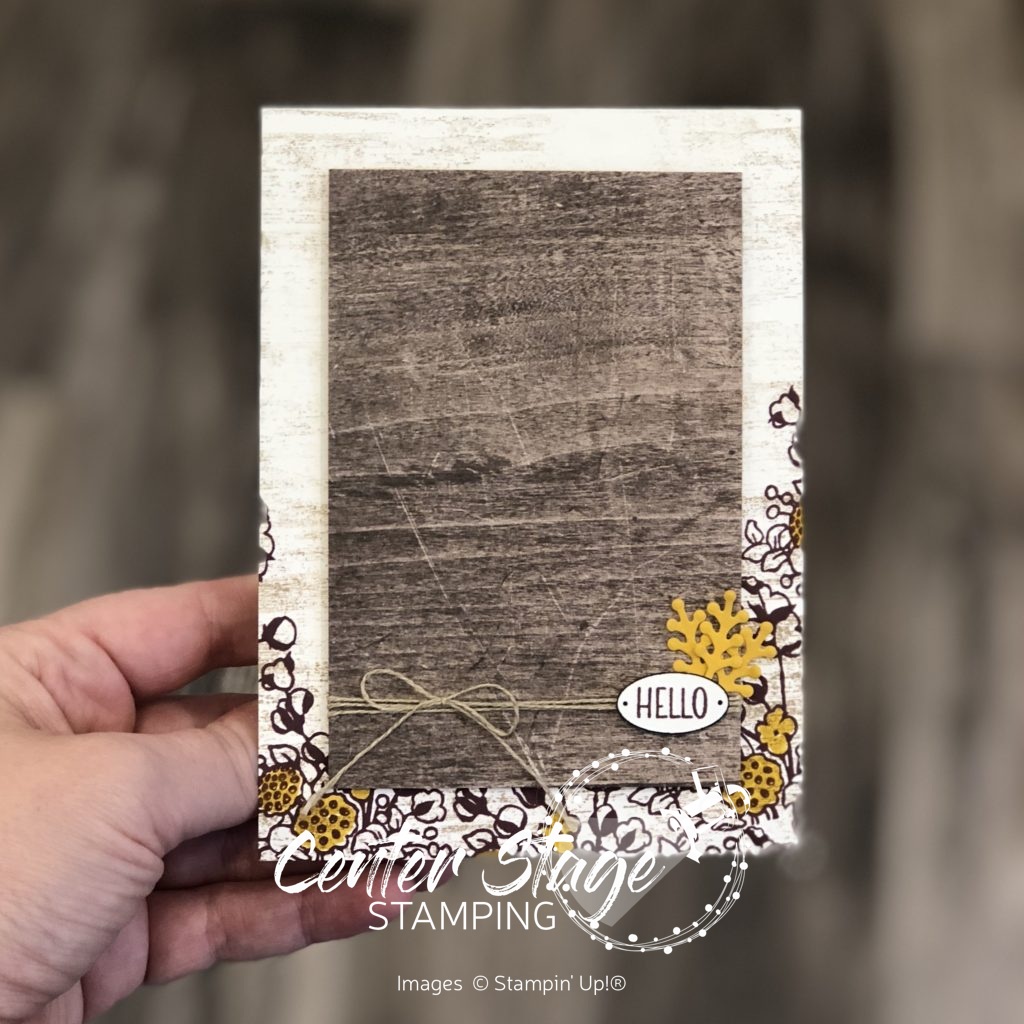
I stamped the cotton spray image in Fresh Fig along the bottom of the card base and colored select flowers with my Crushed Curry marker.  I used an image from Timeless Textures to add the distressed look on the base.  I wrapped some linen thread around a Wood Textures dsp layer and layered the fussy cut little oval with the sentiment.  The little Crushed Curry sprigs are from the Eclectic Layers Thinlits.  A quick and simple card with a funcountry fall feel.  Don’t be afraid to branch out from the obvious with a stamp set.  There is a lot more fun to be had!

That’s a wrap for today!  Join me again to put a spotlight on creativity!

Share with your friends:

Christmas Wreath

The weather here has been nutso this week.. We dropped into the 40’s, back into the 50’s, jumped up to the 80’s for a day, then plummeted back to the low 50’s.  Plus rain every other day.  Please, bring back the sun and some warmth!  I am not ready for winter.  At all.  I think I need to move farther south.

In spite of the weather, I have been busy creating some fun Christmas cards.  And I just got some new goodies that I can’t wait to play with this weekend! I’m excited to share those projects with you soon.  Today I have a card that puts the wonderful Wishing You Well set center stage.

Wishing You Well wreath - Center Stage Stamping

I love the combination of Crumb Cake, White and a touch of copper!  I embossed the wreath in white and added little “berries” with the Bright Copper Shimmer Paint.  I used the stylus end of the Take Your Pick Tool, dipped it in the Copper Shimmer Paint and dotted it on the wreath.  a great way to add some detail with the shimmer paint. A Copper Trim bow is a great finishing touch for the wreath.  The sentiment is embossed in copper on a little tag cut from the Stitched Labels Framelits.  This would be an easy card to mass produce.

While I am not ready for winter and the cold and gray skies that come with it, I do love Christmas and creating fun cards to send to friends and family.  But, hey! I can do that year round!! Hmmm – maybe I do just need to move where it is warmer….

That’s a wrap for today.  Please, join me again to put a spotlight on creativity!


Share with your friends:

stamp review crew: country home

Welcome to another Stamp Review Crew blog hop!  Today, we are shining a spotlight on the fabulous set Country Home from the 2018 Holiday Catalog.  Rustic farmhouse style is very hot right now and this set is totally on trend! It is full of fantastic images and great sentiments.  Make sure you check out all of the stops in this blog hop – you wouldn’t want to miss all the awesome inspiration!

This set isn’t really my usual style.  I’ll admit I stared at it for quite awhile before diving in to create.  But, I am quite happy with the outcome!  I decided to bring back color on Crumb Cake card stock.  This time, I colored in the floral arrangement with Stampin’ Up!’s Watercolor Pencils.  I like the soft look, but I really LOVE the white colored pencil on the Crumb Cake card stock!

Hello:Contry Home - Center Stage Stamping

I stamped the pitcher in Night of Navy on Whisper White and Crumb Cake card stock.  I cut out the Whisper White one, sponged it with a little bit of Crumb Cake ink to “dirty” it up a bit and adhered it over the pitcher on the Crumb Cake panel.  I distressed the edges of the image panel to add to the rustic farmhouse feel of the card.   I punched out  a partial 1/2″ circle on either side of the card front to let the ribbon rest in.  I think the Harwood background stamp (on the card base) is a perfect compliment for this set.

That’s a wrap for me.  I am sending you on to the talented Lauren Alarid, or you can go back to the creative Mike Funke.  Either way, you are in for some fantastic projects!  Thanks for stopping by.  Join me again to put a spotlight on creativity!


Share with your friends:

inky friends: 2018 holiday catalog showcase

Welcome to My Inky Friends 2018 Holiday catalog Showcase blog hop!  We are shining the spotlight on some of the great new stamp sets in the Stampin’ Up! Holiday Catalog.  If you are following the hop in order, you have come here from Cindy and her wonderful Winter Woods display.  Now, join me as I put the fantastic Wishing You Well set center stage.

I love a versatile set and this one really is great for any season.  So, let’s take a look at some of it’s many talents.

Wishing You Well, just a note - Center Stage Stamping

I love this wreath with the Wood Textures designer series paper!  Lemon lime twist and Berry Burst create a vibrant contrast to the wood.  A wonderful card just to let someone know you are thinking of them.  But, change out the greeting and this would work for a Christmas card as well.  See, versatile!


Since this is the HOLIDAY Catalog showcase, I naturally had to make a Christmas card.  I went with traditional green and red, but chose to work with bright and bold Lemon Lime Twist (I seriously can not get enough of this color!) and Poppy Parade.

Wishing You Well: Season's Greeting - Center Stage Stamping

I love how the bit of striped Poppy Parade paper peeking out from the main panel echoes the striped Poppy Parade ribbon!  The three little pearls were colored with my Poppy Parade Stampin’ Blends marker.  Voila – perfect coordination!  This would be an easy card to mass produce.  Simple, but with some fun little details to make it interesting.


That’s a wrap for me.  I will now send you over to Twila who is showcasing one of my favorite sets – Dashing Deer.  Thanks for stopping by!  Come back again and join me in putting a spotlight on creativity!

Share with your friends:

dashing deer

Let’s kick off the week with another Christmas card.  Now, I am totally NOT ready for winter: the snow, cold, short days, ice, cold, gray skies, cold, snow and did I mention the cold?  But, with the release of the NEW Stampin’ Up! Holiday Catalog – and so many great products waiting to be used – it is hard not to get a jump start on some great Holiday creating!  Today’s card is a wonderful Christmas greeting using the Dashing Deer stamp set, coordinating Detailed Deer thinlits and Joyous Noel designer series paper.

Dashing Deer - Center Stage Stamping

First off, I love the Joyous Noel designer series paper!  The touches of copper accents really dress it up.  I started with a strip of it on the left and added a thin strip of copper foil sheet on a Gray Granite card base.  I stamped the greeting on the right to create the background for the deer die cut.  I really love the pattern on this deer stamp.  I added a couple of the tiny flowers cut out of copper foil and layered with a pearl center, and a bow made from Braided Linen Trim.  I am loving these colors for Christmas cards.  Do you like to change up your Christmas color schemes or are you a traditional green and red person?

That’s a wrap for today. Join me again to put a spotlight on creativity!

Share with your friends:

holiday catalog is here

It’s here!  The Stampin’ Up! 2018 Holiday Catalog is here and loaded with fabulous products and creative inspiration.  Let’s kick it off with a project that features a couple of great new products. Buffalo Check background stamp and Merry Christmas to All bundle.

Buffalo Check Christmas - Center Stage Stamping

Isn’t this just perfect for a woodsy Christmas?! The Buffalo Check is stamped in black on Real Red card stock and backed with the log design from the Wood Textures designer series paper stack.  Kind of has a lumberjack feel, doesn’t it.  Change out the Sentiment and it would be great a great guy card  “Merry” is cut out in Tranquil Tide with one of the Merry Christmas Thinlit dies. I really love die cut words, and this thinlit set has FOUR!  “Christmas” from the Merry Christmas to All stamp set is stamped in black on a strip of Very Vanilla card stock.  A bit of Linen Thread and a few gold metallic pearls add just the right finishing touch.  I’m ready to curl up with some hot cocoa, flannel and fuzzy socks.  Just kidding, I’m am NOT ready for that just yet.  I’ll keep the sun shine, shorts and flip flops for a bit longer, thank you.  (Seriously, I am NOT ready for winter…)

That’s a wrap for today.  Come back and join me again to put a spotlight on creativity!

Share with your friends:

inky friends: dc9

Time for a design challenge from My Inky Friends! For this challenge, we are featuring a square sketch, inspired by page 16 of the Annual Catalog.

I decided to use some new items from the Stampin’ Up! Holiday catalog which goes live tomorrow!  It is chock full of fantastic goodies for all of your holiday projects!  For this challenge, I used the Dashing Deer Bundle – stamp set and coordinating thinlits – and the Joyous Noel Specialty Designer Series Paper. Oh. My. Goodness.  It is sooooooo pretty!  The copper foil accents are stunning.

Dashing Deer Happiest Christmas

Colors are Sahara Sand, Gray Granite and Copper.  A close up look at a few details:

Dashing Deer Happiext Christmas close up - Center Stage Stamping

The vellum circle is cut out with one of the Stitched Shaped Framelits.  The sprig is from the Frosted Bouquet Framelits (part of the Frosted Floral Suite) cut out of Copper Foil.  For the Soft Suede strip I crumpled it up then separated the layers so it has a look of suede (difficult to see in the photo). I used the Bright Copper Shimmer Paint and the stylus end from the Take your Pick too. to put the copper details on the image at the bottom of the card.

Finished project is a 5″x5″ card.  I love the neutral tones on this.  What a fantastic Christmas greeting to send.

Head over to My Inky Friends blog and check out the other projects based on this sketch.  I hope you will join us and play along.  Create your project based on this sketch then upload a link to it on My Inky Friends blog to share it with us.  We love to see your projects!

That’s a wrap for today.  Join me again to put a spotlight on creativity!

Share with your friends: