Stampin’ Up!

You’re Grand

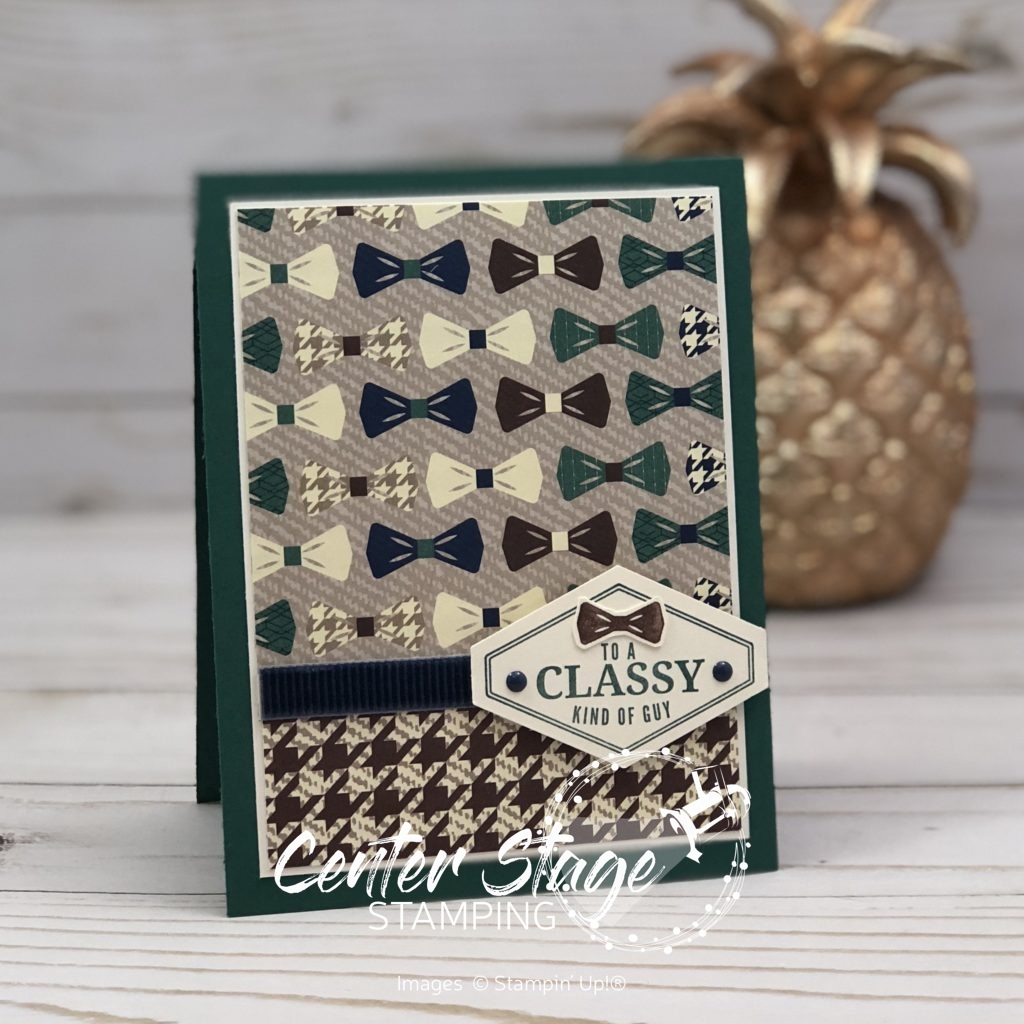
Sharing one last project with the Truly Tailored Suite today.  How about a little treat box filled with goodies to let someone know how “grand” they are.

Grand Day - Center Stage Stamping

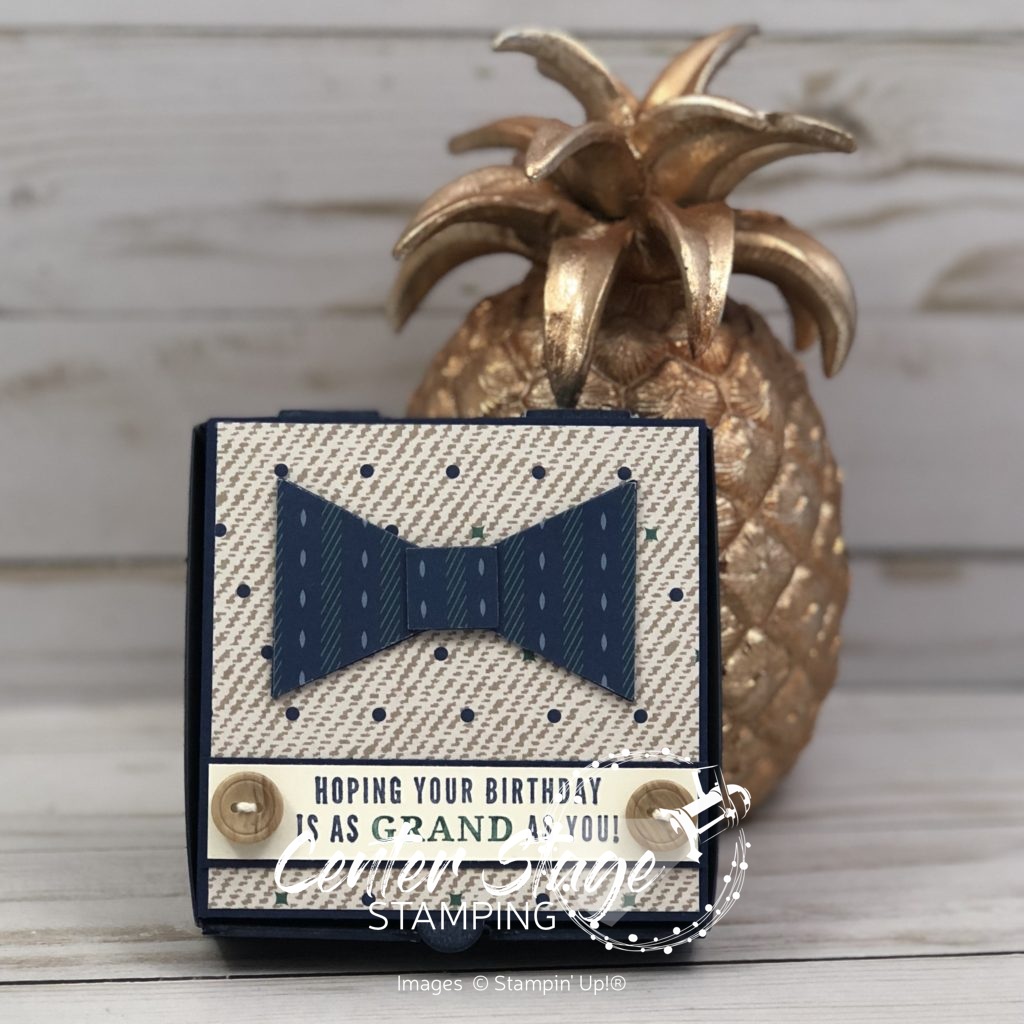
I started with on of the adorable little pizza boxes.  I sponged Night of Navy all over it and let it dry over night.  I layered the DSP and stamped image on top.  I created the bow tie by punching out a piece of DSP with the Tailored Tag punch and cutting it in half and adding the tiny center piece. A couple of True Gentleman buttons finish off the box.  And then I had to find the perfect treat to put inside –

Grand Day - Center Stage Stamping

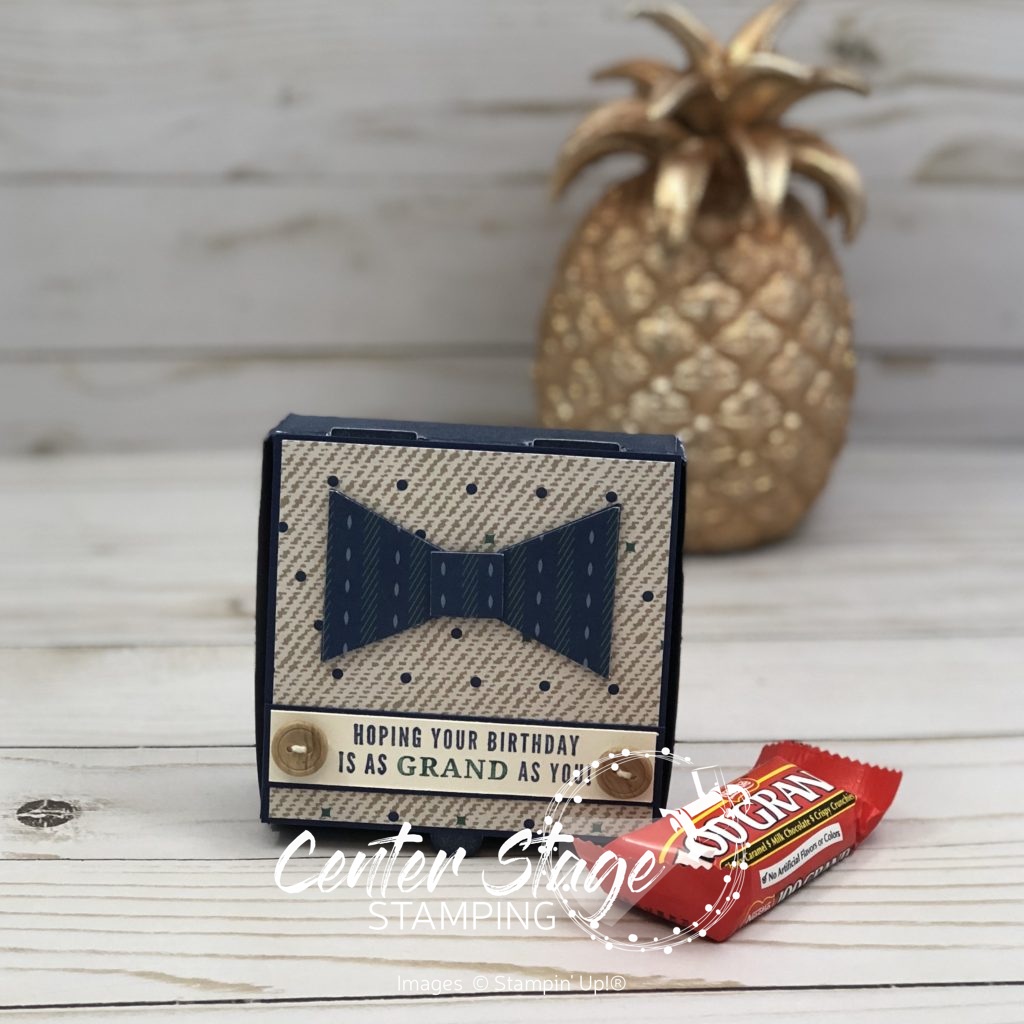
100 Grand bars, of course (three will fit nicely in this little box).

Make sure you stop by on Friday.  It’s time for another Inky Friends blog hop and we have some great projects lined up.  Thanks for stopping by! Happy Stamping!

-Mary

Share with your friends:

A Dapper Day

The title of today’s post definitely refers to the card I made, not the weather.  Freezing rain, high winds, snow coming – Yuck!  But that means more time in my studio. I have another card featuring the Truly Tailored suite.  What can I say, I was on a roll.

Dapper Day - Center Stage Stamping

I started with a Night of Navy card base and added a Navy panel I embossed with the Simple Stripes embossing folder.  I used Stampin’ Write Markers in Night of Navy, Tranquil Tide, Chocolate Chip and Crushed Curry on the sentiment stamp and cut it out with the Stitched Shapes framelits.  Finished off with a True Gentleman button and some Linen Thread.  Fun greeting for the dapper gent in your life.

Thanks for stopping by! Happy Stamping!

-Mary

Share with your friends:

Lookin’ Sharp

I was on a roll with the Truly Tailored Suite.  I finally have several masculine cards in my stash!  I saw a card similar to this one on Pinterest and knew this product suite would be great for my version.

How cool is that!?  The True Gentleman Designer Series Paper is perfect for the fabric of this shirt card.  I used the Tailored Tag punch to do the bottom of the pocket. I added one detail that you really don’t notice, but I think it makes a difference when you see the card in person.  I went over the edges of all the dsp with a Night of Navy marker to cover the white core of the paper.  I think it made it seem more like fabric.    There is a thin strip added under the buttons and at the top of the pocket to help the seams stand out.  The collar is adhered with a dimensional strip at the top (I also colored the Night of Navy to hide the white).

Thanks for stoping by! Happy stamping!

-Mary

Share with your friends:

Classy Kind of Guy

I often find it difficult to design cards for men.  I tend to like a lot of accessories and BLING!! Thankfully, the Truly Tailored Suite in the Stampin’ Up! Occasions catalog makes it so much easier to create something more masculine, like today’s card.

Truly Tailored - Center Stage Stamping

I started with two patterns from the True Gentleman designer series paper.  I just LOVE those little bow ties – so cute!  Next i stamped the image from the Truly Tailored stamp set and punched it out with the coordinating Tailored Tag punch. The image actually has a comb over, but I wanted to keep the tie theme.  So, I stamped the bow tie, fussy cut it out and adhered it over the comb.  I think a tie is a little more “classy” than a comb. The Night of Navy Corduroy Ribbon covers the seam of the two pattern papers and two Nigh of Navy enamel dots finish off the details. This card came together pretty quick, the coordinating products in the suite made it easy!

Thanks for stopping by! Happy Stamping!

-Mary

Share with your friends:

Inky Friends DC 3

Time for another design challenge over at the Inky Friends blog.  This week is a card sketch challenge based on a sample form page 10 of the Occasions catalog.

Here is my card based on this layout.

Petal Palette Thank you - Center Stage Stamping

I decided to work with products from the Petal Passion Suite.  I love the bold black and white prints in the Petal Passion designer series paper.  The polk-a-dot print made for a great base for this card.  I used the Petals and More Thinlits to die cut the flowers in Lemon Lime Twist and the scallops in copper metallic. The top panel has the sentiments stamped in Lemon Lime Twist and Basic Black.  I added a copper trim bow and finished off with some Basic Pearls the I colored with a copper sharpie marker.  Head over to My Inky Friends and check out the other Design Team members take on this sketch.  Then create your own and share it with us on the Inky Friends blog.  We would love to have you play along!!

Thanks for stopping by! Happy Stamping!

-Mary

Share with your friends:

Today Blooms

Just popping on with a quick post today.  I’m getting prepped to start blocking at today’s rehearsal for the High School play I’m directing.  The most tedious part of directing – figuring out who moves where, when and why.  At least today’s card wasn’t tedious to make, even though I made 20 of them for a recent swap. I really love the delicate feel of this one.

Perennial Birthday - Center Stage Stamping

I used the Perennial Birthday set.  Colors are Rose Red, Soft Sky, Peekaboo Peach, Pear Pizzazz and Crumb Cake.  The Soft Sky card base has been embossed with the Simple Stripes Textured Impressions embossing folder.  The sentiment is embossed in white on a strip of Wood Textures designer series paper.  This is hands down my favorite designer series pack.  I LOVE the various wood textures/ grains.  They are a great addition to many projects.  A few rhinestones and a small linen thread bow add the finishing details.

Thanks for stopping by! Happy Stamping!

-Mary

Share with your friends:

Sweet Pineapple

Fab Friday has a new sketch challenge up and I was inspired to play along.  I really like sketch challenges when I need to jump start my stamping mojo.  Here is the sketch:

And here is my take on it:

Sweet pineapples - Center Stage Stamping

I love this pineapple print from the Tutti-frutti designer series paper stack.  I used the pineapple from the Itty Bitty Fruit punch pack to punch out tiny pineapples from the patterned paper.  I stamped the bowl from the Fruit Basket stamp set on Pool Party card stock and fussy cut it out.  To add a little detail, I added some shadows with the light Pool Party Stampin’ Blends marker.  Here is a close up so you can see it better.

Pineapple bowl close up - Center Stage Stamping

I think it added some nice depth to the bowl.  And, aren’t those little pineapples adorable?  I LOVE that little punch.  The whole Tutti-frutti suite in the Occasions catalog is fun.  I can’t wait to play with it some more.  I have lots of ideas floating around in my head, just need time in my studio!

Thanks for stopping by!  Happy Stamping!

-Mary

Share with your friends:

Canvas Stamping

Sometimes I branch out from making cards and the rare scrapbook page. Every once in a while I get inspired to create a home decor piece.

Breathe Canvas - Center Stage Stamping

For this project, I started with a 4 inch square canvas.  I did a water color wash with Soft Sky ink across the canvas.  Next I stamped the branch and flowers from the Colorful Seasons stamp set.  It is difficult to get a full image on the canvas because of the edge of the wood under the canvas, but don’t worry.  Next I went over the stamping with my aqua painter to bleed out the image and get more of a water color look.  I stamped “breathe” in black memento ink and traced over it with a Black Journaling Pen to fill in the gaps on the canvas.  a few Rose Red die cut flowers with Crushed Curry baker’s twine knots.  A bit of Linen Thread wrapped around the canvas finishes it off.  All in all, this project came together really quick.  The most time was waiting for the initial water color wash to dry.

Thanks for stopping by! Happy Stamping!

-Mary

Share with your friends:

Valentine

Happy Valentine’s Day.  Thought I would pop on and share one more card I made with the Sure Do Love You set and Painted with Love DSP.

Valentine - Center Stage Stamping

This picture really doesn’t do it justice.  The dark spots are actually the gold foil on the DSP.  I just couldn’t get it to photograph well.  The vine heart is embossed in gold and fussy cut out.  I kept the rest pretty simple to let that gorgeous specialty paper take center stage.  I seriously want to just frame a few of the pieces.  They are works of art all on their own!

Thanks for stopping by! Happy Stamping!

-Mary

Share with your friends:

Little Love Notes

I normally don’t make a lot of Valentine cards.  One for my husband and maybe little notes for my kids. But, I am having so much fun with the Painted With Love Suite.  There are so many fun products to work with.   I made three little coordinating love notes with this suite.  They are made with the Narrow Note Cards and Envelopes in the Occasions Catalog (page 19 – they are easy to miss).   The Painted With Love Specialty DSP is SO GORGEOUS!! The gold foil accents are stunning.  The Sure Do Love You stamp set and Lots to Love Box Framelits combine to make some wonderful Valentines.  These little love notes would be perfect to tuck in with a Valentine treat.

Love Notes - Center Stage Stamping

Aren’t these so cute!  Each one features a different pattern from the DSP and different stamps from the set.  Let’s take a closer look at them.

Sure do Love you Note - Center Stage Stamping
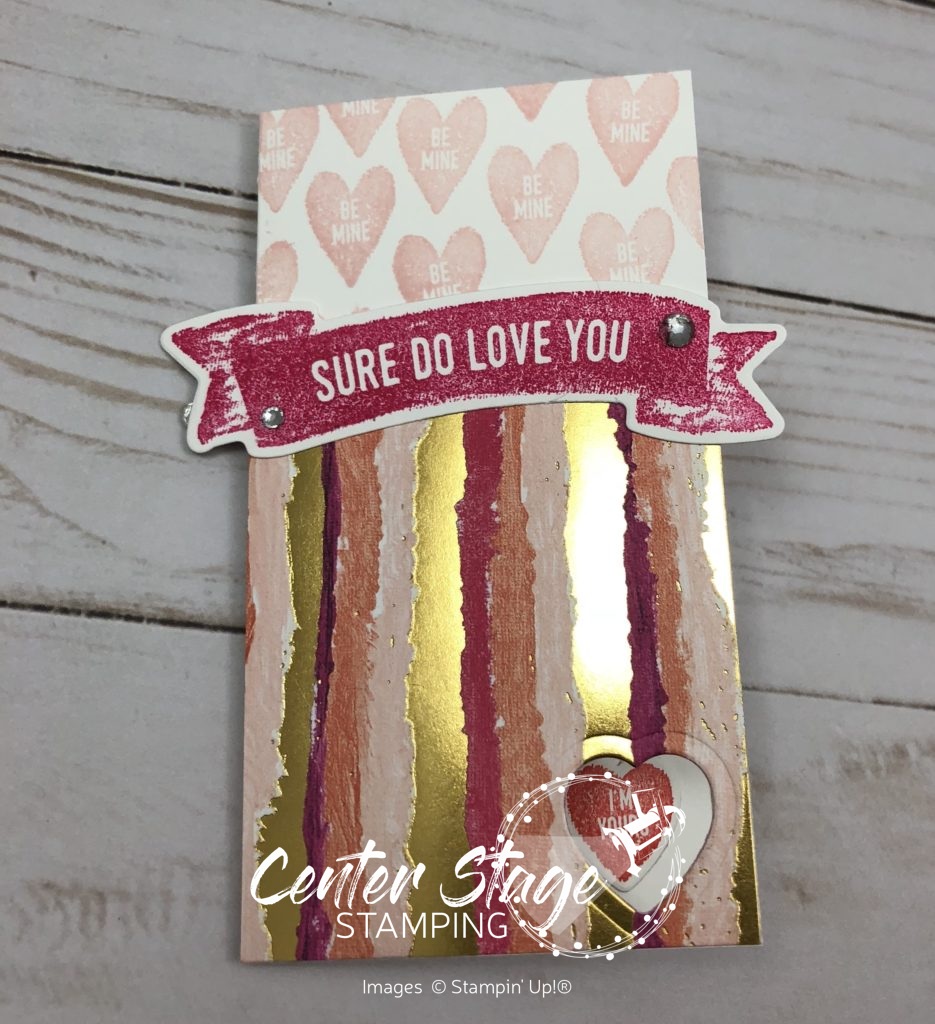
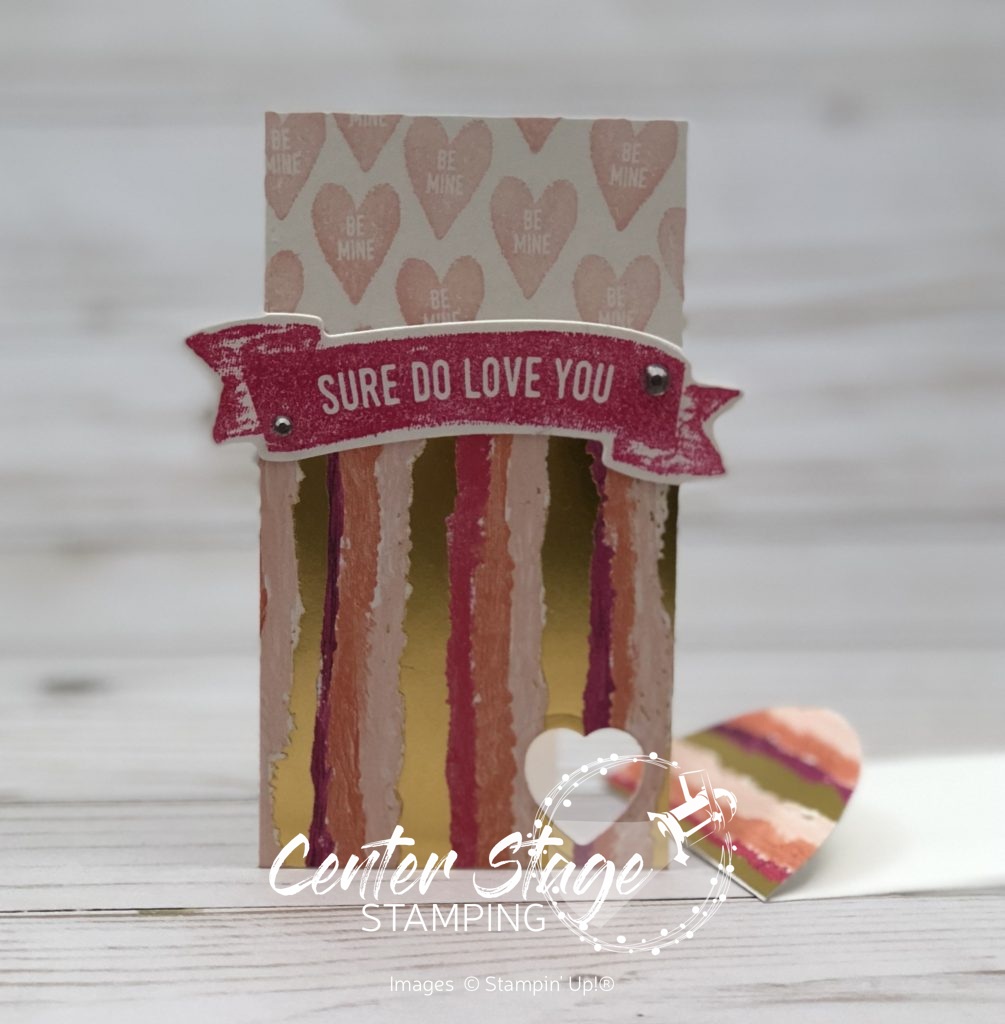
Here is another angle so you can see the little heart peeking through from the inside.

Be Mine - Center Stage Stamping

My Valentine - Center Stage Stamping

For You Valentine - Center Stage Stamping

I added some of the DSP to the flap of two of the envelopes and sponged ink and stamped a little heart on the other.  It really ties them together.  Another fun thing is that these notes would fit inside this little box I shared last week!

Valentine Trio - Center Stage Stamping

Thanks for stopping by! Happy Stamping!

-Mary


Share with your friends: