Stampin’ Up!

gifts of the season

It’s a good day. It has been ridiculously cold here. Yesterday it snowed. (UGH) . But today I get to escape it all and head to Las Vegas for Stampin’ Up!’s On Stage event! WooHoo. Sun, warmth, stamping friends and NEW goodies! Bring. It. On! Check back next week, I will be sharing some of the cards I made to swap over the weekend. And, maybe some sneak peeks of goodies from the upcoming Mini and Sale-a-Bration catalogs!

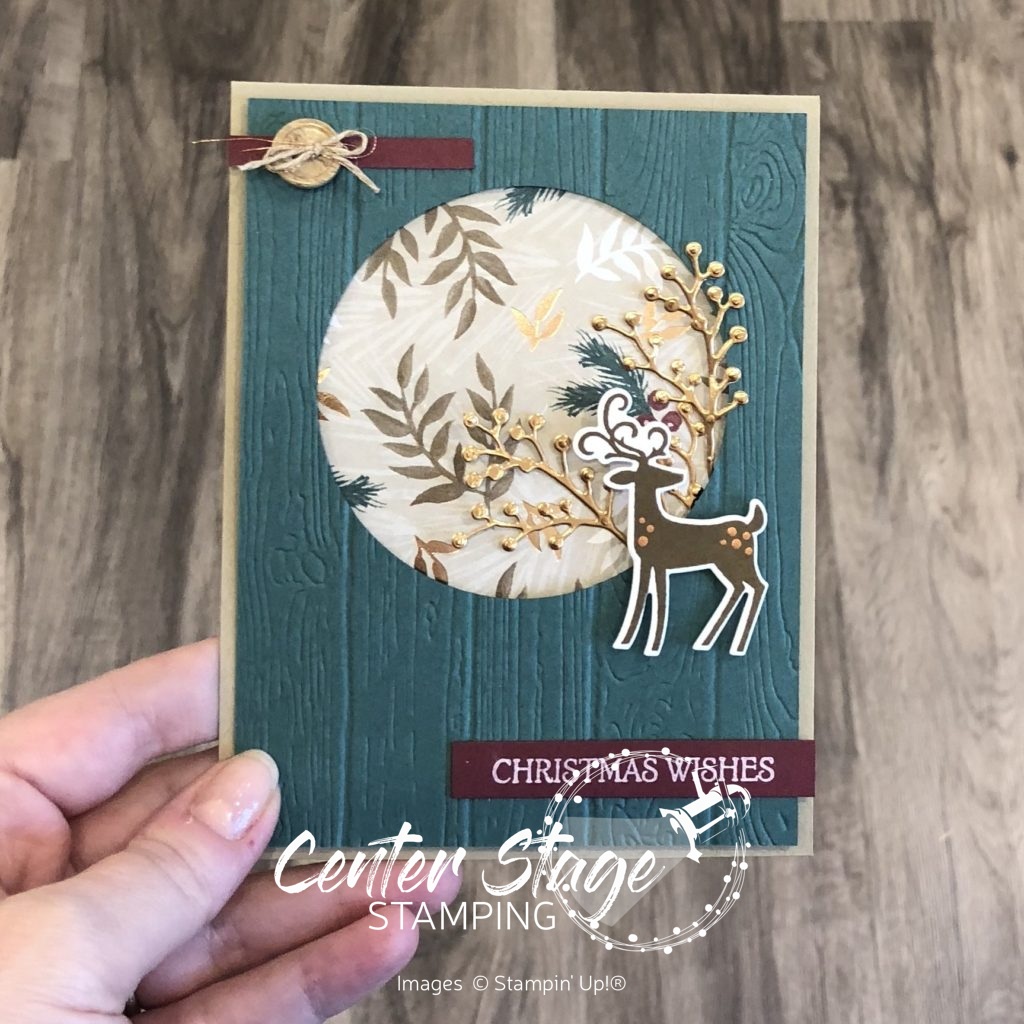
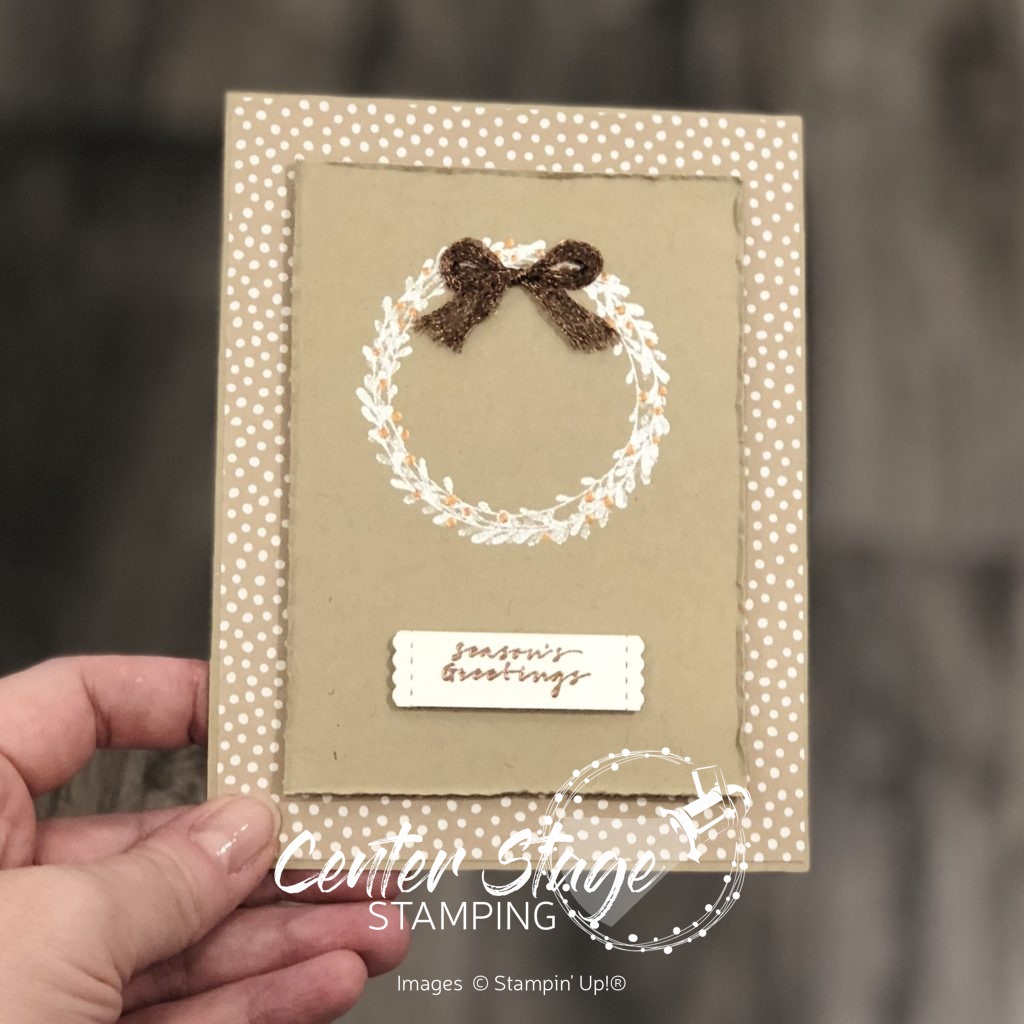
Right now, Stampin’ up! has a fun product suite ONLY available until the end of November – Christmas Time Is Here. I decided to branch out and use the stamp set and dies with a different color combo. (I’m just not ready to admit it’s winter yet.) This is a great color combo for fall, but also works for a non-traditional Christmas.

Colors are Terracotta Tile, Seaside Spray and Gray Granite. I LOVE these colors together. The sentiment is embossed in white on Early Espresso. And I adore the woodgrain print from the Gather Together DSP! I need more of that for sure!

Check out all the great products in the Christmastime Is Here Suite:

You can order items individually or get the entire suite. there is even a beautiful bracelet! Don’t delay – order yours today!

Thanks for stopping by! Join me again to shine a light on creativity!

Share with your friends:

everything is rosy

I love Rose Gold. In fact, it is the accent color in my white and gray studio. I even found rose gold drawer pulls! When Stampin’ Up! announced the Everything Rosy Medley and we saw that Rose Gold was a prominent feature, I knew I HAD to have it. And I was not disappointed. It is GORGEOUS! The rose gold foil highlights, mirror disc embellishments and shimmer paint are fan-tab-u-lous! I may need to order a second kit so I don’t run out. Oh, and did I mention, you can create Ah-Mazingly cute projects with it! Check it out –

The photo doesn’t do justice to the gorgeous rose gold foil on the designer series paper, die cuts or the spatter of rose gold shimmer paint. The Everything Rosy kit comes with sheets of printed and rose gold die cuts that help cards come together even faster.

I adhered the strip of DSP to the inside of the card and trimmed of 1.5″ from the card front for a unique look. The sentiment label and die cuts hang over the front edge. I LOVE everything about this kit. Grab yours today – but hurry it is only available until May 31!

Thanks for stopping by – Join me again to shine a spotlight on creativity!

Share with your friends:

inky friends: thankful for… blog hop

Today, I am joining My Inky Friends Thankful For… blog hop. You are in for a great variety of inspiration on today’s hop.  We are each featuring a Stampin’ Up! stamp set or product that we are thankful for.  If you are following in order, you have arrived here from Holly and her wonderful projects.  Weren’t they great.  If you are starting here make sure you check out all the stops and see what everyone is thankful for!

I am thankful for… Stampin’ Blends!  These markers are so amazing and really easy to use.  They make me feel like a real artist!  There is so much you can do with them!

First off, how about no-line coloring.  I’ve seen it done with watercolors and thought why not try it with my Stampin’ Blends!  I love the outcome!

Country Home: no line with blends - Center Stage Stamping

I stamped the milk can and flowers in Sahara Sand that was stamped off to make it lighter.  Then I colored it in.  I used the stamps as a guide if I could no longer see the inked outline.  I really like how the milk can turned out! It’s even better in person.

Next up, I went with basic coloring.  Postcard Palls is a great set for this.  Isn’t that little otter just adorable!  The Stampin’ Blends make it possible to get so much depth with the shading.

Postcard Palls: Otter - Center Stage Stamping

Finally, I made my own designer paper – the flowers and background are colored with Stampin’ Blends.  The possibilities are endless!Perennial Birthday: stampin' blends - Center Stage Stamping

If you haven’t tried Stampin’ Blends yet, you need to.  They make coloring so much fun!  I now send you over to Cindy and her fantastic creations!

Thanks for stopping by!  Join me again to put a spotlight on creativity!


Share with your friends:

watercolor sunset

Hey crafty friends!  I am basking in the sun in Orlando!  Today is check in day for Stampin’ Up! On Stage!!!  I am so excited to celebrate Stampin’ Up!’s 30th anniversary with many of my demonstrator friends from around the world!  Lots of fun, laughter, swapping, and possibly some shenanigans ahead.  Plus, we get to see the NEW Occasions catalog and Sale-a-Bration offerings!!!  Squeee!  I’m so excited!  I thought I would share one of the cards I made to swap with fellow demonstrators this week.

sunset daisy - Center Stage Stamping

I blended Pineapple Punch, Mango Melody and Grapefruit Grove for a fun sunset look.  The perfect backdrop for a sweet daisy flower. Stay tuned for an On Stage recap next week after I get home! I’m off to swap (and maybe a visit to Disney this evening!)

Thanks for stopping by! Join me again to shine a spotlight on creativity!

Share with your friends:

stamp review crew: farm house Christmas

The Stamp Review Crew is starting off November with a fun holiday set: Farmhouse Christmas!  This set is loaded with possibilities!  Make sure you go through all of the stops on the blog hop.  You don’t want to miss any of the amazing creations we have in store for you! As always, you can find the full blog hop list on the Stamp Review Crew page.

Growing up in northern Minnesota, this set brings back a lot of great holiday memories.  My three cards today draw from those memories.  For my first card, I wanted to feature the coordinating Festive Farmhouse DSP.

Farmhouse Christmas: festive farmhouse - Center Stage Stamping

Of course, this set and DSP pairs wonderfully with the Wood Textures DSP.  (Then again, what doesn’t!?)  The card base and stitched circle are Pear Pizazz.  I took a couple of leaves off of one of the Boxwood Wreath embellishments and three of the red rhinestones to create the holly.  I think it is the perfect little embellishment.


Farmhouse Christmas: tuck - Center Stage Stamping

For this next card, I wanted to feature the fantastic little truck.  And again I went with the Festive Farmhouse and Wood Textures DSP’s.  What can I say.  When it works, it works!  I colored the truck with Mint Macron and the tree with Shaded Spruce Stampin’ Blends.

Farmhouse Christmas: tree and fence - Center Stage Stamping

This last card is all about texture with embossing folders and framelits.  The Crumb Cake card base is embossed with the Pinewood Planks and the Pool Party panel is embossed with the Subtle embossing folder.  I cut a piece of Sparkle Glimmer Paper with the snow mound die in the coordinating Farmhouse Framelits and layered it behind the fence cut from Wood Textures DSP.  The tree is cut out and colored with Stampin’ Blends.  Don’t you just love those tiny little red bows?  There is a die in the Farmhouse Framelits that cuts out six off them at once! So much fun!

Did these projects stir up any nostalgic holiday memories for you?  Leave me a comment, I’d love to know!  Now for some more creative inspiration, I am sending you over to Holly and her fantastic creations! or you can always go back to Stesha and her amazing creativity.


Thanks for stopping by.  Join me again to put a spotlight on creativity!

Share with your friends:

snow is glistening

Stampin’ Up! has a fantastic new Suite of products: Snowflake Showcase – that is available for a LIMITED TIME.  You only have until the end of November to snatch this awesome group of products.  You won’t want to miss out!  There are two stamp sets.  One is perfect for Christmas and one is for year round fun.  Plus some awesome coordinating dies and fabulous embellishments: white flocked paper and snowflake trinkets!  I LOVE IT ALL!!

I love the snowflakes in the Snow is Glistening set.  I decided to recreate a card I previously made with this new set.

Snow is glistening: Joy - Center Stage Stamping

I started with a Pool Party card base that I embossed with the Pinewood Planks 3D Dynamic Textured Impressions Embossing Folder.  I stamped the snowflakes in Pool Party, Tranquil Tide and Crumb Cake on a pice the Wood Textures DSP which is layered on a Tranquil Tide panel.  The Joy sentiment is stamped in Whisper White on Tranquil Tide and wrapped with Linen Thread.  It is a quick and easy card with a wow look.

Thanks for stopping by! Join me again to shine a spotlight on creativity!


Share with your friends:

stamp review crew: dashing deer

Welcome to another Stamp Review Crew blog hop!  This time we are featuring the fantastic Dashing Deer stamp set!  I have been having a lot of fun creating with this set.  And to think, I almost didn’t get it.  What was I thinking?!  I am so glad I came to my senses and ordered it right away.  I LOVE it!  I have featured it on two previous blog post that you can find here and here.  For today’s spotlight, I decided to showcase two different looks for the set.  The first is a very deep, rich card pairing Dashing Deer with the Joyous Noel Designer Series Paper.

Dashing Deer: Christmas Wishes - Center Stage Stamping

I started with a Crumb Cake card base.  I embossed the Tranquil Tide panel with the Pinewood Planks Textured Impressions Embossing Folder and used my Layering Circles Framelits to cut out a circle in the panel.  I backed this with some of the Joyous Noel DSP.  I stamped the little deer in Soft Suede and cut him out with the coordinating Detailed Deer Thinlit.  I added a few dots of Copper Shimmer Paint for some extra detail. I cut out the twig spray from the Frosted Bouquet Thinlits in copper foil paper and adhered it poking out of the circle.  The sentiment is embossed in White on Merry Merlot card stock with a smaller strip at the top of the card with a True Gentleman button tied with Linen Thread.  My second card has a much lighter color scheme.

Dashing Deer duo - Center Stage Stamping

For this card I wanted a winter white woods look. The white panel is embossed with the Woodland embossing folder.  I stamped the large deer with Gray Granite ink on Sahara Sand card stock.  The smaller deer is stamped with Sahara Sand ink on Sahara Sand card stock.  I added some Frost White Shimmer Paint dots on the smaller deer.  The sentiment is stamped in Early Espresso ink on Sahara Sand card stock with Linen Thread wrapped on the ends.  I love these two deer together.

I am now going to send you over to the wonderfully creative Tanya.  Wait until you see what she can do with this great set!  Or you can go back to Lou and her beautiful projects.  Either way, make sure to go all the way through the blog hop – you won’t want to miss any of the inspiration for the gorgeous stamp set!  You can find the full blog hop order on the Stamp Review Crew page.

That’s a wrap for me.  Join me again to put a spotlight on creativity!

Share with your friends:

Christmas Wreath

The weather here has been nutso this week.. We dropped into the 40’s, back into the 50’s, jumped up to the 80’s for a day, then plummeted back to the low 50’s.  Plus rain every other day.  Please, bring back the sun and some warmth!  I am not ready for winter.  At all.  I think I need to move farther south.

In spite of the weather, I have been busy creating some fun Christmas cards.  And I just got some new goodies that I can’t wait to play with this weekend! I’m excited to share those projects with you soon.  Today I have a card that puts the wonderful Wishing You Well set center stage.

Wishing You Well wreath - Center Stage Stamping

I love the combination of Crumb Cake, White and a touch of copper!  I embossed the wreath in white and added little “berries” with the Bright Copper Shimmer Paint.  I used the stylus end of the Take Your Pick Tool, dipped it in the Copper Shimmer Paint and dotted it on the wreath.  a great way to add some detail with the shimmer paint. A Copper Trim bow is a great finishing touch for the wreath.  The sentiment is embossed in copper on a little tag cut from the Stitched Labels Framelits.  This would be an easy card to mass produce.

While I am not ready for winter and the cold and gray skies that come with it, I do love Christmas and creating fun cards to send to friends and family.  But, hey! I can do that year round!! Hmmm – maybe I do just need to move where it is warmer….

That’s a wrap for today.  Please, join me again to put a spotlight on creativity!


Share with your friends:

stamp review crew: buffalo check

Time for the Stamp Review Crew to put another great stamp set in the spotlight!  Today’s blog hop is featuring the amazing Buffalo Check background stamp.  Buffalo Plaid is very trendy and yet timeless.  It can be found all over fashion and home decor.  With this stamp, your card making can be on top of one of the hottest trends too!  It is great for any occasion and can be the star of the show, or a great supporting role.

Let’s start with featuring Buffalo Check in a supporting role.

Buffalo Check Wishing You Well - Center Stage Stamping

Stamped in Crumb Cake ink on Whisper White card stock, Buffalo Check makes a great base for this bouquet from the Wishing You Well set.  The layers and ribbon look black in the photo, but it is actually Night of Navy. The flowers and heart are Lovely Lipstick.  I love the little corrugated tag!

The next card puts Buffalo Check in the leading role.

Have a cup of Cheer - Center Stage Stamping

Stamped in black ink on Real Red card stock, you get the iconic buffalo plaid.  I used the tiny cup from the Coffee Cups framelits and layered it on a white Stitched Shapes circle.  I hand wrote the sentiment to get just what I wanted and to fit the space.  The ’tis the season repeated on the right is from Itty Bitty Greetings.  Final touches are a few pine sprigs from the Pretty Pines Thinlits and tree from the Festive Farmhouse Elements.  I used the backside of the tree and colored it with my Garden Green Stampin’ Write marker.

One last card.  I know I have shared it before, but it showcases this stamp so well.

Buffalo Check Christmas - Center Stage Stamping

I think this is one of my favorite Christmas cards I have made this year.  I love Buffalo Check paired with the log patten from the Wood Textures designer series paper stack.  (I don’t know why the tiny bit got blurred out in the photo.  must have blended with my backdrop too much.)

If you are #madforbuffaloplaid like me, this stamp is a must have.  Check out the rest of the stops on the blog hop for more amazing Buffalo Check inspiration!  You can go back to the wonderfully talented Nikki or move on to the uber creative Stesha.  Enjoy the rest of the hop and join me again to put a spotlight on creativity.


Share with your friends:

inky friends: suite designs blog hop

Welcome back!  I excited to be part of My Inky Friends Suite Designs Blog Hop!  This time we are putting a spotlight on various product suites in the 2018-19 Stampin’ Up! catalog.  I am thrilled to put the broadway Bound suite center stage! (I know, you are all so surprised that i would pick that suite.  What can I say?  Somethings are just meant to be!)  This dramatic suite can be found on page 69.

Let’s start with this fun project pairing.

Golden Broadway Birthday - Center Stage Stamping


Who wouldn’t love to get a birthday treat like this.  The gold foil in the Broadway Bound designer series paper brings out that Broadway sparkle!

Hooray cupcake - Center Stage Stamping

First off how awesome is this cupcake topper?  A bit of gold glimmer paper punched with the Starburst punch makes a great base for the fun greeting. A few gold Metallic Pearls are a great finishing touch.

Broadway Wish card - Center Stage Stamping


The gold shimmer cut from the Broadway Lights Framelits balloons make this a great coordinating card for the cupcake treat.

This next pair of projects Brings out the Bold colors of Lovely Lipstick and my favorite, Lemon Lime Twist,

Broadway Wish set - Center Stage Stamping

Here is a closer look at the gift box.

let's celebrate gift box - Center Stage Stamping

I started with one of the Lustrous White Mini Gable Boxes.  I wrapped the bottom with the cake pattern from the Broadway Bound dsp.  I glued some Lovely Lipstick 1/8″ Grosgrain Ribbon around the top.  The greeting on the box is layered as follows: 1-3/8″ scallop circle in Basic Black, 1-1/4″ circle in Lovely Lipstick, the hat die cut from the Broadway Lights Framelits (I added the black dots with a Basic Black Stampin’ Write Marker).  I stamped the sentiment on Lemon Lime Twist card stock and cut it apart and adhered to the circle.  This element is added to the box with dimensionals.

Broadway Birthday Wish card- Center Stage Stamping

I let the Broadway Bound dsp take center stage for this card.  The little candle embellishment on the “I” is one of the silver Candle Embellishments.  But wait, it’s pink, not silver.  Ah ha!  I colored it with the dark Lovely Lipstick Stampin’ Blend!  How cool is that?

Broadway Birthday treats - Center Stage Stamping

Broadway Bound is a fantastic suite of products that give your birthday projects great dramatic flair!   I’m sending you over to Twila and her wonderful projects featuring the Under the Mistletoe Suite.  Or, if you are traveling backwards through the hop, you can go back to Rhonda and her delightful projects with the Delightfully Detailed Suite.

That’s a wrap for now. Happy Stamping!

Share with your friends: